Monday, 28 December 2009

A Little Light Relief

As usual, I hoped to get plenty of stitching time over the Christmas break and, as usual, things conspired to keep me away from the frame. Never mind.

Tomorrow we are off to Amsterdam to spend New Year with my Sister-in-law and her partner. It has become an annual event that J and I look forward to. I anticipate good food, good wine and extremely pleasant company. We usually do more walking than during the rest of the year, exploring the city and taking in the museums. My only care for the next few days is that A and S will remember to feed the cat and not throw any wild parties while we are away.

I usually fit in some stitching while we are there but like to take something that I can do while chatting or pick up and put down easily. A while ago I purchased a kit from Beadalot that I have been keen to start but have saved it as I thought it would be an ideal project for A'dam. Yesterday I prepared the base.


Apart from the fabulous fabric, it doesn't look like much yet, but when it is beaded it is going to be amazing. I know this because I have seen the finished article, in fact I have seen three of them and each was uniquely beautiful.

As well as the delightful fabric the kit constists of some very yummy beads. I did intend to leave the beading for when we were in A'dam, but could not resist making a start.


I may not be able to post again before we return, so until then Happy New Year and Happy Stitching.

Sunday, 27 December 2009

The Beginning of the Ends

I've turned the frame! That feels like the half way mark but in fact I have done considerably more that half. I've stitched each of the cords beyond the center of the fabric, which means that I have done at least two thirds of each and all of the prep is completed, so Himotaba is a least two thirds complete. I estimate that I have 20-30 hours stitching remaining.

Usually I am eager to turn the frame but this time I was hesitant. I had got used to stitching the cords top right to bottom left. I thought that when I turned the frame I would have to stitch on the opposite angle but in fact turning the frame 180 degrees does not alter the stitching angle at all.

I have been looking forward to finishing the cords. I don't mean completing Himotaba but rather finishing each individual cord. I like how they fade away.

© JEC/Carol-Anne Conway

Friday, 25 December 2009

Merry Christmas


Earlier this month I passed my third anniversary of blogging. In those three years I have made so many new friends around the world from many different countries and cultures.

'Christmas' has become such a big festival that I am sure most of the world is aware of it, even if it has no significance in their culture.

For me, Christmas is a celebration of Joy and Goodwill and I have found both in abundance within the stitching community. The Joy is in my own stitching and all the lovely stitchy creations I have seen on the blogs and forums I read. The goodwill is in the comments I have received or read on other blogs, the tutorials, the tips, advice, gifts and swaps exchanged or freely given. It is hard to imagine a more generous, friendly or appreciative community than this.

Whatever you believe in, whether or not you celebrate Christmas, whenever your New Year begins, I wish you Peace and Joy today, and for the coming year. Above all, I thank you for the friendship and goodwill you have given to me.

Merry Christmas and a Happy New Year to All.

Sunday, 13 December 2009

Making Progress

Although I have blogged my progress in the space of about 2 weeks, I have been working on Himotaba throughout the year. I prepped during February so that all of my class time could be spent learning how to stitch the cords. And I got on well during class. I picked up the techniques better than I expected to and made good progress. This is how Himotaba looked at the end of the week.

© JEC/Carol-Anne Conway

Following my week in Bournemouth I put Himotaba away so I could focus on finishing Venerable Friends. I didn't look at Himotaba again until my next class in October. By then all my initial doubts and insecurities had risen back to the surface but it didn't take much stitching time for me to resettle and rediscover the joy of stitching cords.

I did struggle with cord #4 for a while but overall I progressed well again. I don't have a picture of where I was at at the end of this course but I know that I these cords were stitched during the couse.

© JEC/Carol-Anne Conway

Since than I have been making steady progress, an hour here and an hour there.

© JEC/Carol-Anne Conway

And I am a little surprised to see how far Himotaba has come.

Happy Stitching.

Thursday, 10 December 2009

Cord #8

I like to save the best to last.

That's not always possible in Japanese embroidery because there are certain 'rules' that should be followed. One 'rule' is that you stitch from left to right. Happily for me the 'best' cord is on the right.

Cord #8 is a double central braided cord. I think this is the most impressive looking cord and it is very satisfying to stitch. It needs a little more preparation than the other braided cords. A #4 imitation gold is couched just inside each edge of the cord and padding cotton is couched down the centre.

© JEC/Carol-Anne Conway

The design is formed by sets of left diagonals stitches alternating with sets of right diagonal stitches. Each set, consisting of 4 stitches, overlaps the preceding set resulting in a double row of diamonds. Because of the padding this cord is three-dimensional. I have stitched this cord in 4-1 twist of 905 gold silk. Although I was initially disappointed with the colours selected for me, this was one colour I was really pleased with. Further, the gold silk fades into metallic gold resulting in, I think, a really lovely cord.

I began the fading by introducing a strand of gold into the twisted silk and randomly substituting the all silk stitches with this thread. I then introduced stitches in gold metallic thread in the same way. Initially, I stitched with a single strand of #1 real gold half hitched on the needle (therefore stitching with the thread doubled).

© JEC/Carol-Anne Conway

I thought that the gold looked too skimpy. After consulting my tutor, I tried again with 2 strands of #1 gold doubled in the needle but not half hitched. I couldn't 'see' this working. I thought that the 4 stands of gold would bunch and look messy but Margaret, my tutor, is very experience and a beautiful stitcher. Having sought her advice, I was not about to reject it out of hand. I gave it a go.

© JEC/Carol-Anne Conway

Teacher knows best. This is heaps better.

Real gold is more delicate than imitation gold and doubling the thread in the needle causes more wear than half hitching. The gold shreds easily so extra TLC is called for stitching with real gold this way but I think the result is worth it.

Happy Stitching.

Tuesday, 8 December 2009

Cord #6

Cord #6 is another "imitation wicker" cord worked in the same green as cord #1 but this time in flat silk. I worked the foundation stitches at a slightly steeper angle this time.

The second step of this technique is to superimpose alternating left diagonal and right diagonal stitches on top of the foundation with #1 gold. Each stitch covers the end of the preceding stitch giving a chevron effect.

I worked this technique before on Suehiro but that was nearly 3 years ago. I had to read the text book to remind myself how it should be done and it took me a while to figure out the correct length and angle of the stitches. The first couple of stitches went well but then the spacing went awry.

© JEC/Carol-Anne Conway

After a couple more attempts the spacing is better.

© JEC/Carol-Anne Conway

The little I have done so far looks right but I don't feel I have 'got' this technique yet. I am having to think hard about each stitch.

Happy Stitching.

Monday, 7 December 2009

Cord #7

I nearly forgot to mention cord #7. In some ways this is the most dramatic and attention grabbing of all the cords but it terms of stitching in is very quiet. Like the imitation wicker cord, it is stitched in two stages. The first stage is to couch rows of #4 gold to and fro. I did this at the same time as prepping the other cords. The gold threads are held with red couching thread in a brick effect.

© JEC/Carol-Anne Conway

The rein effect is superimposed over the gold in 4-1 twist of 108 worked in groups of seven stitches with an equal amount of space between. Like many techniques in Japanese embroidery it sounds simpler than it is. The mechanics of the stitch are simple but judging the angles and spacing around the curves make it far more difficult.

© JEC/Carol-Anne Conway


Happy Stitching.

Sunday, 6 December 2009

Cord #4

Cord #4 emerges from behind cord #5, so cannot be begun until some of cord #5 has been worked.

© JEC/Carol-Anne Conway

This cord is stitched in a wicker braid using 2 strands of flat silk. I had thought that this would be one of the easier techniques but so far I have struggled with this more than any of the other cords.

Part of the cord is stitched around the tightest curve on the design and that caused me such difficulty. My first attempt was far from right. I had to reverse stitch almost the entire length.

© JEC/Carol-Anne Conway

My second attempt was better, not perfect but I decided to leave it. I could see the needle holes from the first attempt and did not want to risk damaging the fabric.

© JEC/Carol-Anne Conway

After this tight bend the cord passes under cord #1 the runs straighter for a short section before curving, more gently, the opposite way. I had expected to settle into the technique along this section but it really wasn't going well. After going two stitches forward and one stitch back for some time, I decided to reverse stitch the entire section. Before starting again, I reread the box chart and the instructions in both the Japanese Embroidery books that I have. I also borrowed a book from a friend and read what that had to say about wicker stitch. I concluded that the angle of my stitches had been too shallow and when I started again, stitching at a steeper angle, the technique finally started to fall into place.

© JEC/Carol-Anne Conway

In addition to my struggles with the technique, there was the colour. This was my least favourite colour in the palette but again I have to admit that it works well with the gold fabric and with the other colours.

When you are stitching, you view the work from nearly directly on top and close up.
When I was photographing my progress, I noticed for the first time the two tone effect that occurs when the light hits this cord at a angle.

I wasn't very keen when I began stitching Himotaba, but gradually it has worked its magic on me and at last I am enjoying the intricacies and subtle details.

Happy Stitching.

Thursday, 3 December 2009

Cord #5

I said that there was no particular reason why I had chosen to do cord #1 when I did. It occurs to me now that there was a reason behind that decision. One of the 'rules' of Japanese embroidery is to start stitching on the left and work towards the right. We stitch with your left hand below the fabric and your right hand on top (another rule in Japanese Embroidery), this ensures that your hands are not resting on your completed work.

With cords 1, 2 and 3 stitched as far I a could without turning the frame, the next cord that I could start was cord #5. This cord is another single central braid this time worked in two strands of flat silk, red 108, the same as was cord #1.

© JEC/Carol-Anne Conway

This cord passes under other cords. In stead of an abrupt stop the stitching appears to fade out. The 'fade' is achieved by reducing the thickness of the thread while maintaining the spacing of the stitches. The effect is enhanced by skipping stitches or parts of stitches.

© JEC/Carol-Anne Conway

This is another technique that I really enjoyed and think it looks really effective.

Happy Stitching.

Wednesday, 2 December 2009

Cord #3

With cord #1 complete, I could resume stitching cords #2 and #3. Cord #2, "imitation wicker" is done in two steps. Step 1 consists of a diagonal foundation. The only real complication with this step is adjusting the angles around the curves. However, the basic angle for the stitches should be quite steep to support the over stitching that will be added in step 2. I am not confident that mine are steep enough. I will soon know when I move on to step two.

I find "single central braided" used on cord #3 one of the most difficult to stitch. Essentially, it is four diagonal stitches the full width of the cord, then four short stitches worked across them at the opposite angle. One end of the short stitches 'tucks' under the previous set of stitches; the other end will be covered by the following set. The trick is to get the angles correct and to space your stitches consistently so that regular diamonds are formed in the centre of the cord. Difficult enough on a stretch of fairly straight cord, perplexing when working around a curve.

Cord #3 also has an optional colour change. The transition from the first colour to the second should be gradual. It is achieve by twisting several threads with varying quantities of each colour, eg, thread 1 - 4 parts colour A; thread 2 - 3 parts colour A + 1 part colour B; thread 3 - 2 parts colour A + 2 parts colour B; etc. Thread 2 needles; one with thread 1 and another with thread 2. Continue stitching as before but randomly switching between threads, initially using mostly thread 1 but gradually increasing the use of thread 2. Then substitute thread 1 with thread 3 and continue in the same vain until you are stitching entirely with colour B. Got that?

© JEC/Carol-Anne Conway

It is because of techniques like this that I love learning and doing Japanese Embroidery.

Happy Stitching.
Tuesday, 1 December 2009

Cord #1

Although the box chart suggests cord #8 is worked next, any of the remaining cords except for #3 could be started at this point. For no particular reason I started cord #1.

Double central, braided looks like the most complicated of the cords. In fact, once the pattern is established, I found it one of the simplest to work, although getting starting was a little complicated.

I didn't dislike all the colours in my palette. I am very happy with the red, 108, which is a deep, rich crimson that looks stunning with the gold. This cord is stitched in 108 using two strands of flat silk.

Except for where it passes under the start of cords #2 and #3, which are already stitched, this cord lies on top of the others so I was able to stitch the entire cord as far as the tassel.

© JEC/Carol-Anne Conway

As Sue commented on the previous post, the joy of cords is watching the braid appear from your stitches.

Happy stitching.

Sunday, 29 November 2009

Cord #2

In an earlier post I wrote about the importance of stitching the cords in the correct order. The box chart says to start cord #2 and then begin cord #3. These are done in "imitation wicker" and "single central braided" respectively, the two cords that I learnt on Suehiro. Given how apprehensive I was feeling about this Phase, it was a relief to begin with something familiar.

Cord #2 is done in a 4-1 twist of 417, leaf green. My two favourite colours are green and purple. I love nearly every shade of green except acidy, limey greens and the more olive shades. 417 is an olive green and taken in isolation I found it very unappealing. However, when I began to stitch I saw how beautifully it complimented the gold fabric.

© JEC/Carol-Anne Conway

Cord #3 is also done in a 4-1 twist, this time in 648, a colour that the Japanese Embroidery Centre call burgundy but one I would describe as plum (although, interestingly, when I look at it in artificial light it appears more burgundy). Again, I love nearly all shades of purple but did not find this particular shade very appealling.

© JEC/Carol-Anne Conway

Although, you begin with these two cords, and have to stitch beyond where they pass over cord #1, you have to stop stitching them before they pass back under it.

Happy Stitching

Saturday, 28 November 2009

Learning in Phases

Like many things in Japan, Nuido is taught in Phases.

In Phase I the new student learns the most fundamental stitches, those that form the foundation for all other techniques. In Phases II and III, you build on these stitches, learning some padding techniques and special effects. Phases IV-VIII are a little different because they concentrate on specific techniques. In Phase IV, you learn the basic gold work techniques. Phase V concentrates on cords and has a bit of a reputation for being difficult.

I am stitching a design called Himotaba, which is traditionally stitched in Noh Drama colours; red, green, blue, purple and gold. As I know nothing about Noh drama I asked my tutor to choose an appropriate colour palette for me. The colours she selected were really strong and quite unlike anything I would have choosen for myself.

At the start of this Phase I was feeling intimidated by the fabric and the design, and the colour palette left me cold. This was a totally new experience for me; normally I am filled with excitement at the prospect of starting a new Phase.

Thursday, 26 November 2009

Another Petal

With the things that I learnt from redoing the first petal, I found it much easier to do the second one.

The padding ends a little abruptly on the right handside but I can live with it.

© JEC/Carol-Anne Conway

Happy Stitching.

Monday, 23 November 2009

Reverse Stitching

Thank you for your lovely comments about the first petal. As Sue said, in Japanese Embroidery, removing stitches or beads is called reverse stitching. In Phases I-X we learn 46 techniques (47 if you count reverse stitching), which ever technique you are taught first, reverse stitch is always the second technique you learn (and the one you practice most).

I think it is true that we are our own worst critics. I also think that we know when we have done that we can and when we could do better. I truly thought that I had not done this petal to the best of my ability.

There were four things that I felt could be improved.

The gold beads that mark the central vein on each petal were worked first. When I worked the other beads around them, their postition looked completely at odds with the rest of the petal. I reverse stitched those.

As I said in my previous post, the angle of some of the stitches and the blending of the colours was not pleasing to me. I reverse stitched those.

Although I was quite pleased with the outer row of beads, they did not sit over the padding as comfortably as they could, I thought this might be because the padding beads were a little too close to the edge of the petal. To reposition the padding, I had to reverse stitch the outer row of beads.

In other words, I reverse stitched everything except for the lovely swarovski beads in the center. There was a surprising amount of stitching holding all of these beads in place and it was quite a complex operation to remove it all ovwithout damaging the fabric. It took me er an hour to do.

First, I redid the the padding beads. I think I may have moved them in a little too far, but the outer edge of the petal now rises in a gentler curve than previously. When reworking the remaining beads I paid much more attention to the direction of the stitchs and colour blending. I also used blue thread to stitch the dark and mid blue beads. I wanted to enrich the colour of these beads to give greater contrast with the paler beads, which I stitched with white thread.

© JEC/Carol-Anne Conway

I think that the differences between this petal and the original one are subtle but I am much happier with it. I think it was worth spending time redoing it.

© JEC/Carol-Anne Conway

Happy Stitching.

Sunday, 15 November 2009

Poppy Pouch

The poppies on Phase III serve as an introduction to padded beadwork.

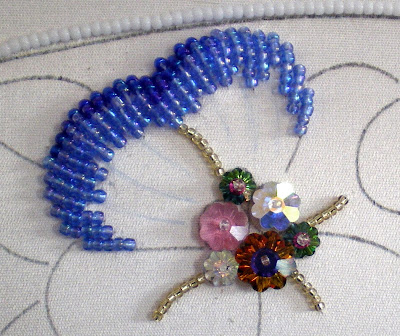
The flowers centres are completed first. The technique here is quite simple. One bead is held in place with another bead but these swarovski crystal beads are so stunning, a simple treatment is all that is needed.

© JEC/Carol-Anne Conway

© JEC/Carol-Anne Conway

A single row of beads forms the padding. For the petals the beads are placed about a beads width from the outer edge.

© JEC/Carol-Anne Conway

The beads are worked in long and short stitch, with the first row covering the row of padding.

© JEC/Carol-Anne Conway

The remainder of the petal is filled with short rows of beads. Four different colours are used with the deepest shade of blue on the outside, followed by mid blue and pale blue, then clear beads nearest the centre.

© JEC/Carol-Anne Conway

I have always found long and short stitch difficult, especially worked in an irregular shape. I found it even more difficult to do with beads. I am really not happy with the angles of some of the stitches. Nor am I happy with the colour transitions.

These beads are coming out!

Happy Stitching.

Tuesday, 3 November 2009

Japanese Bead Embroidery, Phase III

A few weeks ago at a Japanese Beading class I began Phase III, Poppy Pouch. The design comes in two colour ways, white with blue poppies or black with red poppies. I am making the white version because I like that one best and also to have a change from the black beads of Calm Flow.

Much of the bag is covered with rows of couched beads. With all the hours I spent couching beads on Calm Flow I thought that I had learnt this. On Calm Flow the rows of beads drift together or apart in gentle waves and any remaining spaces are filled with random beading. Once the guidelines are stitched over there is no way of telling if the lines are positioned 'correctly' or not, as long as the curves are smooth and the rows touching. On Poppy Pouch all the couched beads are in parallel lines.

© JEC/Carol-Anne Conway

I thought that this would be straightforward but I soon realised that couching perfectly straight rows is more difficult than it appears. Any wiggle shows up like a sore thumb and is amplified by subsequent rows. The same thing applies if the rows are not absolutely parallel. I found with Calm Flow that if was unhappy with the curve of one row I could adjust the next row to correct it. With the parallel lines, correcting the next row only accentuates the problem.

The poppies themselves introduce some new techniques, such as padding; I thought they were the lesson for Phase III. I now realise that I still had more to learn about couching.

© JEC/Carol-Anne Conway

With both Japanese Embroidery and Japanese Bead Embroidery the Phases are carefully structured. At Phase I you learn the fundamental techniques. In Phase II builds on those techniques and introduces some new ones, as so on with each subsequent Phase. With most things I have done in life I have always wanted to jump straight in at the deep end; run before learning to crawl. With JE and JEB I have been content to learn each stage before moving onto the next. On many of the Phase designs, the technique being taught is repeated over and over. It can seem monotonous at times but this repetition affords ample opportunity to practice and improve before moving on to the next challenge.

© JEC/Carol-Anne Conway

I have another lesson on Saturday; I think I might be ready to move onto padding.

Happy Stitching

Tuesday, 27 October 2009

Missed by a Mile

Week two of Girl with Pearl Earring went well.

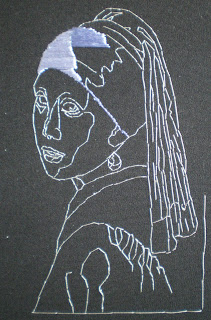
Ok, I didn’t get very far on day one, but on day two I made real progress. I completed the foundation stitches on this part of the turban and began short stitch holding. I have not reached the short stitch holding phase in my Japanese Embroidery lessons and have only done a very small amount previously. According to the book, I should use temporary holding stitches across the foundations. Well, I am short of time and my foundation stitches are relatively short, so I decided to skip that stage. In the instructions the stitches are of equal length and arranged in an orderly manner. I want to give an impression of brush strokes so I’m doing my stitching in a more random fashion. Yes, you heard me correctly; I am doing random by choice! I also hope that the short stitch holding will blend the colours and reduce the blocky appearance of the foundations.

Day 6, 10 minutes


Day 7, 1 hour 20 minutes


Day 8, 20 minutes


Then we went on holiday for a week. When we returned I managed 3 more short stitching sessions.

Day 9, 20 minutes


Day 10, 20 minutes


Day 11, 20 minutes


11 hours 30 minutes

The exhibition has started now, so I failed miserably in my challenge. I intend to continue stitching my Girl with a Pearl Earring but first I have other things that are a higher priority. In some ways I regret starting her. I knew that I had left myself to little time to stitch her and my time could have been better spent doing some of the other things I have committed to.

Happy Stitching

Monday, 12 October 2009

A Thousand Splendid Suns

Khaled Hosseini’s second book, A Thousand Splendid Suns, is the story of the unlikely bond between two very different women.

When Miriam is only fifteen years old a tragic event forces her to marry a man thirty years her senior. Two decades later, when a similar fate befalls Lalia at the same age, Rasheed takes her as his second wife. Set against a backdrop of war torn Afghanistan, there are many parallels between the shifting fortunes of Kabul and the lives of Miriam and Laila.

Amid growing unrest between the warlords of the Mujahideen, Miriam is struggling to please her husband. As years past and she fails to provide him with a son his disappointment turns into bitterness and he treats his wife with contemptuous cruelty. When Laila first joins their unhappy household a tense and uneasy peace descends but when her first child is a daughter, Rasheed's unpredictable moods and violent outbursts resume. It is fear and loathing of their husband and their shared love of Laila's children that eventually draw the women together and a strong bond develops between them. When the Taliban seize control of Kabul, Rasheed takes perverse pleasure in their arrival. His control over his wives is as suffocating and brutal as their Shari'a laws.

The book is divided into four parts with short chapters that move swiftly through the defining events of the story. The crisp narrative does not waste words on anything unimportant and yet leaves no loose ends, no questions unanswered. The author paints a vivid picture of the brutality of war and the savage beatings Rasheed's wives endure, there is a welcome lack of gratuitous gory detail. The story is relentlessly brutal with only brief reprieves in the misery and suffering. Yet it is a story about love, about many loves and mainly about the love between mothers, fathers, sons and daughters. It is a story about the trusting, innocent love a child has for a parent and the all consuming love of a parent for their children.

Sunday, 11 October 2009

Probably the Best View on the Island

We'd spent the morning searching for a cave.

In fact we had looked for it the previous day but had given up and gone to the beach when someone told us that the cave was extremely difficult to find and definitely could not be accessed from this side of the hills. Unwilling to accept defeat so easily we had set out early to find the remote village of Giri and resume our search. Following some sketching directions from the owner of a local Taverna we drove causiously along the gravel track he'd discribed as a 'not very good road' until the surface deteriorated to a state unsuitable for our hired Hyundi i10! We continued on foot marvelling at the complete lack of man made sound. The Western side of Zachynthos is more sparsely populated than the east and we were about 3 kilometers from the nearest habitation. There was no farm machinery to be heard, no music from the tourist resorts, not even the faint hum of a distant road. Only the the gentle buzzing of insects, the occasional rustle of grass as a lizard darted away and intermitent bird song accompanied us. As soon as we crossed the summet of hill sounds of the farming community 600 meters below drifted up to puncutate the stillness; a dog barking, cocks crowing, the creaking and clanging of a tractor.

At the end of the track we found the foot path that wound its way down the steep hillside to our elusive cave. We might have been exhilerated at meeting our objective had we not been so underwhelmed by the cave itself. To be honest, that was not unexpected; this is not the first time we have spent hours searching for a cave that turned out to be little more than a small hole in the side of a hill and nor do I expect it to be the last.

Travelling back to our resort by the road that the previous day we had been told did not exist, we saw a sign for a taverna boasting the best view of the island.

Now we are sitting on a terrace that seems to be suspended above the roof tops of Agios Marina. To the north of the island Kefallonia is clearly visible, as is Laganas Bay in the south. Beyond the ancient bell tower in front of us are acre upon acre of olive groves, beyond them the sea shimmering in the bright afternoon sunshine, and beyond that the purple mountains of mainland Greece just showing against the purple haze of the horizon.


The tavern's boast may not be exagerated, this may well be the best view of the island. After our hot, dusty trek our plate of calamari is possibly the best in the Mediteranean and the cold beer we are drinking is probably best in the world.

Wednesday, 30 September 2009

Silk Wrapped Purl

The second needlework nibble kit introduced a new thread made by Bill Barns of Golden Threads. Again it is actually an old thread that was commonly used in 17th century embroidery but then went out of production. Silk Wrapped Purl is copper wire wrapped with Au Ver a Soie silk that is coiled into a purl. They can be couched in place with matching silk threads, such as Au Ver a Soie 100/3 or Soie Paris or treated in the same way as other metal purl threads.

There are two kits available; each covers a different technique for attaching the Silk Purl. In the design I have, lengths of Silk Purl are couched in place with matching silk with a single strand Soie Paris in a matching colour. So far I have outlined each section of the design. They will be filled in using the same technique. At first I found it a little bit fiddly working with this springy thread but I soon got the hang of it. It would have been easier with the work on a stand but I had mounted the linen in a small spring hoop for ease and was holding that in my hand.

© Thistle Threads/Carol-Anne Conway

Happy Stitching

Tuesday, 29 September 2009

Needlework Nibble, Gobelin Stitch

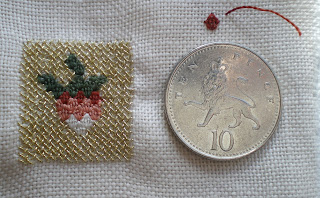
The background of the strawberry motif is worked in gobelin stitch using Gilt Tambour Special. Both the stitch and thread were new to me. Tricia of Thistle Threads worked with Benton and Johnson to develop the thread for one of her teaching projects. It is subtle with little overtwist that makes it suitable for stitching the type of backgrounds commonly used in the 17th century.

There are several versions of gobelin stitch, this variation is essentially a half cross stitch worked over 2 threads. As with the queen stitch, I found working on this scale fiddly.

© Thistle Threads/Carol-Anne Conway

Most difficult for me was getting the needle into the same hole as a previously worked stitch. I think this was partly down to the needle. As Tricia suggested, I used a hand made Japanese embroidery needle. I think this is the most suitable needle for the GTS. I also tried with a tapestry needle; it was very difficult to thread the GTS through the oval eye if I used an appropriately sized needle and it was hard on the thread. However, Japanese needles have very sharp points that pierce the linen threads very easily; the rounded tip of a tapestry needle would be better suited to this type of stitch on linen. I considered sanding my needle to dull the point but they are very expensive and I couldn’t bring myself to do that unless I were to find myself doing a lot of this type of work.

That aside, I really enjoyed this project. I have learnt 2 new stitches and worked with 2 new threads, both of which I really like.

© Thistle Threads/Carol-Anne Conway

I shall now look forward to the next Nibble, which introduces another new old thread. I can hardly wait.

I wrote the first part of this post at the beginning of August but have just discovered that I never published it! I've now finished this into a key fob. I didn't enjoy the finishing and I didn't make a very good job of it, which is disappointing as the design is so pretty.

I found it very fiddly lacing that tiny embroidery over board and I trimmed the seem allowance too narrow, the linen was beginning to unravel and I had to be very careful with it. I also think that I should have made a thicker cord for the edging. I don't know why I didn't do that. I also think that the tassel, although nice, is too big.

© Thistle Threads/Carol-Anne Conway

Happy Stitching

Sunday, 27 September 2009

Getting my Hand In

My instinct was to start with her face, after all if I can't get the face right, there is no point doing the rest, right?

Well, I have been so obsessed with beads lately, that I have done very little silk embroidery and I felt that it was important to 'get my hand in' before I tackled the focal point of the design.

My plan is to spend an hour each morning stitching GwaPE. This week I didn't manage to meet that target but I did do a little stitching every morning and have made a start.

I'm still not sure of what techniques I am going to use but no more prevaricating, I'm going to get on with it.

Day 1, 40 minutes

Most of this time was spent collecting together my threads and searching through a book for information on a technique that I wanted to try. Helen M Stevens creates a shadow line by using a row of stem stitch in black under the main stitches. Were the light hits the left hand side of the turban I outlined with white to create a highlight. I also stitched along bottom edge with blue. I'm hoping that this will give me a crisp line between the turban and the face.


Day 2, 40 minutes

I started stitching with a single strand of silk but as soon as I had laid three stitches I could see that this would not give sufficient coverage. I started again with two strands which gave me the coverage that I wanted.


Day 3, 20 minutes

In Japanese embroidery it is usual to leave one point open space between elements so I began that way but did not like the obvious black line this left. I removed that a restitched it slightly overlapping my stitches. This creates a slight split in the silk through which the black fabric is visible but this is far less obtrusive.


Day 4, 20 minutes


Day 5, 40 minutes


8 hours 40

Happy Stitching