Tuesday 23 December 2008

Some Time Spent with Friends

I spent this morning padding and stitching plum blossom buds.

© JEC/Carol-Anne Conway

I know that it does not look like much for a morning's work, it never does, but something much more than can be seen here was achieved. A few hours patiently working with flat silk has instilled in me a deeeeeeep, deep, sense of peace.

Over the past few weeks, I have managed a few short sessions with Venerable Friends, couching the outlines of the pages. Yesterday, I completed all but the final book and I need to embroider the motif before I can outline this book and complete the last leg of this voyage.

© JEC/Carol-Anne Conway

Normally, I enjoy couching, but I became almost bored with the process of outlining the pages. Maybe that is because I am becoming impatient to finish this Phase that has been on the frame for nearly two years now.

Happy Stitching

Monday 22 December 2008

More Wallpaper

Three more rows of stitches: the first is Vandsyke stitch, a new stitch for me that I found in Mary Thomas's Dictionary of Embroidery Stitches. I purchased this book, second hand, from a book sale at my local branch of the Embroiderer's Guild. Four of the following stitches were taken from this book.


I worked the stitch in the lovely fine wool from Gumnut Yarns (light fawn) that I picked up at Alli Palli. I found the stitch easy enough to work, although it was a little difficult to keep the central chain straight. At one point, I tried to shape the stitch around a circular cut out, that proved more difficult and I am not entirely happy with the result.

To the right of the Vandyke stitch is a row of reverse chain in Rachelette (silver Taupe) from the Caron Collection and the right of that is Basket Stitch worked in DMC cotton. Again the stitch was fairly simple to work.

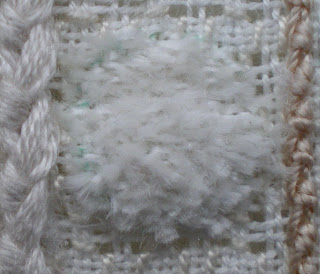
The design has three small circles set into the striped back ground. The first (on the far right) I filled with velvet stitch.


This is an other stitch that I have not tried before. I found the stitch fairly easy to follow but on this scale (28 count linen) extremely fiddly. However, the stitches were tightly packed in and felt secure so that when I trimmed them the result was a nice thick velvety pile.

For the circle on the left I used Turkey Stitch (another new one). On paper, this stitched looked more straight forward than velvet stitch but I found it difficult to translate into practice. I think I got it eventually, but am still not certain that I was working it correctly. It was less fiddly than Velvet Stitch but is less dense and never felt as secure. Although Velvet Stitch was more difficult to work, I think the resulting texture makes it more worthwhile that Turkey Stitch.


The third (central) circle I filled with padded Satin Stitch outlined with stem stitch.


Particularly unimpressive. I could say that the linen frayed and came loose from the calico border, so the linen was not taught in the frame. I could tell you that I worked it late at night and was tired. Poor excusses really, I should be able to work a better satin stitch than this by now.

All three of these circles are worked in Flat silk. Allthough much of the sheen is lost in the Velvet and Turkey stitches, I think that the lushious pile of the Velvet Stitch is largely due to the silk. I will try this stitch again in another thread to compare the results.


Happy Stitching

Wednesday 17 December 2008

Wall Paper

Most evenings I am progressing my stitched samplers for Sumptuous Surfaces. The course has concluded now but I am still working on Lesson 2, such is the content and inspiration of Sharon's course notes.

Over the past week or so I have been working on a stripped design, aiming to fill each vertical stripe with a different texture, some low relief and some more textured. At the moment, I am particularly fascinated by pulled work, so these have featured heavily.


The area on the left is filled with satin stitch worked in a zig-zag pattern over a 2, 3, 4, 5 or 6 threads, #8 cotton perle. Actually, I am a little pleased with this bit. Random usually terrifies me, but for once, I just went with it, rather than trying to work out a random pattern.

To the right is cobbler filling, also worked in #8 cotton perle. Nothing random here, a straight forward pattern.


These two areas are seperated by a row of Portuguese Stem Stitch worked in 12 strands of Soie Cristale. Sharon had commented on an earlier sample of this stitch that it worked well in thicker threads, so I decided to give it a go. I agree, the thicker thread shows the stitch of well.


I enjoyed working the zig-zag satin stitched so decided to try it again, this time in a regular pattern over 6 threads, again in #8 cotton perle. I really like the pattern created in the fabric.


Next, I worked a stripe in four sided stitch. Again, this is a regular pattern and it creates a lovely texture. These 2 stripes are seperated by a line of heavey chain, stitched in Mulberry Silk.

From a question posed in the class forum, and rereading the instructions, I realised that my earlier attempts at Portuguese Stem Stitch were not stitched correctly (although I like them as they are) so I tried again, wrapping the stitch twice as per the instructions, rather than once, as I had done previously.


I worked two rows, one going up and one down, expecting to get a mirrored effect, but I realise now that I should have worked both rows in the same direction, but one left-handed and one right-handed. Between them I worked a row of cable stitch in a twisted rayon.

Happy stitching

Tuesday 9 December 2008

Good Weather Stops Play

This weekend was cold and frosty, but dry and sunny. Unfortunately for Venerable Friends, gardening won the day!

*****

A month ago I got an opportunity to do something that I have wanted to do for a long time, my first Japanese Bead Embroidery class. The Japanese
Embroidery Centre
have offered bead embroidery classes for a few years but until now there was not a qualified tutor in the UK. Through a brief conversation with Mary Alice Sinton on Stitchin Fingers, I learnt that a newly qualified tutor was just about to begin classes here. A few days and a flurry of emails later I was enrolled for my first lesson, together with my good friend Sue.

Apart from Sue, I did not know anyone at this class. I am much less intimidated by that than I would have been a few years ago. I have learnt that stitchers are a fairly friendly bunch, and when you are all learning something for the first time (as we were) any ice soon melts. In fact the rest of the class knew each other very well as they are studying Japanese Embroidery together, but they made Sue and I feel very welcome. Indeed our tutor and our host had framed and prepped for us so that we would not be behind our class mates, who had done that in advance of the lesson.

Marion, our tutor, seemed a little nervous at first (bearing in mine that she only qualified 2 months earlier, who wouldn't be) but she soon relaxed and took us through all we needed to know for Phase I.

I think that everyone enjoyed the class, I know that I did. As usual, I came away with very little completed but with sufficient knowledge to go on and complete the design. I've done two short sessions since and managed to finish the border.

© JEC/Carol-Anne Conway


The design is outlined with a picot stitch. Aren't these beads gorgeous? They are tricut beads and seem to be unavailable in the UK. If anyone knows of a source, I would like to know about it.

© JEC/Carol-Anne Conway

The central design is this flower pattern. The flowers are beaded in one of four colours, arranged in a random manor. I think you know by now that I am more than a little intimidated by random, but I have a cunning plan!

© JEC/Carol-Anne Conway

This is the story so far.

Happy Stitching

Wednesday 3 December 2008

Venerable Friends - Page outlines

I seem to have fingers in lots of pies at the moment, which is not my usual modus operandi. Some of them are making a very strong did for my attention and my Japanese Embroidery is not one of them (gasp). On Venerable Friends I am currently outlining the the pages with couched tight-twist karayori and I have become bored with this process, surprisingly because I really enjoy couching. In truth, I don't think it is the couching that I am bored with but the stop start nature of this part of the design. The pages are stitched in a variety of colours so for each new section, a tight twist karayori and a 1-2 couching threads have to be made and I have found it a little disjointed and tedious.

The box chart declared the colours for the pages to be 'stitcher's choice'. That in itself is cause for mild panic on my behalf as it entails two of the things that I find most daunting; colour choices and randomness. My first thought was to look closely at the colour picture supplied with the design and follow the professional embroiderer's choices, but then I decided to put the copy out of sight and 'have a go'. I decided to limit my palette to colours already used in Venerable Friends - I thought that this would create unity and balance. Secondly, I've tried to apply a colour theory that I had learnt from gardening - reds come forward and blues recede.

© JEC/Carol-Anne Conway

I did not want to restrict myself to using shades of a single colour for each book, so I tried to look for shades of blue, red and yellow within colour groups. For example, I have used both shades on the main book but I used the more yellowy green for one of the pages and used the bluer green for the cover, which is behind the pages. The the book that lies beneath all the others, I will out line in one of the shades of blue.

© JEC/Carol-Anne Conway

I outlined several pages a couple of weekends ago and then did nothing more until this weekend. When I uncovered the work and looked at the whole design (while working, I only uncover the area I am working on), I was struck by how defined it is beginning to look with some of the outlines completed. I've noticed before that the finishing details can bring a design together and make it look sharper. My urge to work on has returned and I feel frustrated that I only get the opportunity to do so at the weekends (gardening permitting!).

Happy Stitching