Wednesday 26 March 2014

Journey’s End!

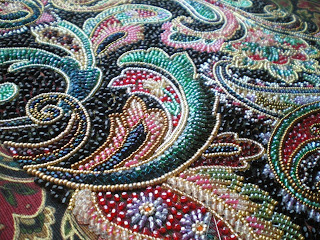
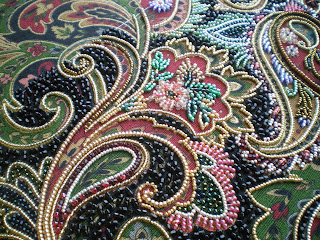
As soon as I had completed the beading for the Pouchette, even before I had constructed the bag, I sent photographs to the Japanese Embroidery Center. They sent them to Matsukawa-sensei and Uematsu-san for their assessment. I then waited an agonizing six weeks to hear whether or not my work would be approved.

© JEC/Carol-Anne Conway

When I started Japanese Bead Embroidery in 2008 I only wanted to learn this beautiful art form and as I worked my way through the phases my love of beads and bead embroidery grew. In 2010 I learned that my tutor, the only one in the UK, was immigrating to New Zealand and shortly after that the 2011 beading classes at the JEC were cancelled because Matsukawa-sensei had fallen ill. There was some doubt if she would ever return to Atlanta to teach another beading class. I was devastated to think that my journey into JEB was coming to an end when it had barely begun. I was also deeply saddened to think that there would nobody in the UK qualified to share JEB with others. I resolved to progress as far as possible before my tutor left for New Zealand.

In June 2011 it was announced that Matsukawa-sensei would return to Atlanta in 2012. I was elated, now I might be able to complete my journey and even began to foster thoughts that someday I might qualify to teach JEB in the UK. I determined to be in that class. Sadly, ill-health once again prevented Matsukawa-sensei from travelling but fortunately this time a substitute teacher was found and the class went ahead.

© JEC/Carol-Anne Conway

Phases I-IV are designed to teach the various techniques of bead embroidery. At Phase V the student is required to come up with their own stitching plan that demonstrates all they have previously learned. It is hard: there are no instructions and no pictures to refer to, only your own imagination. Umematsu-san is there to offer advice and guidance but the class is only 3 days long. After that you take your piece home and you are on your own.

I thoroughly enjoyed beading my Pouchette but all the time I was wondering how well I was doing. Do my colour selections work? Do the stitches I have used enhance the fabric design? In class, Umematus-san had mentioned that my lines of gold beads could be smoother. I tried hard to make them so but was I succeeding? I was elated when I finished the beading and felt that I had done my best work but would it be good enough to be approved by Matsukawa-sensei and Uematsu-san?

© JEC/Carol-Anne Conway

At the beginning of March I finally received the news that I had been waiting for. Matsukawa-sensei approved my work and I am qualified to teach Japanese Bead Embroidery. My certificate arrived in the post a few days ago.

So that is it the end of my Journey! Except that it is not the end, it is the beginning of a new phase. My good friend and fellow beading enthusiast, Sue, who travelled to Atlanta with me in 2012 has also qualified and together we plan to start teaching Japanese Embroidery here in the UK. A new journey begins!

© JEC/Carol-Anne Conway

Happy Stitching

Monday 24 March 2014

Pouchette - Finished

In addition to the front and back, the design for the pouchette includes 2 lengths of decorative trim four round ‘buttons’. Both were quick to bead but the keeping the buttons perfectly round was challenging.

© JEC/Carol-Anne Conway

With all the beading complete I was ready to construct the pouchette. First, I finished the beading as described here, except that I no longer use glue. Instead I first tack the foam and interfacing to the wrong side of the beading. I then turn the seam allowance and hand stitch it into place. I use a herring bone stitch and stitch through the seam allowance, the interfacing and the foam but never through the main fabric. I then remove the tacking stitches.

A small piece of synthetic velvet was supplied with the main fabric to trim the pouchette. I found a piece of antique silk velvet on the internet that was big enough to line the pouchette as well as trim it. I cut the lining and trim in one piece and machine stitched it to the beading.

© JEC/Carol-Anne Conway

The decorative trim is used to conceal this seam. I first trimmed the seam allowance and slip stitched them in down, then hand stitched the trim in place.

© JEC/Carol-Anne Conway

I then placed the front and back lining pieces right sides facing and machine stitched them together, leaving an opening on each side. I then folded the ‘trim’ part of the velvet in half so the lining was in place and top stitched 2 cm from the top of the trim to form a channel for the cord handles. The front and back beaded pieces were then hand stitched together sandwiching the lining between them.

Once I had threaded the cord handles through the channels, the ends are secured and neatened with the beaded ‘buttons’.

© JEC/Carol-Anne Conway

Happy Stitching

Sunday 16 March 2014

The Final Furlong

The lasts elements I worked on side two were the raised and/or padded elements.

© JEC/Carol-Anne Conway

While they are not as attention grabbing as the centres of the main motifs they are great fun and rather challenging to work.

© JEC/Carol-Anne Conway

I think that they are integral to the design. While they enhance the swirling gold lines in the design, they also serve as quiet spots that gently lead the eye from one hot spot to the next.

© JEC/Carol-Anne Conway

The fancy centres and the raised areas took 28 hours and 30 minutes to complete. The total beading time for side two was 86 hours and 15 minutes. Side one took 99 hours so the combined time to bead both sides was 185 hours and 15 minutes.

© JEC/Carol-Anne Conway

Happy Stitching

Friday 14 March 2014

Flower Power

I was undecided whether to do the padded leaves and paisley outlines next or the patterned central motifs.

© JEC/Carol-Anne Conway

In the end, I decided to leave the most raised and padded elements to last.

© JEC/Carol-Anne Conway

Although it was the swirling gold lines that attracted me to this fabric, I think these are the elements that bring the design to life.

© JEC/Carol-Anne Conway

I kept the background of these motifs very simple so as not to detract from the floral designs.

© JEC/Carol-Anne Conway

Happy Stitching

Wednesday 12 March 2014

Quiet Spots

At first glance it might appear that there is no difference between the pictures on my previous post and those on this post. The centres of the main motifs are, in my view, the stars of the show. There are a few small motifs that are supporting cast. They are, however, integral to the overall design. I see them as quiet spots where the eye can rest a while before moving onto the next highlight.

© JEC/Carol-Anne Conway

I have used subdued colours so that these areas are subtly different from the background but do not compete with the main motifs for attention.

© JEC/Carol-Anne Conway

Surprisingly, these areas took 11 hours to bead.

Happy Stitching

Monday 10 March 2014

Sowing the Seeds

Seeding the back ground was the last thing I did on side one. I would have liked to do that first on side two but in Japanese embroidery you always work the foreground first. I needed to complete enough of each motif to establish their boundaries before starting on the back ground.

© JEC/Carol-Anne Conway

The first time I did a seeded background the random aspect of seed stitch freaked me out but I have come to enjoy this technique and find it quite relaxing now.

© JEC/Carol-Anne Conway

The seeding took 6 hours and 45 minutes.

© JEC/Carol-Anne Conway

Happy Stitching

Saturday 8 March 2014

Feathering my Motifs

On side one I tended to start with the inside of each motif, picking out the features I wanted to accentuate and then working outwards leaving the 'feathery' bits to last.

© JEC/Carol-Anne Conway

On side two I planned to work things more or less in reverse order so when I had completed as many of the gold outlines as I could, I started on the 'feathery' bits.

© JEC/Carol-Anne Conway

For no other reason than it pleased me to do it that way, I worked all of the red/pink feathers first ...

© JEC/Carol-Anne Conway

... and when they were done, went back and worked all of the green feathers.

© JEC/Carol-Anne Conway

The feathers took 12 hours to complete.

© JEC/Carol-Anne Conway

Happy Stitching

Thursday 6 March 2014

Ding, Ding. Round Two

When I last wrote about Pouchette I had nearly completed side one and had only the seeding on half the background remaining. It did not take me very long to complete that. With a bag that has the same design on both sides, I find it a little bit difficult to motivate myself to do the second side. To avoid this, when I stitched Phase IV I worked on both sides simultaneously. With Pouchette, because I was working out my own stitching plan, I did not want to work that way. Wanting to finish this project provided a lot of motivation for doing side two but I still experienced that "Hooray, I’ve finished - oh, wait! I have the other side still to do!" feeling. I looked for a way to make it fresh for myself.

On side one I had stitched one motif at a time. On side two I planned to work on the whole design at the same time.

© JEC/Carol-Anne Conway

I like the way the gold lines flow through the design and from the beginning I intended to feature them so that is what I worked first on side two.

© JEC/Carol-Anne Conway

It took me 28 hours to couch all of the outlines.

© JEC/Carol-Anne Conway

© JEC/Carol-Anne Conway

Happy Stitching

Tuesday 4 March 2014

Smalls Exchange

My Nan used to call her undergarments 'smalls'. I can assure you that this post has nothing to do with swapping knickers!

On a different on-line community that is related to an on-line course I am doing, I took part in an exchange of small embroidered, or embroidery related items.

I made a beaded needle case to give to my swap partner. I have done quite a bit of bead embroidery and done some other bead work but I have not beaded around a form in this way before. I used a pattern from "Beaded Needle Cases" by Carol Andres and Helen E Payne. I had to alter the pattern slightly because I used and different size needle case and different size beads from those stated.

© Carol Andres and Helen E Payne/Carol-Anne Conway

I made two or three false starts while I tried to work out how many beads fitted around the wooden form and how tight my tension should be. I must have made a slight error somewhere in my pattern because things did not fit exactly as I had expected.

© Carol Andres and Helen E Payne/Carol-Anne Conway

All-in-all this was a fun project once I got over the frustration of a few false starts.

Happy Stitching

Sunday 2 March 2014

Elevation Cloak Patch

In September/October last year I worked on two small projects. One was to make a 3 inch square patch to be appliquéd onto an elevation clock. Now, I don’t know exactly what an elevation cloak is. All I know is that Kimiko is a member of the Society for Creative Anachronism (SCA) and that she was to be made a Laurel (an honour and an achievement) and would be wearing the cloak for part of the ceremony. I had met Kimiko in an on-line stitching community and frankly am in awe of her knowledge and her generosity in sharing that knowledge. Many of those in the community know Kimiko are also members of SCA and would be present at the ceremony. Those of us who would not be there in person, but wanted to be there in spirit, embroidered a patch for the cloak.

My Original Stitched in Rajmahal Art Silk
© Debbie Cripps/Carol-Anne Conway

My patch is based on an embroidery I first did in 1999. It was one of three designs by Debbie Cripps published in Needlecraft magazine. Up until then I had been doing mainly needle point and cross stitch. They marked the start of my love affair with surface embroidery. They used to hang on the landing wall but have been in a cupboard for the past few years. I came across them recently and thought it would be interesting to stitch them again to see how my stitching had developed.

© Debbie Cripps/Carol-Anne Conway

I had to reduce the design so that it would fit onto the 3 by 3 inch square. The original was stitched in Rajmahal art silk which is 65% rayon, 35% silk and 100% of a nightmare to work with (but the colours are lovely and it is very shiny). This time I raided my stash for some of my most precious treasures - soie de Paris silks, Elizabethian Twist 2% gold, paillettes and seed pearls left over from the Floral Glove class.

© Debbie Cripps/Carol-Anne Conway

The design being so small it did not take very long to stitch and I really enjoyed doing it. I don’t usually like making something for the second time but so much time had passed since I made the first one that it did not feel repetitive.

© Debbie Cripps/Carol-Anne Conway

Kimiko made a border of gold thread, seed pearls and garnets to her elevation gown. I wished I had a garnet to add to the centre of the rose but Kimiko said that she would add one when she received the patch.

Happy Stitching