Sunday 23 December 2007

A Good Stitching Day

Having spent Friday doing necessary but boring jobs, yesterday I managed several hours of, guilt free stitching. First, I finished couching imitation silver #4 round and round with 1-2 twisted silk. Silver is traditionally couched with white as it is thought to enhance the appearance of the silver. Here I have I have also used black silk along the line of the veins. I have not decided yet whether or not I like how it turned out.

I then added the green 2-1 twisted green silk to the wing tip. This is not the green that I originally chose. Jennifer Ashley Taylor who supplied the silk thought that the green I had selected was too yellow with my other colour choices and suggested this green in stead. Jennifer had given me a list of DMC colours that most closely matched her silks but the matches are not exact so, as I had not seen the actual silks, I was happy to accept her advice. I love green but this is not a shade that I would have been drawn to but I am so pleased that Jennifer suggested it, I think it is beautiful colour.

© Jennifer Ashley Taylor/Carol-Anne Conway

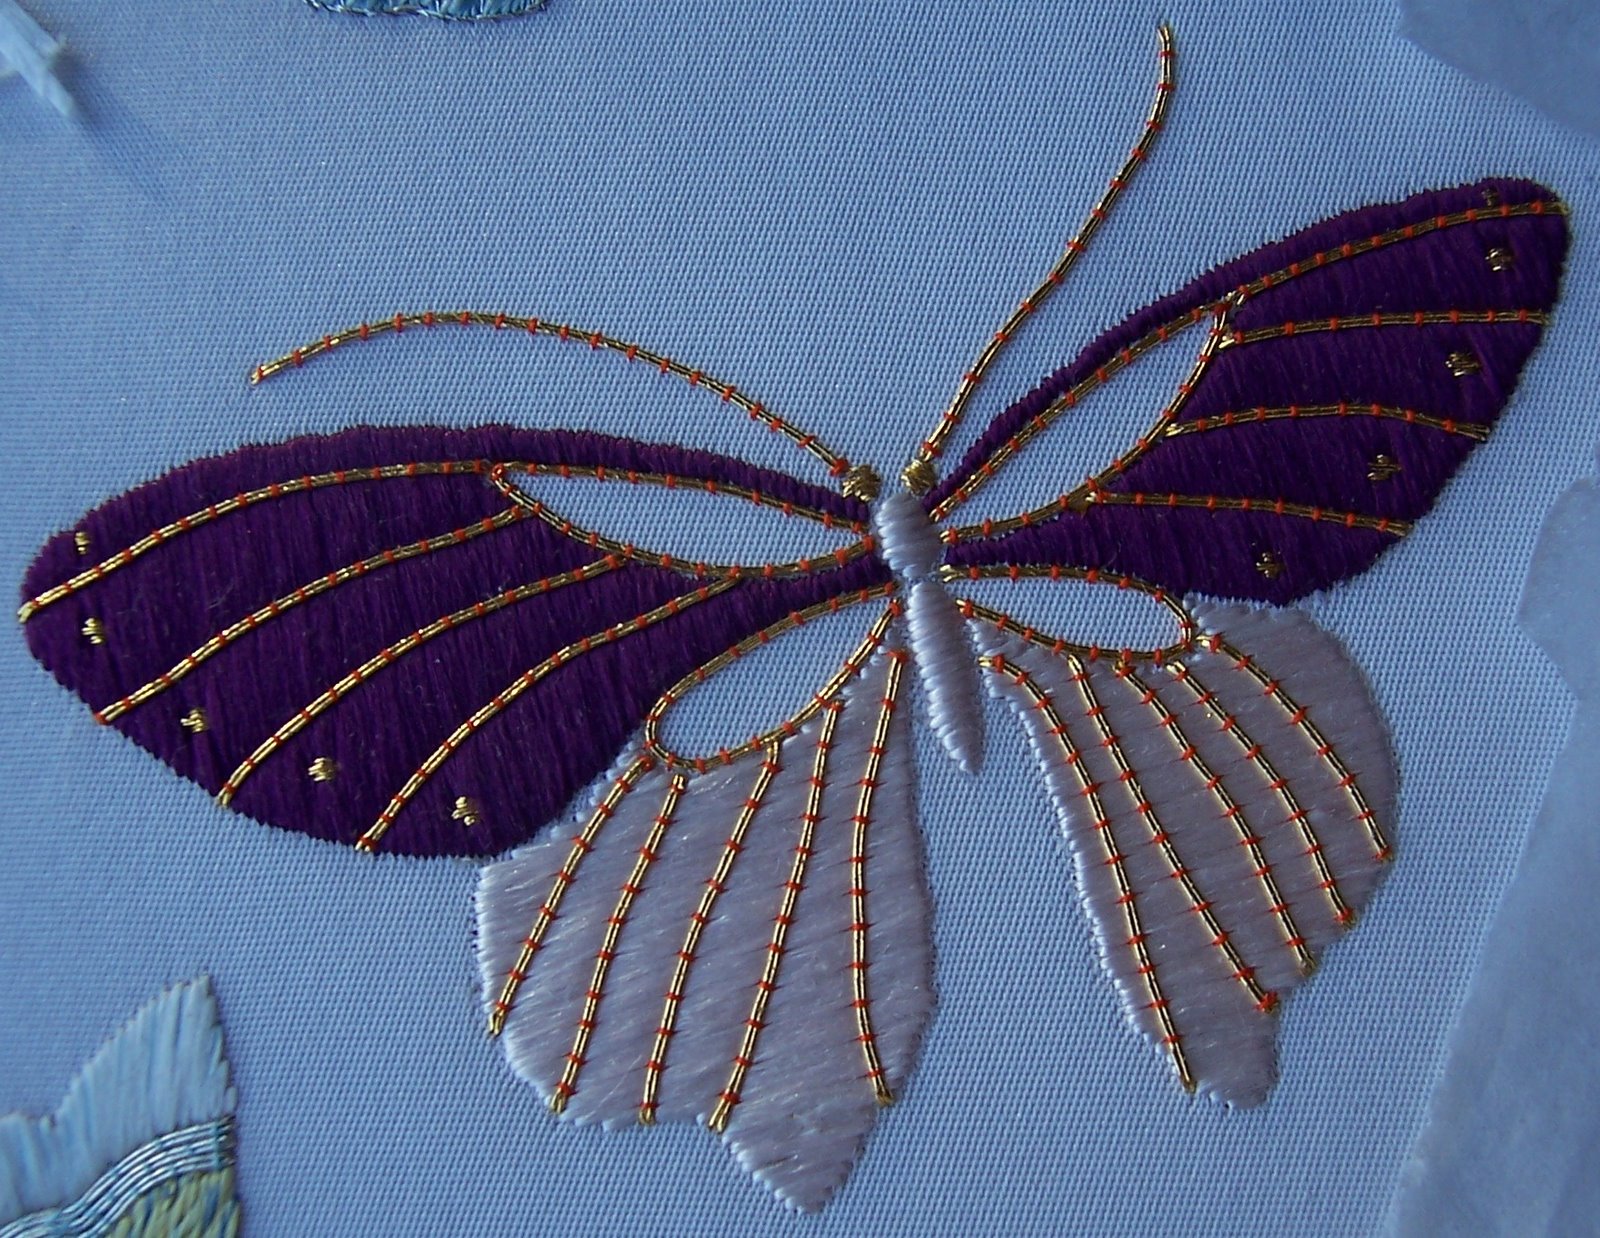
The second wing is behind the first and I have tried to emphasis this by stitching it in flat silk. Also I wanted to mimic the different textures of the front and back of a butterfly’s wing.

© Jennifer Ashley Taylor/Carol-Anne Conway

© Jennifer Ashley Taylor/Carol-Anne Conway

I had virtually no interruptions all day, the light was good, I was totally in the zone and the stitching just flowed. Usually, I will take out most of what I stitch at least once and do it again, but I barely took out a stitch. If only it could always be like that.

Happy Stitching.

PS. I am typing this in the kitchen, but I keep stopping to look out of the window. I have several bird feeders in the garden and they are teeming with birds. This morning I have seen the usual gang of great tits, blue tits, coal tits, green finches, chaffinches, siskins and sparrows; a pair of gold finches, a pair of doves, a robin, black birds, starlings, pigeons and a woodpecker who all are frequent visitors. Recently a fieldfare and a magpie have started dropping in and just now, my favourites, a gang of long-tail tits who only visit us now and then are vying for a place on the nuts. We also have a pair of squirrels who come regularly. I love watching them but they have a nasty habit of destroying the feeders, I scatter nuts on the ground to encourage them away from the feeders but they are greedy and want it all. I want to go and stitch but I can’t tear myself away from the birds!

Thursday 20 December 2007

TAST Bullion Knots

Forgive me Sharon; it has been many weeks since my last TAST submission! Comfort dolls and fairy shoes amongst other things have distracted me, but I always intended to tackle at least some of the stitches I had missed, especially Bullion Knots.

The last TAST sampler I stitched was French Knots and I found it a very satisfying piece to work on. I worked the bullion sampler as a companion piece but I did not find this one nearly so satisfying. Bullions for me are a bit hit and miss and they did not seem to get any easier with practice. I did pick up a few tips that helped, like twisting the thread around the needle in the right direction and loosening the twists by twisting the needle before drawing the thread through the knot. I found that threads with a good twist, like cotton perle, are much easier to work with the loosely twisted thread and that ‘fluffy’ threads, like Border Medicis ‘drag’ are do not form bullions easily.

It was difficult for me to stick with this piece until I thought it was complete but I am pleased that I did.


There are some areas that I enjoyed working and I like how they turned out.


There are some areas that I seemed to struggle with every stitch and the result looks messy and unattractive.


We may not work in perfect harmony but there is something about this stitch that really appeals to me and I think we will meet again.

Happy Stitching

Monday 17 December 2007

Why don't I feel the need for speed?

There has been a lot of discussion about slow clothes recently. Much of the conversation has taken place on SharonB’s Blog, In a Minute ago and Sharon has provided links to several posts on other blogs. From all that I have read, I think that Nuido - The way of Embroidery fits very neatly with the concept of Slow Cloth. I briefly mentioned Nuido in a post two weeks ago, and although it is a concept developed by the JEC for teaching Japanese Embroidery, I think that the philosophy applies equally well to any embroidery and indeed to any craft.

The word Nuido is made up of two parts; Nui, or embroidery (also shishu), and Do (the way). The way of Nui refers to the acquisition of technical skills and knowledge. Do refers to the development, and constant discovery, of the spiritual components of the art of Nuido. Nuido has three aspects: the acquisition of technical skills and knowledge (rationality), the development of artistic sensitivity and awareness (sensitivity), and understanding the spiritual aspects of shishu (Spirituality).


I am a slow worker (not only in embroidery) and although I do not think that being slow necessarily qualifies one as being a slow practitioner, I think in my case the two are intrinsically linked. Part of the reason I stitch slowly, cook slowly, read slowly, write slowly is that I am nearly always lost in thought about whatever I am stitching, cooking, reading or writing. I know that it is a source of frustration to some people around me that I cannot pick up a task and simply do it.

I take an eternity to read a book because I keep going back to reread something I have not fully understood, or to check details that I have forgotten. Preparing meals I like to make whatever I can from basic ingredients. Watching me make sauce for a prawn cocktail, my partner will ask "wouldn’t it be easier to buy it ready made." Of course it would, but where is the satisfaction in that. If I bake a cake (which I don’t do often, because my baking leaves a lot to be desired) I like to mix it by hand. I don’t think this is a ‘better’ way than using a food processor, I simply enjoy creaming the butter and sugar far more than getting the machine out of the cupboard and listening to the awful noise it makes. Why make a rubbish cake, if you don't enjoy the process of making it?

I can take months to stitch a design. Before I start stitching, I spend hours admiring the threads and fabric, contemplating the design. When it comes to actually stitching the piece I work in a slow, almost meditative fashion. If it is something I want to stitch I care little about how long it takes to work and rework the motifs. If it is something that I have no interest in stitching, I would struggle to dedicate 5 minutes to it.

I like ‘quick’ projects (something that takes me less me than a month to complete) and may have several on the go along side my ‘serious’ embroidery. I also like workshops that allow me to ‘dabble’ in something completely new to me but now that I have come to terms with being ‘slow’ I find it deeply satisfying to spend several hours couching only a few rounds of imitation silver to a butterfly wing!

© Jennifer Ashley Taylor/Carol-Anne Conway

Happy Stitching

PS. I took me more than two hours to write this and as I type I am still contemplating the title. Now I am going to cook stir-fry prawns (a quick meal but one I will prepare from scratch) while I think of a title that I like, even if it is not very inspired!

PPS. This title came to me while waiting for the water to boil to cook the noodles in. If I'd used 'Straight to Wok' dinner would be ready but I might not have a title yet!

Friday 14 December 2007

Double Flower, Outer Flower

While in Cambridge, I had made a start on the outer part of the double flower and it kept calling to me to be finished. The first stage is to stitch the 'curls' on the outer petals. These are done in diagonal layer with bright pink flat silk. I found it difficult to get a good shape to the curls and each one took two or three attempts before I was happy with it.

© JEC/Carol-Anne Conway

When all five curls where complete, the inside of the petals was stitched in fuzzy effect. The box chart suggested the same bright pink as the curls but Tamura-san said that he thought this might be too 'flat' and invited us to experiment with the colour for this part of the petal. After much consideration I opted to use the mauve that will be used elsewhere in the design. I think that the bluey tint helps the flat petal to recede and the curls to stand out.

© JEC/Carol-Anne Conway

Tamura-san also suggested that we add a 'shiner' to the weft valley layer of fuzzy effect. He explained that traditionally the shiner is added above main thread since most embroidery is done on kimono or obi and therefore viewed from above. However, Tamura-san is aware that in the west, an embroidery is more likely to be framed and hung on the wall, in this case, he suggested that the shiner might be more visible if placed below the main thread. I elected to use a single strand of 0.8 gold, placed above the mauve thread, where I hope it will catch the light and sparkle when displayed on the wall.

© JEC/Carol-Anne Conway

Finally, the main 1T mauve thread and the 0.8 gold thread are couched together with 0.5T mauve using vertically holding stitches.

© JEC/Carol-Anne Conway

I am very pleased with the completed flower and the new techniques that I learned stitching it.

Happy Stitching

Tuesday 11 December 2007

Shibori no Hana, Rose


The rose was more difficult to make than the flower in the first class but not as difficult as the pansey. I have used the same colour ribbon that I used for the first flower but this time I used the other side as the 'right' side. The method of producing the ribbon means that on one side the peaks are colour A and the valleys are colour B, but on the other side the colour way is reversed, so although both sides are same colours, the tonal effect is different. Also the tone changes depending on how much you steam out the ribbon; the more relaxed the pleats, the more colour B shows.


I have a short length of this colour ribbon remaining with which I will try to fashion a bud.

I have really enjoyed making these ribbon flowers but don't yet know what I will do with them!

Happy Stitching

Sunday 9 December 2007

Happy Bloggiversary to Me!

I thought that I had started my blog at the end of December so when, a couple of days ago, I looked up the date of my first blog I was surprised to see that it was today! It’s interesting to re-read your first post, to see what you choose to say about yourself and what you left out. I am amazed that I didn’t even mention Japanese Embroidery when this has been my main focus of interest for the past three years and has dominated my blog this year. Nor did I mention the main motivation for starting a blog in the first place - Take a Stitch Tuesday.

Fully participating in the challenge included sharing my progress via a blog or Flickr account and I opted for a blog. Although I have not succeeded in doing the nominated stitch every week, I don’t feel that I have entirely failed. At first I kept up with the weekly stitches but as usual I set the bar too high for myself. Instead of experimenting with a few variations of the stitch, I aimed to complete a whole sampler and I wanted each one to be as good as I could possibly make it (that’ll be the Virgo in me!). Even though it took me all week, I kept up with each week until I went to India in April - that set me back by three weeks. When I returned, I started with the stitches I had missed – wanting to do every thing in order is another characteristic of my Virgo personality! When I got to Week 24 – French Knots, my sampler took 4 weeks to complete, so that made me six weeks behind. Torn between doing each stitch in turn, picking the ones that I fancied or doing the stitches as they arose, I prevaricated and dithered and fell more and more behind.

I always intended to continue with the challenge, but in the mean time, I was distracted by a call from Pat Winter to stitch comfort dolls, and a desire to be involved with the Plinmoth Project even though I could not travel to Boston to stitch on the actual jacket, I wanted to do a sampler for them.

So why do I say I did not fail? Well, for one thing, I have done more stitching this year than ever before and that is a direct result of TAST. Most days I have picked up a needle, even if only for a few minutes stitching. On those days that I have not found time to stitch, I have either blogged about my stitching or spent a little time admiring, and gaining inspiration from all the fascinating blogs that I have discovered via TAST. Since SharonB was behind me starting this blog in the first place, it somehow seems appropriate that on my first bloggiversary I have signed up for her next challenge, Take it Further.

Happy Stitching and Happy Blogging.

Thursday 6 December 2007

Shibori no Hana, Pansy

I found the second flower in the class, a pansy, more of a challenge. Something about the construction confounded me but if a thing is worth doing, ...


... it's worth persevering with.

Re-reading the instructions today, I can see that I missed some information that would have helped with one step. I'm really enjoying working with these shibori ribbons. Isn't that colour combination stunning?

Happy Stitching

Tuesday 4 December 2007

Oh No! Not Another Brother

I have a few details to still to stitch, but effectively only one butterfly remains - my youngest brother. Of all the butterflies, this was the most difficult for me to design and I have had no flash of inspiration like I did with The Optimist’s Suit. I have to admit that I do not know this brother terribly well.

I was six when youngest was born. I understood that Mummy had a baby in her tummy - a new brother or sister. I already had two brothers - an older one and a younger one - I didn’t need any more brothers. I wanted a baby sister and I was very disappointed when I got a third brother. Throughout my childhood, I don’t think I ever quite forgave him for being a boy. My big brother was so cool and clever. My middle brother was great, we played together all the time - we were the gang of two but my youngest brother was just annoying. It’s not surprising I don’t know much about him, when we were children I tried to avoid him as much as possible, as a young woman I was too busy with my own life and see what was happening in his. Of course I know about things he has done and things that have happened to him but I realise that I have never really got to know him and that is a great shame because somewhere along the line the most stupid and annoying little brother in the world grew up to be a thoughtful, caring and intelligent man.

I haven’t committed any designs to paper; I have an idea in my head and I am just going let it evolve. During the lectures Tamura-san reminded use of the three pillars of Nuido: rationality, sensitivity and spirituality. Working on Flutterbys, I have come to understand these three pillars like never before. I have given much thought to the design (sensitivity) and concentrated on doing the best stitching I can (rationality). In a comment on The Butterfly with No Name, Jane mentioned Master Saito's saying "the hands are the exit of the spirit" this is the spirituality of Nuido. Working on each of the butterflies I have thought deeply about the person represented and the love I feel for them is woven into every stitch.

© Jennifer Ashley Taylor/Carol-Anne Conway

© Jennifer Ashley Taylor/Carol-Anne Conway

There is a more detailed explanation of Nuido on the JEC website, here.

Happy Stitching

Monday 3 December 2007

The Butterfly with No Name

The first four butterflies spoke to me while I was planning them and all the time I was stitching them. They told me their name, how they wanted to be stitched and all the time they kept calling to me to work on them. They could not wait to emerge. This butterfly, the one that represents me, has been a completely different experience. She is purple because that is my favourite colour, with pink from the Mother butterfly and gold from the Father but she gave me no hints about how she would like to appear and I still don't know her name. Until she decides to identify herself to me (if she ever does), I have nick-named her Purple Missus, after a blog of that name.

© Jennifer Ashley Taylor/Carol-Anne Conway

I wouldn't say that stitching her has been a chore, I always enjoy time spent stitching, but I have not had the same buzz that I had watching the others emerge. Nor am I as satisfied with the stitching, I feel I could have done better. She is not quite finished, something more is needed on the hind wings but I am going to leave that for now and move on to the last butterfly, my youngest brother.

© Jennifer Ashley Taylor/Carol-Anne Conway

Happy Stitching

Thursday 29 November 2007

Shibori no Hana

One day I would like to do SharonB’s on-line class "Develop a Personal Library of Stitches". I don’t feel I can commit to such an intensive class yet and I have never done an on-line class before, so I thought it would be a good idea to do a short class as a taster. Looking at the classes on offer at Joggles, "Shibori no Hana" caught my eye and I signed up. The class began the day after I returned from Cambridge but my supplies did not arrive until Monday this week. The shibori silk ribbons are delicious. The actual ribbon is about 5 inches wide but the arashi shibori reduces the width to about half an inch. By gently steaming and gently teasing out the ribbon you can relax the pleats and the ribbon gets wider. The ribbons are dyed, discharged and over dyed to give a two-tone effect and being silk, the colours are glowing. You can see how the ribbon is made here.

In lesson one I learned how to make a leaf and a simple flower. I found the instructions simple to follow and was able to create a flower that resembled the one pictured on the instructions.


Take a look at these beautiful flowers created by Shibori Girl.

Happy Stitching

Wednesday 28 November 2007

Long-legged Knots

The third flower that I wanted to start during the classes used another technique devised by Tamura-san especially for this design. The stitch is a variation of another one called blister stitch. This is worked by first making a round knot that is later covered by a straight stitch of flat silk. Tamura-san’s variation uses long-legged knots that are also covered with a straight stitch. I have not done blister stitch or long-legged knots in any of my Phase designs so I asked Ishida-san to demonstrate the stitch to me.

Round knots are similar to colonial knots and long-legged knots are round knots with a leg. The trick is to get the knot to stay at the end of the leg. Watching Ishida-san work, I realised that I have not been working my round knots correctly. It would have been easier for me to concentrate on keeping the knot in place if I had round knots of pat but I wanted to complete some while Ishida-san was still available to advise me so I persevered and finally started to get the hang of long-legged knots. I have yet to add the straight stitches that complete the stitch.

© JEC/Carol-Anne Conway

I will get an opportunity to practice making round knots when I add them to the flower centres. Because I knew that the knots would be stitched on top of the yellow foundation, I concentrated on making it as flat as possible in the way Tamura-san had described and I saw his son demonstrate. It still seems strange to me to have spaces between the stitches but I think this is to allow for the silk spreading when the other stitches are added.

This is all I managed to do in 3 days of class but I was more concerned with improving my technique than getting a lot done and, as I feel I learnt a lot in those three days, I am satisfied with what I have done.

© JEC/Carol-Anne Conway

As much as I want to continue with this, it has to go away for a while now so that I can focus on finishing Flutterbys.

Happy Stitching

Sunday 25 November 2007

Pointed Flower, petals

I have always been particularly found of padded stitches; I like the added dimension that padding gives. However, when viewing the Hoitsu Scroll stitched by the professional staff of Kurenai-Kai, I was really struck by how incredibly flat some of the stitching is. Unless you look very closely, some of the flowers look as if they are printed onto the background. During the morning lecture, Tamura-san impressed upon us that for Step 1 of the petals on the Pointed Flower we should stitch the foundation as flat as possible. He described how he wanted us to make the stitches barely touch; in fact, he said that a little fabric showing between the stitches is desirable.

I found this concept very difficult; I have always striven to cover the fabric entirely, so much so, that I tend to pack in too many stitches. I had to really discipline myself to achieve this with the first petal and was rather satisfied my stitching especially when Tamura-san nodded his approval* when he viewed it. I’m afraid I allowed this accolade to turn my head, and did not apply myself so carefully to the second petal falling back into my normal stitching pattern. When Tamura-san and his son next viewed my work they commented that I should make the next petal more like the first than the second. I was less satisfied with the second petal already and, upon hearing their appraisal, I promptly removed the stitches.

© JEC/Carol-Anne Conway

Shortly after this Arata-san was demonstrating to another student how to stitch the petals. Several others and myself gathered to watch. My tutor has shown me before how to keep the tension on the silk while stroking it with the tekobari but I don’t think that it really registered - when you start to learn there are so many things to take on board. Watching Arata-san stitch a penny dropped and I returned to my frame eager to try what I had just seen. I found the technique a little awkward and cumbersome at first but immediately I thought I could see an improvement in the flatness and shine of my silk. I will continue to practice and hopefully my stitching will benefit. I stitched 2 more petals before the end of class and on the final viewing for the day, both Tamura-san and Arata-san commented that the petals were an improvement on the one that I had removed.

© JEC/Carol-Anne Conway

* Several times during the day Tamura-san would walk around the class, sometimes with his assistant, to observe each persons progress. As he walked around I could occasionally hear him make observations or suggestions. The first 2 or 3 times Tamura-san stopped at my frame, he looked intently at my work and moved on without comment. During lunch I mentioned to another student that I found this a little disconcerting but she explained that no comment meant that was satisfied with my progress. Over the course of three days, I found that if I looked up during his visit, he would nod if my work were satisfactory. If he thought something could be improved upon, he would explain how I could achieve that and when he thought I had done something well, he would say so.

Happy Stitching

Saturday 24 November 2007

Pointed Petal Flower

While the box chart gave one method for completing the centre of the ‘Pointed Petal Flower’, during the morning lecture Tamura-san gave a detailed description of an alternative method. It was difficult to miss his obvious desire that some of us attempt the ‘mischievous effect’ that he himself had devised. The central circle of the flower is already divided into a grid on the printed design. In both the box chart and the alternative method the first step is to work round knots in the center of each square.

© JEC/Carol-Anne Conway

Step two differed according to which design you chose to stitch. The box chart called for a blister stitch to be worked over each round knot but Tamura-san’s alternative method suggested working a weft layer foundation over the entire motive before working step three.

© JEC/Carol-Anne Conway

For both methods, Step 3 is to stitch the grid in #1 gold and to couch the intersections with a small straight stitch.

© JEC/Carol-Anne Conway

I am a bit of a teacher’s pet, but also I like to experiment with something new so there are no surprises as to which method I chose!

Happy Stitching

Thursday 22 November 2007

Double Flower

I said that the first 3 flowers each contained a special technique, actually this one didn’t! The flower is Tamura-san’s own design, based on one in his inspiration source. The central flower is a cherry blossom, stitched in 3-1 twist with self-padding. Self-padding means that the same thread is used for padding as for the decorative stitching. I chose to stitch this element first as it is one that I am familiar with, I thought that it would calm my nerves, and by and large it did.

The face petal (the largest petal) is always stitched first. The padding stitches are laid perpendicular to vertical top layer. Each petal is padded and stitched before starting the next petal.

© JEC/Carol-Anne Conway

After the face, the two arms are stitched and finally the legs. One leg always sits slightly under the other and this leg always stitched last. This may all sound very controlling but hundreds of years of modifying and improving technique have shown this to give the best finish.

© JEC/Carol-Anne Conway

When all five petals are stitched, the stamens are added. In this case they are created with a single stitch of 3-1 twist with gold. Normally, straight stitches are couched, but Tamura-san’s design stated no couching. The central flower is completed with a single round knot in the same pink/gold twist, that Tamura-san called a seed.

© JEC/Carol-Anne Conway

Unfortunately, nearly every photograph I took during the classes is out of focus, I have salvaged some that hopefully demonstrate the various stages.

Happy Stitching

Tuesday 20 November 2007

Embroidery Bridge Between East and West

While in Cambridge, I attended a 3-day class. In all the classes I have attended previously the student’s are working on various Phase pieces or practice designs. In this class, everyone was stitching Embroidery Bridge Between East and West, a special design created for the World Exhibition. During the mornings we attended a lecture by the designer and tutor, Mr Shuji Tamura, President of the Japanese Embroidery Center in Atlanta. During these sessions Tamura-san explained how he came up with the design and what it represented to him. The inspiration came from a design that Tamura-san had traced many years ago, the origins of which he has since forgotten but he said that the design had always spoken to him and he had long since intended to create something from it. Tamura-san explained that the Victorian style urn represents the West and the oriental flowers represent the East. The ornate supports at the top left and right contain the hidden letters ‘E’ and ‘W’. The inspiration for this come from a Japanese art form know as Ashi-de (reed and hand) in which calligraphy is hidden within the painting. The string of spheres suspended from the supports represents the colour preferences of the Japanese and Western ladies that Tamura-san has taught. Japanese ladies, he says, have a preference for the mauve used predominately on the right, where as Western ladies prefer the blue used on the left.

On the first morning we were given a design box chart, a chart that details the colours, threads and stitches used for each element. During the morning lectures, Tamura-san explained some unfamiliar techniques that he had devised specially for this design.

During the class we were given free choice of which order to stitch the elements. In Japanese Embroidery, you begin with the foreground and work the background elements last. Three of the flowers have no other element in front of them so either could be worked first. Each of them contained one of the special techniques that we learned about in the lecture. I aimed to stitch at least some of each of these flowers so that I could attempt the special techniques during the class.

I needn’t have wasted time worrying about the classes, Tamura-san and his assistants - his son, Arata-san and Ishida-san, one of the professional embroiderers from Kurenai-Kai - were wonderful teachers. I really learnt a lot in just 3 days and think that this will help me improve my stitching.


Happy Stitching

Sunday 18 November 2007

Charmed


I've been sent this lovely charm by Pat Winter for making a Comfort Doll. Thank you so much Pat, while there was no need for you to send anything, I am thrill and honoured to receive my charm. I really enjoyed making the dolls; it is we that owe you something for all that you have done towards this project. Thank you.

A few people have expressed interest in making Fairy Shoes. I am happy to say that they are a project in the current edition of Stitch by the Embroiderer's Guild. It doesn't say on their website, but I think the article must be by Annette Emms.

Happy Stitching

Friday 16 November 2007

Evening Bags

In addition to the stunning kimonos and obi worn by the Japanese ladies, several beautiful hand embroidered bags were in evidence at the Get Together Party, some of them stitched by their owners.

I love this beaded bag.


This beautiful bag was stitched by Sachiko-san who sat beside me throughout the meal and did an excellent job of translating between Huyome-san (spelling?) who spoke little English and the English ladies who spoke no Japanese at all. Thank you, Sachiko-san.

Wednesday 14 November 2007

World Exhibition - Review

I have had the most wonderful time in Cambridge. If you have the opportunity to go to the World Exhibition between now and 18 November, don’t miss it. The exhibition includes some of the best embroidery I have ever seen.

There are several kimonos and obi exhibited. Unfortunately, photography was not permitted but you can see two of the obi on display here and here. There is a wonderful series of embroideries of Japanese flowers. These are done rather like a botanical study and the flowers are very realistic.

A group of embroiderers from the UK have reproduced a fan screen consisting of five heavily embroidered panels, and extraordinary undertaking. In addition to these, all the Phase pieces and many of the practice pieces, stitched by students from Europe and the USA are included.

The highlights of the exhibition are the Kombuin Fukusa and the Hoitsu Scroll stitched by the professional embroiderers at Kurenai-kai in Japan. My favourite is the Scroll, which is in fact four scrolls, a faithful reproduction in silk embroidery of Hoitsu’s painted scrolls depicting the birds and flowers of the four seasons. The exquisite design must be credited to the artist, but the sublime embroidery adds another dimension to an already beautiful work of art. It is magnificent.

On Saturday evening I attended a get together meal for approximately 100 students, professional embroiderers and staff of JEC and Kurenai-kai. The Japanese ladies wore kimono and obi, so I have a few pictures of some of the embroidery I have been enjoying for the past few days. The pictures far from do justice to the workmanship of the embroiderers.


These elegant designs are worn by married ladies; only by a young, unmarried girl can wear a flamboyant obi like the one below.

Friday 9 November 2007

Japanese Embroidery World Exhibition

I am going to Cambridge for a few days. I shall be meeting up with friends from my Bournemouth classes and attending the Japanese Embroidery World Exhibition.

Members of Kurenai-Kai in Japan have reproduced thirty-one Kombuin Fukusa, these and other embroideries will be on display at the Kaetsu Centre until 18 November.

From Sunday to Tuesday I will be working on improving my embroidery skills at a class. Embroidery Bridge Between East and West is a special design created for the World Exhibition.

© JEC/Carol-Anne Conway

The design is work on white/gold kimono silk; the weft threads are alternately white silk and gold metallic. This will be the first time I have stitched on metallic fabric and I am more that a little apprehensive about it. Phase III was the minimum requirement for enrolling and I am currently on Phase III but to be truthful, I am not sure that my stitching skills are good enough yet. This is not me being modest, I know how many times I have to redo some bits and I am told that metallic backgrounds will not stand much reworking. However, it is a wonderful opportunity to meet new stitchers and to learn from the masters, and you have to push yourself sometimes.

© JEC/Carol-Anne Conway

I took particular care framing up, I did not want to damage the fabric before I began the class, nor could I put aside the thought of how much this small piece of fabric cost. When I told a colleague that these 15 inches of silk cost 81 pounds, she asked how I could justify spending that on material. I told her that I no longer justify spending money on my hobby – I work hard for my money; I pay my bills in full and on time; and I save something every month for embroidery so I can spend it without guilt. None-the-less, I am still terrified that I will damage it before the class!

Happy Stitching

Thursday 8 November 2007

Plimoth Sampler - Finished

So, here is the completed sampler. I was able to stitch each motif in an evening and thoroughly enjoyed all the stitches, especially those that I had never tried before. The sampler is now in the post on it’s way back to Plimoth Plantation.

If you haven’t already paid a visit to The Embroiderer’s Story, I recommend that you do and, if you are so inclined, order a sampler kit and support this amazing project. Half the cost of the kit goes directly to the project and all the completed samplers will be used as part of the Exhibition due to open next year.


On a completely different note, I received an email at the weekend to let me know that my first Comfort Doll has finally found her way to Pat Winter. I am so happy as I thought she had got lost.

While I am urging people to take part, this is another really worthy cause. I love making things and often don’t know what to do with them once they are finished, what better than to send it to someone who could do with a little comfort in their life. If you don’t have time to make a doll, visit the blog anyway and see some of the amazing dolls that have been donated.

Happy Stitching

Wednesday 7 November 2007

Plimoth Sampler - Knot Stitch

I found this the most challenging of the stitches on the sampler. Again, the instructions are very clear and I was able to follow how to do the stitch. The difficult part, for me, was getting the correct tension and maintaining an even twist in the thread. However, I enjoyed the stitched and really like the braided look of the line of stitches - Braid Stitch is an alternative name for Knot Stitch.


I would like to try this stitch in a firmer thread or even a metallic thread as I think they would make a nicely defined looping stitch.

Happy Stitching

Tuesday 6 November 2007

Plimoth Sampler - Ceylon Stitch

I am having so much fun with this sampler. All the filling stitches, are fairly new to me, but the instructions that come with the kit could not be more clear. Not only are they well written they also have both line drawings and photographs of each step.

This worm is first outlined with backstitch and then filled with Ceylon Stitch. It took me a while to sort out the tension but otherwise I found this stitch simple and very pleasing.


Happy Stitching

Sunday 4 November 2007

Plimoth Sampler - Detached Buttonhole Needlelace

I have done detached buttonhole before but never as needlelace.

Part of the outline is worked as back stitch, and part of the outline is a couched thread. After the detached buttonhole with reverse is completed, the couching stitches are removed so that part of the buttonhole 'fabric' is released from the background fabric.


Happy Stitching

Plimoth Sampler- Spiral Trellis


I thought that trellis stitch was fun, spiral trellis is even more fun! I have tried this stitch once before - on my first comfort doll. Then I had a few problems with tension because I did not 'drop' stitches. This time I paid a lot more attention to tension and I think the results are much better.

Happy Stitching

Thursday 1 November 2007

Plimoth Sampler

A blog that I am following with particular interest at the moment is The Embroiderer’s Story. The Plimoth Plantation is recreating a 17th-century Embroidered Jacket and the blog is chronicling their progress. The jacket is exquisite and the team are sharing incredible information regarding their research, the materials used, the history of the design and stitches, not to mention frequent bulletins on the actual embroidery. I can’t tell you how much I would like to go to one of their stitching sessions and work on this jacket.

As that seems unlikely to happen, I am doing the next best thing. Before you can join a stitching session you are required to stitch a sampler. These samplers are also available to those who cannot attend. Half the cost of the sampler goes towards the project and the sampler itself is returned to the Plantation to be used in the exhibition. The Jacket will be in a glass cabinet to protect it, but visitors will be allowed to handle the samplers so they can see the stitches up close.

I received my sampler about a month ago but only now have time to start it. So far I have worked two of the motifs.


The sample is worked on the same linen as the actual jacket except it is white where as the jacket is cream, and uses the same silks - soie perlee. I've never used this thread before. I like it a lot; it has a tight twist and lovely sheen. Not in the kit, unfortunately, is a sample of the 'sparkly' thread also used on the jacket. The best photo I can find of it is the photo of the fox gloves under 'nitty gritty', here. If I have understood this correctly, this thread has been specially commissioned for this project and is not currently available to the general public. I for one would like some of this thread in my stash, I hope that the manufacturers decide to release it for general sale.

The top motif has a reverse chain outline and the filling stitch is detached buttonhole with return. The ‘return’ is the straight stitch from the right to the left so that you always work the buttonhole stitched from left to right. I really enjoyed working the motif but found the small points at the top of the calyx difficult and don’t think that I joined them into the chain outline correctly.

The second motif has a back stitched outline and the filling stitch is trellis stitch. I have never worked this stitch before but found it relatively simple to do (although I am not certain that I worked the stitch at the end of each row correctly. I like the look of this stitch a little more than the detached buttonhole stitch.

Happy stitching

Tuesday 30 October 2007

Comfort Me Doll - Finished

I can’t tell you how much I enjoyed making this doll. I can see why everyone in the Beaded Journal Project is getting so much out of their monthly pages. I am itching to do more beaded embroidery and already have 2 projects floating about in my head.

I put her aside for a while to work on the fairy shoes but at the weekend I finally had time to finish her. Sorry she is on her side, sometimes the camera rotates my pics, sometimes it does not!


It is nearly a month since I posted my first comfort doll to Pam, but she has not arrived yet and I am getting a little worried about her. If she doesn't make it to Pam, I will have to accept that a higher force has a different destiny planned for my little doll. I just hope that she puts a smile on someone’s face. Another package that I sent overseas may also have gone astray. 2 months ago I sent some chenille needles and silk ribbons to India, they too are yet to arrive.

Happy Stitching

Monday 29 October 2007

Fairy Shoes - Finished

Thank you for your comments about my fairy shoes. Full credit for the original design goes to Annette Emms, and the examples she brought to the workshop were delightful. Sadly, I can find neither a website or a blog of her work. The best I could find is this back issue of Workshop on the Web from March 2005. As I don't subscribe to Workshop on the Web I can't access the page.

Last night I finished the second shoe. I will take them to the next Embroiderer's Guild meeting before sending them to their new owner. These were great fun and the possiblities are as limitless as your imagination.


Happy Stitching

Friday 26 October 2007

Fairy Shoes

Two weeks ago, I went to a workshop organised by the local branch of the Embroiderer’s Guild. I always thoroughly enjoy these days, of course for the new and fun things that I learn from the tutor and other attendees, but not least because I get to spend a whole day doing what I like best in the company of other stitchers.

In this workshop, led by Annette Emms, we made Fairy Shoes and it could not have been more fun. It always amazes me that, given the same starting point, everyone in the class produces something totally unique.


Before the class, the Bravery Fairy told me that she would like for me to make a pair of shoes for her to give to a little girl who has had a lot of hospital visits lately. I hope both the Bravery Fairy and the little girl like what I am making for them.


Happy Stitching

Wednesday 24 October 2007

Old Samplers and New Embroideries

I first met Sue on a Japanese Embroidery course and since then we have kept in touch by email/text as well as meeting up each year on the course. This weekend Sue came to visit and we went to see an exhibition. Every year by Witney Antiques and host a themed exhibition of their extensive collection of Samplers and Historic Embroideries. According to their catalogue they hold the largest stock of high quality antique needlework samplers in the UK along with an important collection of 17th and 18th century raised and silk work embroideries. Certainly the examples in the exhibition are extremely high quality and I could only marvel at the workmanship, especially when you consider that the embroiderers had none of today's advantages like prescription glasses or daylight bulbs. Many of these samplers were worked by very young girls and their workmanship is to be marvelled at. Sadly I cannot share any pictures with you, as they are copyright of Witney Antiques but you can get a taste of what they have on show here.

I've done hardly any stitching this week, my evenings have been spent spring cleaning the guest bedroom in preparation for Sue's visit. The room used to a be guest room but for the past year it was re-occupied by number one step-son and his girlfriend. Naturally, they wanted their own pictures on the walls but now that they have moved elsewhere and the room is cleaned, my embroidery can come out of storage and go back on the wall. For the first time my Phase I and Phase II Japanese Embroidery hang side by side on view.

© JEC/Carol-Anne Conway

On a side wall is a small embroidery called Tempus Fugit, my attempt at design. It was inspired by a sampler shown in the Embroiderer's Guild magazine, Stitch, Issue 5. Their sampler was stitched by Aethelwynn, a young girl in one of the Wessex convents in AD1000. I began mine as a millennium project but put it aside for a couple of years before before finally getting around to completing it.

Happy Stitching