Wednesday 17 August 2022

Bacton Marigold

Every week of the Tudor Embroidery course we had a lecture, some of which were related to one of the five samples we stitched. One such was a lecture on the Bacton Altar Cloth by members of the BAC Research Group.

The Bacton Altar Cloth is a heavily embroidered cloth of silk and silver that is believed to have possibly once belonged to Queen Elizabeth I. At some point in its life, it was cut and pieced to form a cover for a small table or alter, most likely after it was donated to the parish church of St. Faith, Bacton. Prior to 2015, when the BAC was removed from display, it was hung in a frame on the north wall of the church for 106 years. After extensive conservation, the embroidery went on display at Hampton Court Palace. The BAC Research Group were able to view and photograph the cloth in detail while the cloth was undergoing conservation and on display.

By studying their own images and examining contemporary printed sources, the group aim to independently categorize and interpret the motifs. In the lecture, they shared their observations, unanswered questions, and evolving understanding of the cloth. Members of the group have also attempted to recreate some of the botanical motifs. Our fourth sample was based on a marigold on the cloth.

The fabric for this sample is a gorgeous ribbed silk called faille. While I loved the fabric, it did cause me some problems later on. Once again, the design was transferred using the prick and pounce method.

For all outlines, I used a combination of two colours, two strands of each. I started with stem stitch, i.e., a ‘/’ diagonal stitch and intended to use this throughout but switched to a ‘\’ diagonal stitch when stitching the lefthand side of the petals.

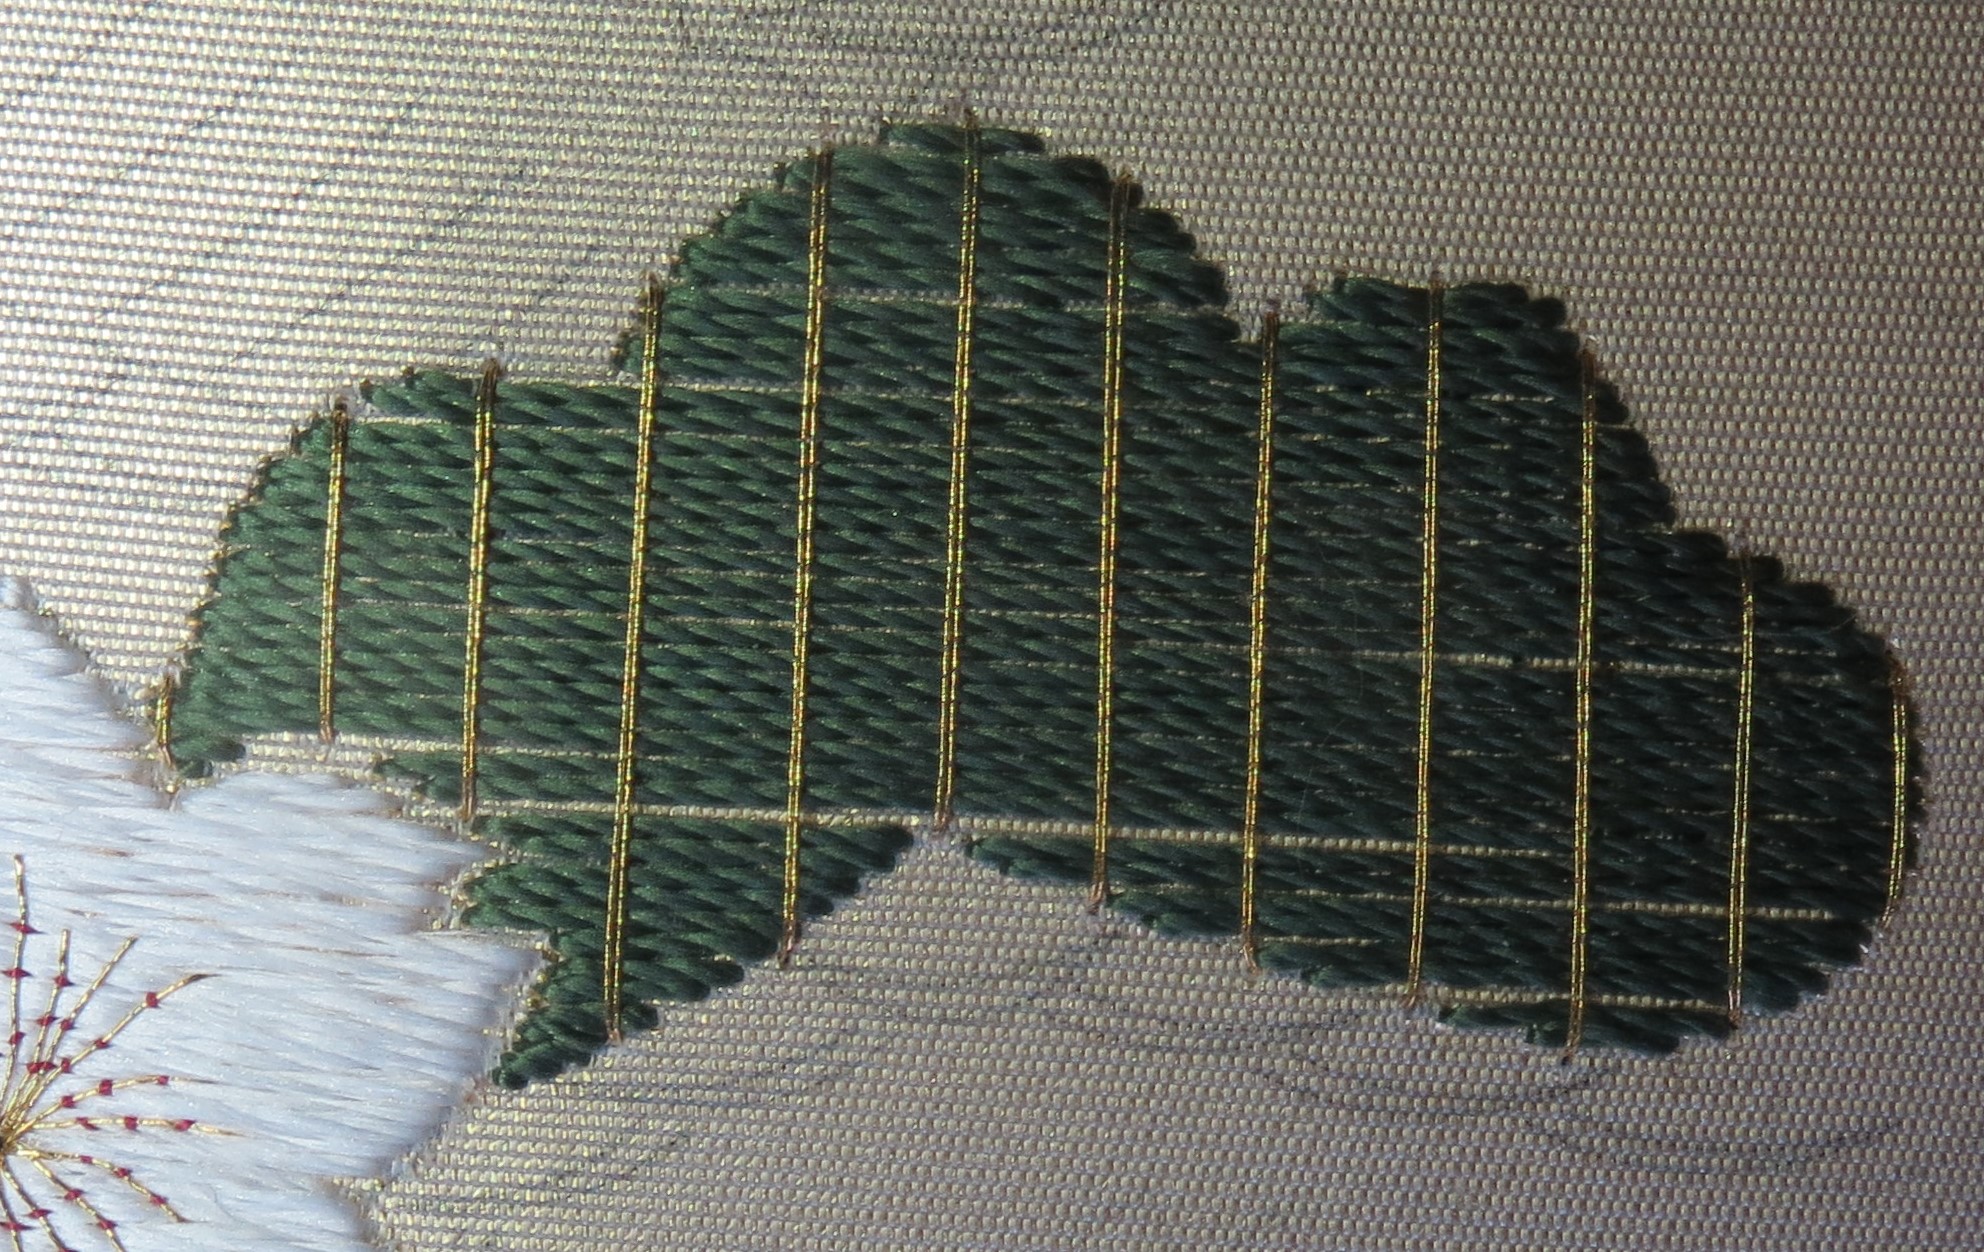
The stem, leaf, and flowers are filled with various seeding techniques.

For the stem, I used seed stitch with four strands of silk. I tried to keep the stitches as small and consistent in size with approximately a stitch size space between each. I tried to make placement and stitch direction random but found it difficult to ignore the obvious weft threads in the fabric. My ‘method’ for random seeding is to make one stitch in a space and then place six stitches around the first stitch in a vaguely hexagonal shape. For each pair of stitches in the hexagon, I place a third stitch to make a more or less equilateral triangle. I continue to make every pair of stitches into a triangle. I vary the angle of each stitch by angling them more or less towards the centre of the triangle. I use an additional filling stitch any time I think the spacing is increasing, or miss a stitch if I think they are becoming too close.
© Cynthia Jackson/Carol-Anne Conway

I used double seed stitch in the leaf, again four strands of silk. I stitched one stitch directly over the other. As this made each stitch slightly larger, I spaced the first slightly further apart than for the single seed stitches. I found this much more difficult to keep consistent than single seed stitch. If I do this again, I will try placing the second stitch at a slight angle to the first.
© Cynthia Jackson/Carol-Anne Conway

For the bud, I used seeded knots. I made a soft 'S' 4 -> 1 twist. Throughout, I have used a combination of two colours in the needle. For these twisted threads, I used 1 strand of each colour on each ply.
© Cynthia Jackson/Carol-Anne Conway

The calyx is also filled with seeded knots but here I twisted 2 ->1 using one ply of each colour. At first, I double-spaced the knots but I thought they were too far apart so I filled in a little.
© Cynthia Jackson/Carol-Anne Conway

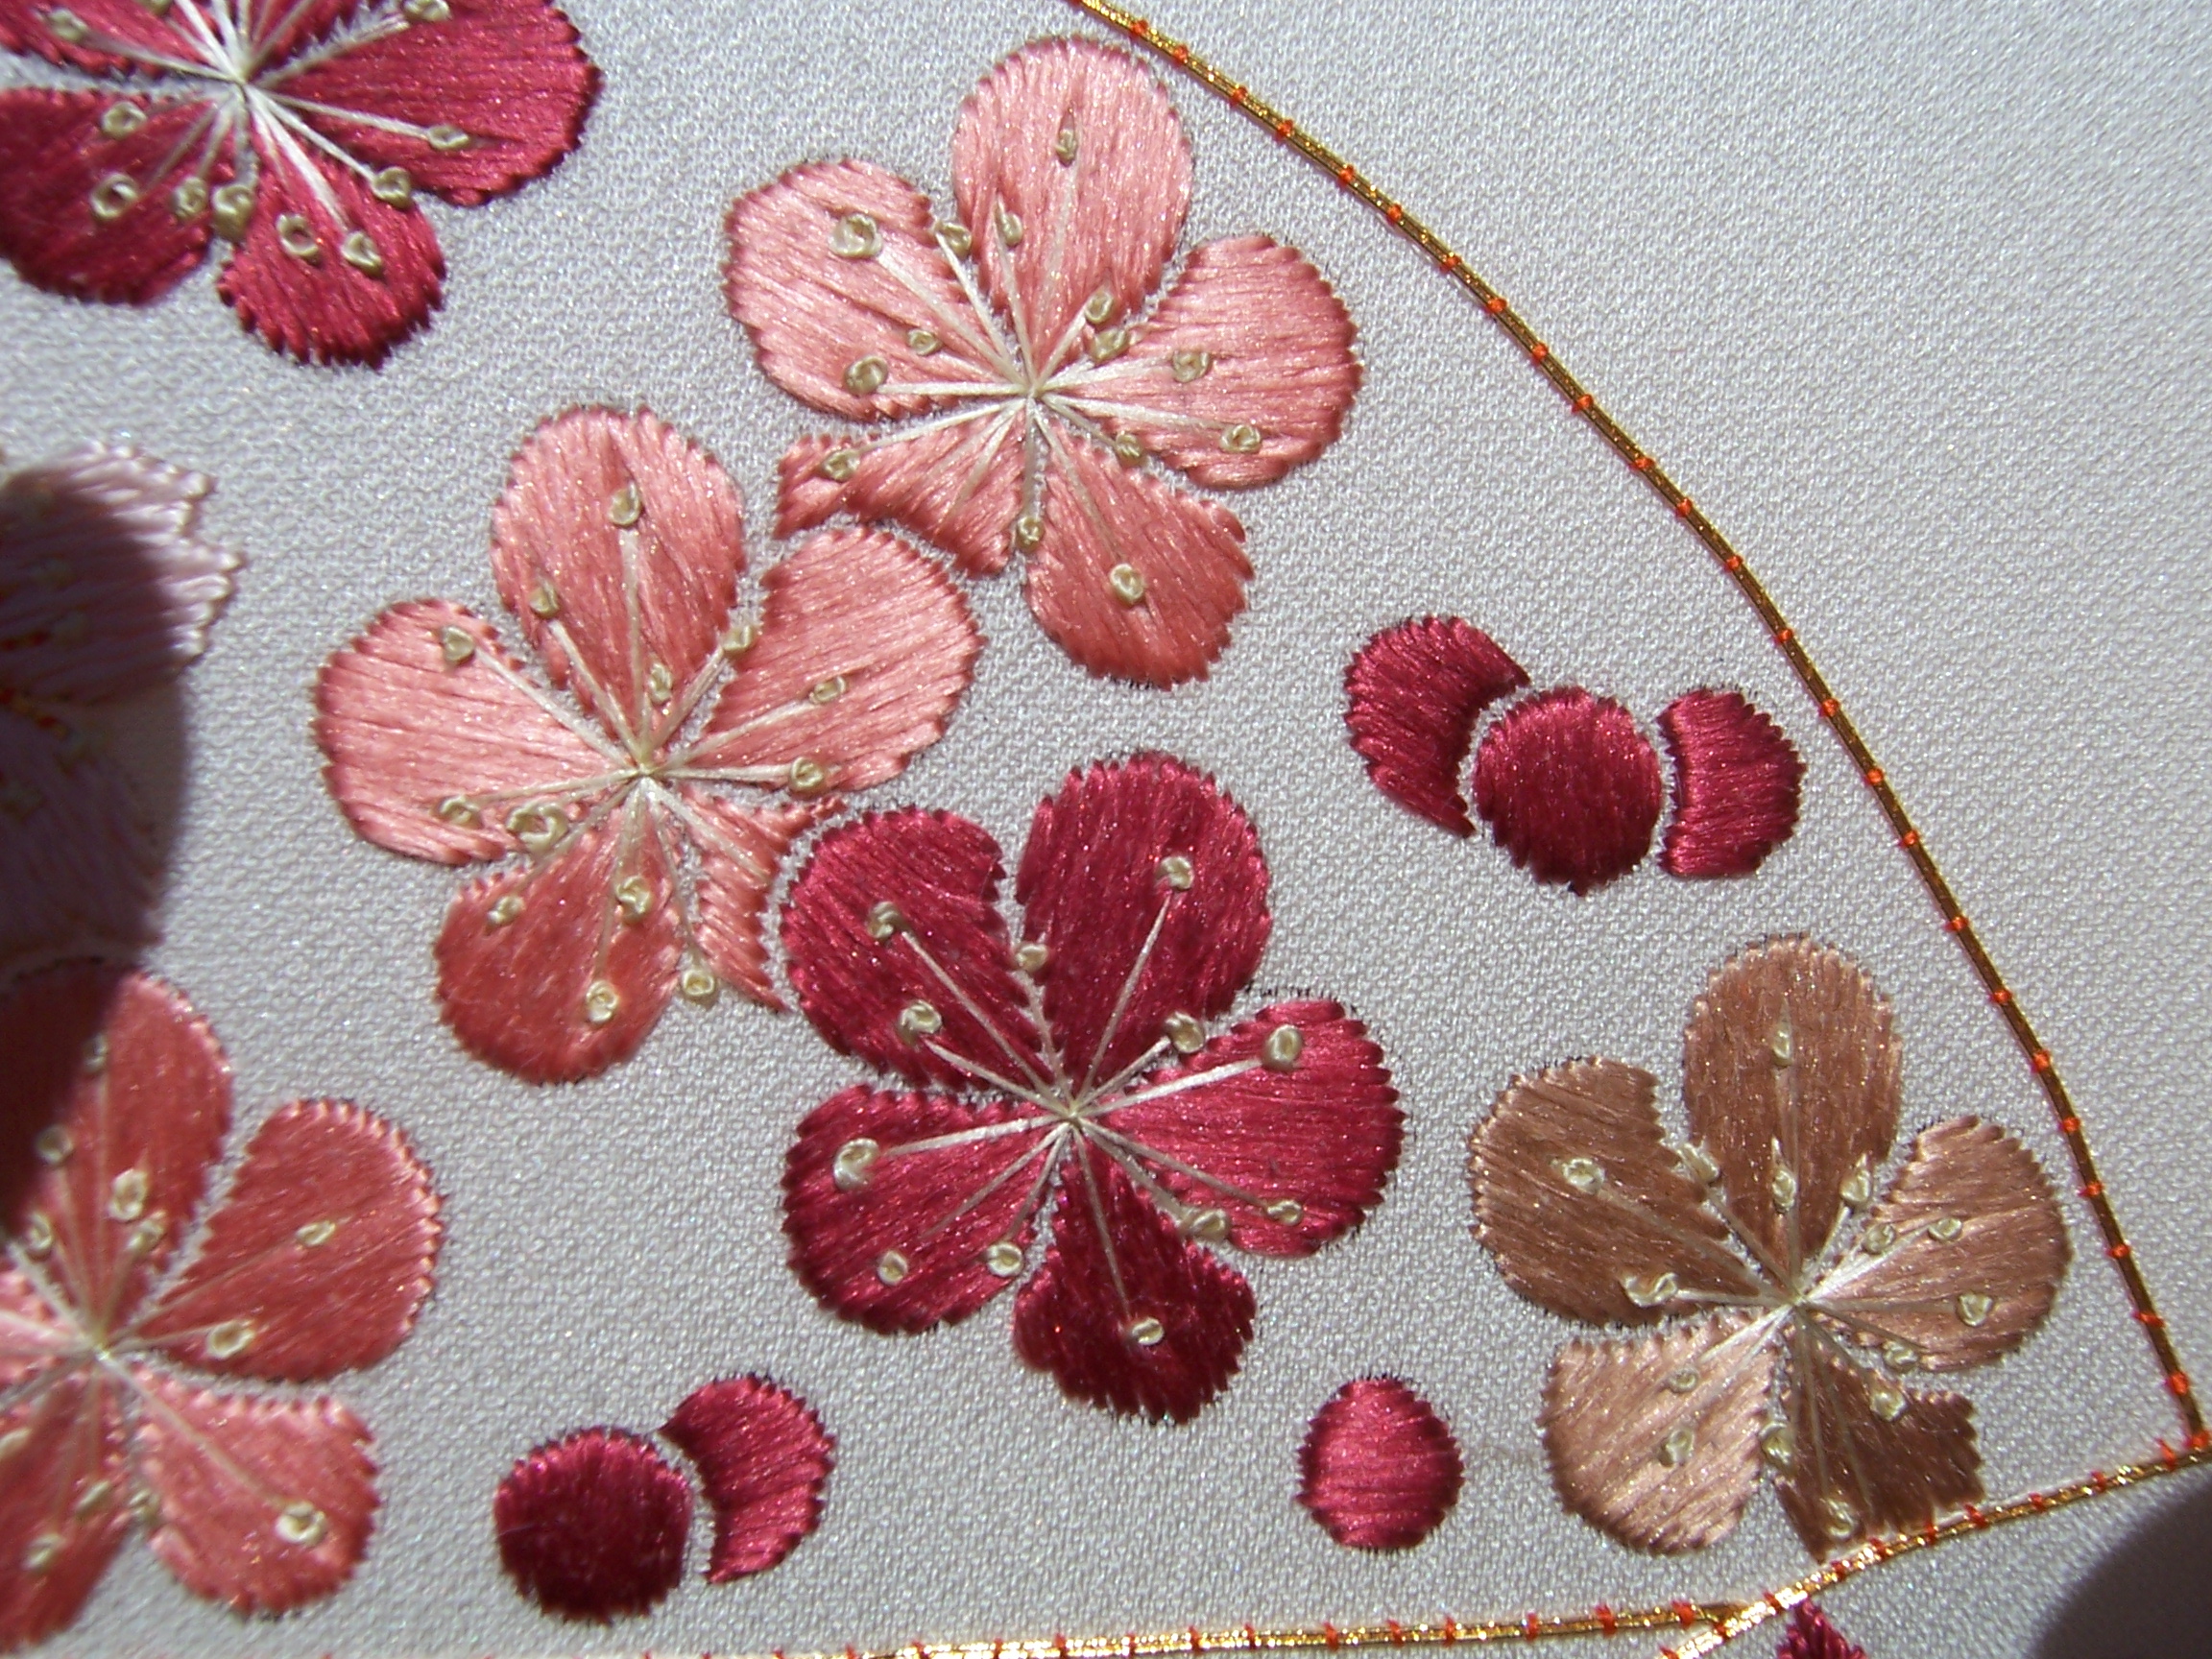
The petals of the flower are worked in single seed stitch, eight strands of silk, four of each colour. I hoped eight strands, closely seeded would give more saturated colour to the petals, which it has. I think the larger, fuller stitches also have more shine on the silk, which I like.
© Cynthia Jackson/Carol-Anne Conway

This was great fun to stitch! It was somewhat time-consuming but once I got into the rhythm of stitching randomly, it required less precision than something like satin stitch. I enjoyed doing the seeded knots and like how they look but they were even more time-consuming. I wanted to try different options and see how each looked. It is interesting to see the different textures and effects of each.

Happy Stitching

Wednesday 29 June 2022

Or Nué Beetle - part 1

During the pandemic, I took part in a few online courses. I kept finding myself on a course with some of the same people. Not surprising, really, as we have similar areas of interest. To share our progress with the course samples, some of which I have yet to do, and to stay in touch, we formed a Facebook group and meet once a month via Zoom. One member of the group had previously designed a stumpwork beetle and, over the course of a few months, had shared with us her design as a stitch-along. I did not intend to join in as I had lots of other things in progress but was enjoying seeing what the others were doing. One day I was looking at images of beetles online and came across an enamelled beetle brooch that caught my eye. I have not been able to find it again but the image stayed in my mind. When I completed one of my ongoing projects sooner than expected I decided to use one of the techniques I had learnt in one of the courses to make a stumpwork beetle somewhat like the enamelled brooch.

I used the template provided by Arlene for the basic wing shape but rather than embellishing organza wings with beads and gold threads, I planned to create my wings using or nué. I’ve known about this form of goldwork for some time and learned more about it in two of the online courses I did during lockdown but I have not yet stitched my samples for either workshop. The wings of the enamelled brooch, as I remember it, had brightly coloured flowers on a black background. Rather than draw a design I looked through my stash for a suitable piece of fabric and settled on one with a design of small summery flowers. Although I have a black metallic thread in my stash, I decided to use a silver passing thread for the base. I then selected a few silk threads that were close to the fabric and worked in harmony with each other. The threads I used are Devere’s 6 thread silk – some of those that I received in an Advent Calendar.

Wire is often used in stumpwork as the foundation for three-dimensional shapes such as leaves, petals, or wings. The wire is first tacked to the fabric around the outline of the shape. The entire wire is then covered with buttonhole stitches. If the shape is to be filled with needle lace, the buttonhole stitches are made around the wire without catching any of the base fabric so that the shape can be detached when complete. The fabric forms the base of my wings so the buttonhole stitches are used to attach the wire to it.

Or nué is a form of goldwork using couching where different coloured silk threads are stitched over the metallic base threads to form the design. Traditionally, the metallic threads are worked to and fro in straight lines although contemporary goldwork artists sometimes work the base threads in circles or more organic lines following the shape of their design (otherwise known as Italian shading). The metallic threads are often worked in pairs but, because the wings are small and the details quite fine, I worked with a single thread, to and fro.
© Carol-Anne Conway

At first, I attempted to replicate the printed design precisely but after a few rows, I realized that the base fabric did not show at all and focused instead on creating a pleasing design, adding stitches, for example, to make the leaves more pointed, or omitting them to create space between flowers.

It took rather less time to fill the wings than I expected and I was more pleased with the look of them than I imagined.

Happy Stitching

Sunday 15 May 2022

5 Diagonal layer: irregular shapes (naname-nuikiri: kiku)

For each of the three layer/foundation stitches that we have looked at so far, the orientation of the stitches has been unequivocally defined and, in each case, the stitches are all parallel to each other. For Diagonal layer (D) the orientation is determined by the motif being stitched and the stitches radiate slightly to accommodate the shape being filled. Exactly how this happens depends on whether the shape is regular (such as a cord) or irregular, such as chrysanthemum petals.

Chrysanthemums, both round petal and pointed petal, have cropped up in a few of my Phase pieces, beginning with Hanayama, and at each phase, I think I have learnt more about stitching diagonal layer on an irregular shape.
© JEC/Carol-Anne Conway

The first thing to consider is the direction in which the central line of the petal curves. The stitches are always laid in a clockwise direction, meaning that for some petals stitching begins at the tip of the petal and works towards the centre, while for others stitching begins at the centre and works outwards.

The first stitch lies along the outline of the shape in the right diagonal direction (top right to bottom left). The following stitches rotate gradually around the curve of the shape. A filler stitch can be used when needed to avoid leaving a gap at the outer edge but I have rarely found these necessary on gently curved shapes such as petals. A filler stitch is a stitch that does not extend the full width of the shape but should be at least two-thirds of the length of full stitches. The end of the filler stitch slightly tucks under the previous stitch and is further concealed by the following stitch so that it blends with the surrounding stitches.

Generally, the stitches should be at a consistent angle to the central axis of the shape and a slightly steeper angle is considered more elegant. On Hanayama, the chrysanthemums were possibly the motif I struggled with most and the stitching with which I was least satisfied. Looking at them now, I would say the main issue (if you completely ignore the utterly inconsistent one-point open space between the petals) is that the angle of the stitches is too shallow.

While there are no chrysanthemums on Suehiro, diagonal layer is used on one of the cords. This, however, is a regular shape and I will review that in a separate post.

The large chrysanthemum on Venerable Friends is a focal point of the design and I recall taking considerable care with it. There are still issues with the one-point open space but, because many of the petals are padded, these are not nearly as evident. What is evident is that I have, in most cases, angled the stitches more steeply so the curves are more elegant. The tips of some petals are a little square and all of them would benefit from a more evident “one-point outward” stitch at the tip.
© JEC/Carol-Anne Conway

I used diagonal layer on the Pink Lady, the butterfly that represents Mum on Flutterbies. I think the improvement in my stitching is evident but then a lot of love and care when into this entire piece.
© JEC/Carol-Anne Conway

Chrysanthemums feature heavily on Sake Boxes, affording me plenty of opportunities to practice diagonal layer. I was not terribly satisfied with the first few round petal mums that I stitched but I recall that I stitched these during a heatwave and that I found the silk more difficult to work with than usual. By the time I stitched the last of the mums, I felt that I had made significant progress. I particularly like how pointy most of the petals are.
© JEC/Carol-Anne Conway

© JEC/Carol-Anne Conway

On Kusudama, I have been focused on achieving and maintaining the correct twist but I have tried not to lose sight of all the other details that I have been working on, the one-point open space between the petals, the shape of the petals, and the angle of the stitches. While I still see room for improvement, it is good to see improvement over those on Hanayama.
© JEC/Carol-Anne Conway

Happy Stitching

Sunday 8 May 2022

Goldwork Rose

The third sample for the Introduction to Tudor Embroidery course was a goldwork rose worked directly onto black velvet. I had done many of the goldwork techniques used in this tutorial but not directly only velvet and that offered up a whole new level of challenging!

The supplies for this course included some black velvet but I substituted that for a firmer velvet that I had in my stash. Prick and pounce was again used to transfer the pattern, using yellow paint to connect the chalk dots.
© Cynthia Jackson/Carol-Anne Conway

First the stems and the outline of the rose were stitched with 1.5 twist which consists of three stands of gold twisted together. I have used similar thread before and have couched other the thread trying to “hide” the couching thread along the line of the twist. In this tutorial we were taught to open the twist by untwisting it slightly so we could stitch through the thread The tutor described this technique as “a little tedious”. I did not find it so but it took me several stitches to find a rhythm and the optimum place to go through the thread so that the couching stitch was not visible when the thread was retwisted to its original state. As a method for applying a twisted thread I think it is preferable to couching over the thread. Once I had found that rhythm, the process went quite quickly.
© Cynthia Jackson/Carol-Anne Conway

The leaves, bud, and inner rose were first outlined in #3 passing thread. #2 passing thread was then couched in a zigzag formation across the outline of the leaves, mimicking the serrated edge of a rose leaf. Smooth passing was used to represent the veins of the leaves. The smooth passing was also used to fill the sepals and the spiraling part of the stem.

The outer petals of the rose and the bud are done in #10 check over linen string padding. I believe this technique is now knows as cutwork and I think it is one of the more difficult goldwork techniques to accomplish. Each piece of check must be cut to the exact length for its position and then applied so that it lies neatly beside the neighbouring pieces. In most cases, these stitches should be perfectly parallel but in some cases, like the bud, you can rotate the stitches gradually to follow the shape and finish with a nice angle at the tip. Both scenarios are, I find, difficult to perfect. I have always found it difficult to cut purls to the precise length required and when they are slightly longer than required, cutting a tiny amount from the end is neigh on impossible, at least it was before I saw how the tutor did it. Using her method, which it to cut into the purl rather than across it, I was able not only to adjust the length more precisely but also to remove the snagged ends that sometimes are left when you make your initial cut.

The calyx is filled with chips of #10 check and the central rose is finished with a spangle and radiating stitches in 9drm tambour.
© Cynthia Jackson/Carol-Anne Conway

Seeing the needle against black fabric is always problematic and much more so on velvet. Also, stitches seem to shift on velvet making it much more difficult to position your stitches precisely! However, it is worth it as the effect of gold work on black velvet is difficult to surpass. I would dearly like a black velvet jacket with goldwork on it, perhaps down the front facings. That is another “wish” project to go on my long list.

Happy Stitching

Wednesday 27 April 2022

30 Woven effect (mushiro-nui)

There are a small number of techniques that come under the heading of Novel Effects. They are three distinctly different techniques. The first of these that I learnt is one that I enjoy very much. I first encountered woven effect (Nw) on Phase III, Venerable Friends, and have used it a couple of times since. It is fun to stitch and produces and interesting effect that I have not seen in any other form of embroidery.

The effect is created in several stages. The first step is similar to creating a weft foundation, two stitches are made across the width of the motif in the weft direction, then a space is left, the width of one stitch. This sequence is repeated, stitch two, miss one, until the entire motif is filled.
© JEC/Carol-Anne Conway

The second step is to stitch lines perpendicular to the foundation at 5 mm intervals. To prevent these stitches from moving they are couched, at approximately, 1cm intervals, in the open spaces. It is not necessary to couch into every open space but the couching stitches should be staggered so that there will be some couching stitches in each of the open spaces.
© JEC/Carol-Anne Conway

The open spaces can then be filled using the same thread as for the first step. Finally, the filling stitches are couched half way between each of the perpendicular stitches made in step two.
© JEC/Carol-Anne Conway

The text book suggests that the weft layer stitches should be a fairly thick tight twist thread, e.g., 4->1 but the pine on Kusudama is first time that I have worked this technique in twisted silk. On Venerable Friends flat silk was used to great effect.
© JEC/Carol-Anne Conway

Woven effect is used again on Phase IV, Karahana, this time using twisted gold for the weft layer.
© JEC/Carol-Anne Conway

On the Flower Circle, I stitched a variation based on something I had seen in an exhibition of Japanese Embroidery. When I stitched the foundation I stitched two and missed two so the “weave” was more even. Instead of laying perpendicular stitches across the first layer, I couched both layers of weft stitches in a brick formation.
© Shizuka Kusano/Carol-Anne Conway

Happy Stitching

Sunday 24 April 2022

Cutwork - Berkeley Grape Vine

The second sample we stitched for the Introduction to Tudor Embroidery course was based on a hanging from Berkeley Castle, now held at the V&A museum (T.90-1926). The V&A describe the hanging as “appliqué velvet on wool”, probably English, late 16th century. Appliqué, or cutwork as it was known in Tudor England, can be defined as “Motifs cut from fabric and applied to a ground with embroidery; they might be padded and couched for a three-dimensional effect.” (Tudor Textiles, Eleri Lynn, Glossary, p.165) Cutwork was often used to embellish large textiles such as hangings.

The Berkley Hanging consists of two repeating designs cut from black velvet and applied to red woollen cloth and embellished with couched (gold?) cord embroidery. Our sample, based on the central grape vine, was cut from red velvet, applied to white wool felt and embellished with gold silk cords which we made in two thicknesses from AVAS soie d’alger.

The design was transferred onto the felt using the prick and pounce method. The templates for the cutwork elements were flipped and transferred to the back of the velvet. The cut velvet shapes where then applied to the wool with small stab stitches around the perimeter.
© Cynthia Jackson/Carol-Anne Conway

The silk cord was couched first along each edge of the central strip and then a continuous length of cord was stitched along the vine and tendrils, and around the grapes and leaves, doubling up when necessary, e.g. for the tendrils and stems. The finer cord was used to add details to the leaves and grapes and a scattering of French knots.
© Cynthia Jackson/Carol-Anne Conway

This was another fun piece to stitch and looks rather striking. It gives a feels for how sumptuous the originally hanging would have been. The wool felt (doeskin) for this project was extremely nice. The velvet was quite light weight (I believe it was not what the designer originally selected but supply issues forced an alternative) but that did not matter once it was attached to the felt. It worked up reasonably quickly and it is a technique I would use again if the right project presented itself.

Happy Stitching

Friday 22 April 2022

3 Vertical layer (tate-nuikiri)

The vertical layer (V) is aligned with the vertical axis of the motif. It is typically worked on smaller motifs, such as the petals of cherry or plum blossom and therefore does not require any form of holding. Stitches are worked from the middle of the motif to the right, then from the first stitch to the left. All stitches are parallel to the centre stitch.

As each petal is orientated in a different direction, so is the direction of stitches. Because of the reflective qualities of flat silk, a mass of blossoms stitched in a single colour can look very effective.

I thought that I had stitched vertical layer many times but when I came to review my progress I was surprised that it is present on only on my first three phase pieces.

When I first wrote about Phase I, Hanayama I said that the design introduces some of the basic techniques of Japanese embroidery, including laying weft and horizontal foundations. In fact it covers each of the layer stitches. Vertical layer is used on both the cherries and plum blossoms. With both flowers, it is important to stitch the petals in the right order, a sequence we refer to as head, hands, feet. One petal is slightly larger or more prominent than the others. This is the head irrespective of orientation of the flower and is always stitched first. The two petals either side of the head are the hands and are stitched next. The two remaining petals are the feet, they are stitched last, if one petal overlaps another, that petal is stitched before the one below.
© JEC/Carol-Anne Conway

Cherries and Plums appear again on my Phase II, Suehiro. At the time, I wrote that, comparing them to their counterparts on Hanayama, I could see improvement and I recall that I really enjoyed stitching this piece. I can see, however, that I had far from mastered the technique of one point open space that should leave a small gap between petals or along the vein of the maple leaves.

© JEC/Carol-Anne Conway

I can see that I was still struggling with the one point open space when I stitched Venerable Friends at Phase III but also that the stitches of my vertical layer on the plum blossoms are parallel to each other. Small improvement at every phase is what we aim for.
© JEC/Carol-Anne Conway

Happy stitching

Tuesday 12 April 2022

Strawberry Cheesecake

Fortnum and Mason have been running a competition to create a Platinum Pudding in celebration of the Queen’s Platinum Jubilee. While we have some very fine bakers among our membership, at Textiles in Oxford we chose to celebrate our silk with a needle by creating stitched cakes and deserts. I, like others, decided to use only ingredients that I had in my store cupboard.

I had a hunt around my sewing room and found both inspiration and the supplies to make my dream dessert. The Epoisses had long since been consumed (and enjoyed) but I had kept the box thinking I’d find a use for it one day and since cheesecake is a firm favourite in this household, that is what I decided to make.

© Carol-Anne Conway

I would have liked to make a strawberry cheesecake but strawberries were not in season when I started so I decided to make a vanilla cheese cake and grow a few strawberries at home to decorate it. My strawberries are heritage varieties, the likes of which Queen Elizabeth I might have enjoyed.
© Carol-Anne Conway

© Carol-Anne Conway

© Carol-Anne Conway

© Carol-Anne Conway

© Carol-Anne Conway

© Carol-Anne Conway

With no recipe, it was a little bit experimental. The vanilla filling curdled slightly but the strawberries are delicious, even if I say so myself.

Happy Stitching

Friday 8 April 2022

Ecclesiastical Flower Motif

In my Golden Compass post, I mentioned that I had taken part in an amazing online class with Cynthia Jackson. It was in fact much more than a class; it was a ten week, in-depth study of Tudor Embroidery with course notes, weekly zoom lectures, and supplies to create a sampler of the embroidery techniques studied. The sampler consists of five panels, each based on extant textiles and/or influences following the development of embroidery during the Tudor period.

In the first lecture we learnt about powdering and saw many, mainly ecclesiastical, examples. Powdering is a medieval term for the scattering of motifs across a cloth or other surface. For ecclesiastical robes and other textiles, the motif might first be stitched on linen then cut out as a slip and applied to the ground fabric. The inspiration for these motifs often came from a pattern book featuring stylized pictures of trees, plants, and animals including fantastical beasts.

The design for our first sample was based on this stylized flower taken from The Tudor Pattern Book in the Bodleian Library. We transferred the design onto the linen using the “prick and pounce” method.
© Cynthia Jackson/Carol-Anne Conway

We used Devere 6-fold for the satin stitch and split stitch areas. 6-fold (or suga) is a smooth and lustrous low twist filament silk. We used two strands which is equivalent to one strand of JEC flat silk or a single strand of DMC. Being low twist, it is less unruly than flat silk and is delightful to work with. I especially like using it for split stitch and stem/outline stitch. The satin stitch areas are really shiny, which is what you want from a silk satin stitch but I found the slight twist prevented the silk from spreading the way flat silk does and, therefore, does not give quite as smooth a finish. None-the-less, I think it is a very nice embroidery thread.
© Cynthia Jackson/Carol-Anne Conway

I made a couple minor changes; I swapped the suggested blue at the top of the flower for red and selected a different diaper pattern for the couched gold in the central panel. The final step on the linen was to outline everything by couching several strands of the silk around each area.
© Cynthia Jackson/Carol-Anne Conway

Before cutting out the completed embroidery, glue was applied to the back of the stitched area and allowed to dry thoroughly. The slip was then applied to the velvet ground with small stab stitches (I laugh at how easy that sounds, knowing how difficult it actually is). A further bundle of silk threads is then couched around the outline before stitch the gold details directly onto the velvet.
© Cynthia Jackson/Carol-Anne Conway

This was a fun piece to stitch and I am pleased it, especially the diaper pattern couched gold, but I don’t think it is a technique that I will do often.

Happy Stitching

Tuesday 5 April 2022

Pomegranate and Grapes

Autumn is the last but by no means the least of the Casket Keepsakes. As with each of the kits, there are two elements and each is a needlework accessory: a Pomegranate Thread Winder Keeper and a Bunch of Grapes Scissor Keeper. Both are exquisite!

The supplies for this kit are every bit as lovely and thoughtfully prepared as the previous kits. Very little preparation is required before you can get on with the important stuff – stitching!

Pomegranate Thread Winder Keeper

I have a growing fondness for the Casket Keepsakes that are pouches cunningly disguised as something else. My interest in them began with the Frog Purse in the Ashmolean Museum that I saw on a study day, several years ago, and a yen to reproduce it but little idea of how to go about it. In each of the seasonal kits, one of the accessories is a pouch, each constructed in a slightly different way and I have loved making them all. In the Autumn kit the pouch is disguised as a Pomegranate. The embroidery on this piece is probably the simplest but it is no less charming for that. The front consists of three pieces with the two side pieces folded back to show the mother of pearl sequin and bead pomegranate seeds. The gathered top of the pink silk pouch sticks out above the top of the embroidered front and back and looks absolutely like the top of a pomegranate.
© Amy Mitten/Carol-Anne Conway

Grape Scissor Keeper

When every piece is gorgeous, it doesn’t seem right to have a favourite but I am just going to say it, this piece is my favourite! Each of the grapes is stitched in a different technique and several different threads are used to create them. They are so much fun! The same techniques are used on the front and back of the scissor case, except that the grapes on the back are stitched flat and those on the front are stitched over felted balls so they are very dimensional! The leaf is made separately and attached over the top of the grapes.

The construction of the scissor case is the simplest of all of the accessories. The front and back are laced together leaving an opening at the top for the scissors. One of the grapes on the front contains a secret something to prevent the scissors falling out.
© Amy Mitten/Carol-Anne Conway

Although this is the last of the Four Seasons Casket Keepsakes, Amy has released other Casket Keepsakes which I predict will be every bit as fun to stitch and make as these were. I

Happy Stitching

Friday 25 March 2022

9 Short-Stitch Holding (kiri-osae)

The most challenging holding stitch (for me) is short-stitch holding (Hs). This technique can be used on either a twisted or a flat foundation. The holding stitches can be in the same colour as the foundation to blend in, or in a different colour to create a delicate contrast.

Short stitch holding is covered in detail at Phase VI. I choose to stitch Loving Couple which includes a variety of short stitch holding techniques.
© JEC/Carol-Anne Conway

Despite the challenges, I absolutely loved stitching “The Ducks”. Here the short-stitch holding is mostly used for effect; to create subtle shading or suggest the iridescence of the feathers. More often short-stitch holding is used to secure foundation stitches where there is no other stitching on top. As a rule of thumb any area more than 1cm long requires holding.

Certain types of leaves consist of either a weft or horizontal foundation with veins stitch on top of the foundation. In some cases the stitched veins with be sufficient to secure the entire foundation. In others, for example where only the central vein is stitched, some additional holding may be required. The vein is stitched first and short-stitch holding is applied only in the sections where the unheld foundation stitches are more than 1cm long.
© JEC/Carol-Anne Conway

In this case the holding stitches should blend, as much as possible, with the background. On a flat foundation, 0.5 flat silk in the same colour as the foundation is used.
© JEC/Carol-Anne Conway

On a twisted foundation a 2->1 twisted thread is used.
© JEC/Carol-Anne Conway

Happy stitching