Tuesday, 28 December 2021

On the Thrid Day of Christmas, Embroidery Gave to me ...

An Embroidery Bridge Between East and West

The last time I mentioned Bridge BEW was in January 2013 and the last time it was seen, either on my blog or on my frame, was March 2011. This piece had in progress since November 2007, longer than any other of my Japanese embroideries. After I completed Queen of Flowers, that last of the nine Phase pieces, I was keen to complete some of the other pieces in hibernation, not least this one.
© JEC/Carol-Anne Conway

The last piece of stitching I had done back in 2011 was on the ribbon holding the string of balls. The ribbon is outlined with staggered diagonal stitches, a stitch that is easy to execute but one that I have found difficult to master. One problem, I think, is that I have always thought of this stitch as being the same as stem stitch where the needle enters the fabric and emerges from it on the design line. This gives a narrow line in which the stitches appear to twist around each other. Staggered diagonal stitches appear more as straight stitches especially when worked in flat silk. Staggered diagonal stitches are used extensively in the Phoenix and Pine. During the advanced class at High Leigh, Arata-san offered advice and demonstrated this stitch to me. Under his tutelage, I became more confident with this technique and I think my stitching improved. I need to practice it much more to make the length and angle of my stitches consistent. When I return to the Phoenix, I will get plenty of practice.
© JEC/Carol-Anne Conway

The space within the ribbons is filled with straight stitches using a boroyori thread. This is made with an uneven quantity of thread in each ply resulting in a bumpy, irregular thread. My first attempt on this design and, indeed, all previous attempts at using this thread, have been disappointing. The bumps tended to flatten out and leave only a scruffy, rather than interesting, finish. Towards the end of the Phoenix class, Arata-san demonstrated how to make boroyori and some of the other twist variations and gave some advice on stitching with boroyori which is the only twist, other than the basic twist, that can be stitched with. The key advice was to use a bigger needle. Originally, the largest needle I possessed was a size 10. I have subsequently added a size 11 and a size 12 to my needle felt. As the kimono silk that Bridge BEW is on is quite forgiving, I used size 12 this time and, finally, my boroyori looks the same stitched as it did when first made.
© JEC/Carol-Anne Conway

The remainder of the design was relatively simple, the brackets from which the ribbons and balls are suspended are couched twisted gold and silver. The vase is horizontal foundation and fuzzy effect in a stunning blue with couched gold details.
© JEC/Carol-Anne Conway

This entire design was a highly enjoyable stitch. It was my first introduction to some techniques, including a few that differed slightly from the basic techniques taught in the curriculum.

Happy Stitching

Monday, 27 December 2021

On the Second Day of Christmas, Embroidery Gave to me ...

Two Winter Warmers

I have collected a number of kits by Amy Mitten. Amy was first brought to my attention through an online course that I was doing called “The Cabinet of Curiosities” . During that time, there was a competition called a “Mirror to My Art”. Amy’s winning entry, a Mermaid Mirror consisted not only of a mirror but and entire etui! The design is reminiscent of the C17 Stuart caskets and mirrored panels that I was learning about on the course and won not only the competition but also the hearts of everyone who saw it. Shortly after this Amy started to release a series of embroidery kits called Caskets Keepsakes based on the toys and keepsakes sometimes found in the embroidered caskets. The first in the series, but not the first that I stitched, was Winter, a set of two needlework accessories fashioned into miniature bellows.

We are blessed with a number of extremely talented needlework designers who are creating some inspired, well thought out, creative embroidery kits. Amy is one of them. Each kits contains all the materials you need (in generous amounts) starting with the design printed onto the fabric when appropriate and very detailed instructions. In Amy’s case the instructions are online but come with a PDFs that you can print out, if required.

For Winter, there is a minimal amount of preparatory work: pressing the muslin backing fabric and the preprinted silk fabric; reinforcing the eyelets with fusible fabric; basting the silk and backing fabric around each of the six design areas; cutting them apart and mounting the first piece into an embroidery ring. There is a similar amount of preparation for the silk fabric that will form the “pouch” on one pair of bellows.

One pair of bellow is pin/needle keep; the front is embellished with a fire that is stitched with a selection of Amy’s hand dyed threads and antique metallics with the flames outlined in silk wrapped purl.
© Amy Mitten/Carol-Anne Conway

The other side of this ornament is embellished with a flaming heart. The heart is padded with wool felt then embroidered with layers of stitching beginning with a satin stitched foundation. The next layer of stitches form horizontal bars over which detached buttonhole stitches are worked in gold metallic thread. The flames and rays of light surrounding the heart are also worked in gold metallic.
© Amy Mitten/Carol-Anne Conway

Both the front and back are finished with an edging of looped gold metallic.

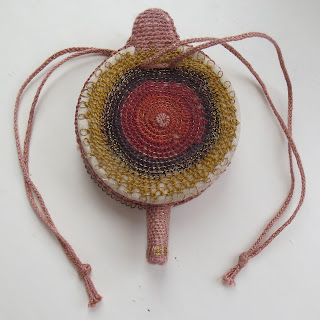
The second pair of bellows are a winder keeper. The front is decorated with a radiating circular design that is worked on a paper template covered with sticky backed plastic. The circles are stitched in detached buttonhole over a gold metallic bar, the gold metallic is first stitched around the perimeter of the circle in small loops. The working thread changes every few rows to create the radiating effect. When complete, the disc of embroidery is removed from the template and appliqued onto the prepared silk front.
© Amy Mitten/Carol-Anne Conway

The other side of this piece is decorated with a spoked circle. The spiraling bar of gold metallic is couched directly onto the prepared silk ground with long diagonal couching stitches. Again, the couching thread changes every few rounds to create a radiating effect. The outer edge of the circle is finished with the same looped metallic thread used on the pin keeper.
© Amy Mitten/Carol-Anne Conway

Half the fun of these keepsakes is finishing them and the instructions for how to do this are as detailed as the embroidery instructions. The nozzle for the winder keeper is made from a silk covered straw. The silk pouch is gathered and secured to the nozzle and the two finished sides of the bellows which are then joined at the base with lacing stitches either side of the nozzle. The pouch is closed with two handmade finger looped braids threaded through the eyelets of the pouch and front and back of the bellows. Most of the Casket Keepsakes feature finger loop braiding but that deserves a post all of its own!

The vial within the needle/pin keep is also made from a straw that is inserted into the bellows that are made from foam core and is sandwiched between the embellished front and back made earlier. The two pieces are laced together using button hole stitches that are covered with a silk ribbon. A second layer of button hole stitches are then worked over the ribbon. The finishing touches are a few pearl head pins inserted through the ribbon edge into the foam core and a supplied wooden spindle to close the needle vial.

Happy stitching.

Sunday, 26 December 2021

On the First Day of Christmas, Embroidery Gave to me ...

A Phoenix in a Pine tree

This project predates the pandemic and is a work in progress in hibernation but it is one that I would dearly like to get back to soon. The White Phoenix first appeared on the cover of Nuido, Summer 2016. It is an embroidered version of Old Pine and White Phoenix by Ito Jakucho (1716 - 1800) and forms a pair with The White Peacock that appeared on the cover of Nuido, Spring 2015.

I totally fell in love with both designs, so was delighted that the design was taught as an Advanced Class at High Leigh Conference Centre, Hoddesdon, in August 2017. I purchased both the Phoenix and Peacock at the same time to ensure that I had both on the same fabric which is nishjin, special gold. Special gold, in this case, means that the fabric is overdyed. I choose not to have the design printed in colour (giving you the option of not embroidering some elements) or the optional gold leaf.
© JEC/Carol-Anne Conway

High Leigh was originally built in 1853 bought by banker Christian Robert Barclay in 1871. Its beautiful Victorian façade, its largely preserved period interiors, and its beautiful grounds could be the setting for a costume drama. It has been extended and converted into a versatile conference centre with on site accommodation and catering.

The Phoenix is a challenging design both in its size and the variety of techniques employed. While most of the stitches are ones with which I was already familiar, on this piece they are combined in new and interesting ways.
© JEC/Carol-Anne Conway

This was my first opportunity to learn directly from Arata Tamura-sensia and a great opportunity for me to focus on some of my weaker skills and redress some of the poor habits that I have developed. We began each day with a lecture either related to Ito Jakucho and his painting, or to Nuido, the Way of Embroidery. Throughout the day there were demonstrations of the specific techniques applied to each part of the design followed by stitching time when we could put into practice what had been learned.

It was an intensive week but, as is often the case, I did not seem to achieve much stitching. What I did achieve, I think, was some of my best stitch to that point. I had one or two a-ha moments when I grasped something more fully than ever before. I came away energized and with a renewed passion for Japanese Embroidery. I continued to stitch on the Phoenix for sometime after returning home and made reasonable progress but it is a huge piece and my stitching time was limited. We had visitors in the following summer that required me to clear my sewing room so that it could be used as a guest room. When they departed, I was strongly tempted to carry on with the Phoenix but decided instead to try to make head way with Sake Boxes which, I am pleased to say, I did. I think the course and my enjoyment of stitching the Phoenix facilitated that.
© JEC/Carol-Anne Conway

At some point, I plan to write more detailed posts about the parts that I have worked on and record the techniques that I have been enjoying.

Happy Stitching.

Saturday, 25 December 2021

The Twelve Days of Christmas

My blog has been somewhat neglected recently, in fact, I have not posted for over a year. In the past, I was not posting often because I was not doing much embroidery for one reason or another. For the last (nearly) two years, I have not been blogging because I have spent all of my free time stitching. Since the pandemic began, I have been working from home and, of course, rarely going out. I stitch most evenings and weekends and have worked my way through several projects.

Over the years, my blog has proved a valuable resource for me and I regret that I have not kept it up to date. Over the Christmas break, I would like to write up some of the projects that have fallen through the net. I will be writing one post for each project rather than detailed posts covering every step. Many of the projects are already finished; a few are started and hibernating until I can I have more time to progress them.

For the Twelve Days of Chirstmas, I will be reminding myself of some what embroidery has given to me over the past two years.
© Golden Hinde Embroidery/Carol-Anne Conway

Happy Stitching

Saturday, 10 October 2020

Queen of Flowers - Finished

From the first time I saw an example of Fuzzy Effect it intrigued me and I was eager to stitch this phase. The technique did not intimidate me in the way some others have but I think it is deceptively difficult. The skill is not so much in executing the stitch as in selecting and blending the threads to give a harmonious effect.

On some of the leaves, I thought I might have been too subtle in my choices.
© JEC/Carol-Anne Conway

While on others, I wondered if the colour changes were too sudden and whether I could have blended the colours more.
© JEC/Carol-Anne Conway

I enjoyed experimenting with different aspects of this technique on the flowers. Working the bud in a single colour and using only the thickness of the thread to suggest the shape.
© JEC/Carol-Anne Conway

The smaller bloom on the left is stitched in every valley whereas the rest of the design is stitched in every other valley.
© JEC/Carol-Anne Conway

The larger bloom relies more on colour than thread thickness to create the shadows.
© JEC/Carol-Anne Conway

It is always important to step away from your work and view it at a ‘normal’ distance. With this piece it was vital. Those leaves, that I had thought might be too contrasty look completely different when viewing the whole picture.

I took especial care to ensure that I was working in the same valley as I moved from one element to the next. This may not be evident at a distance but it pleases me to know that I have that continuity throughout.
© JEC/Carol-Anne Conway

I really enjoyed working on this piece and I am pleased with the finished piece. I am even more pleased that I have now completed all nine phase pieces and can progress to my graduation phase.

Happy stitching

Friday, 25 September 2020

Queen of Flowers - Pollen

With the bud and last remaining leaves stitched, I had just a few finishing details to stitch.

© JEC/Carol-Anne Conway

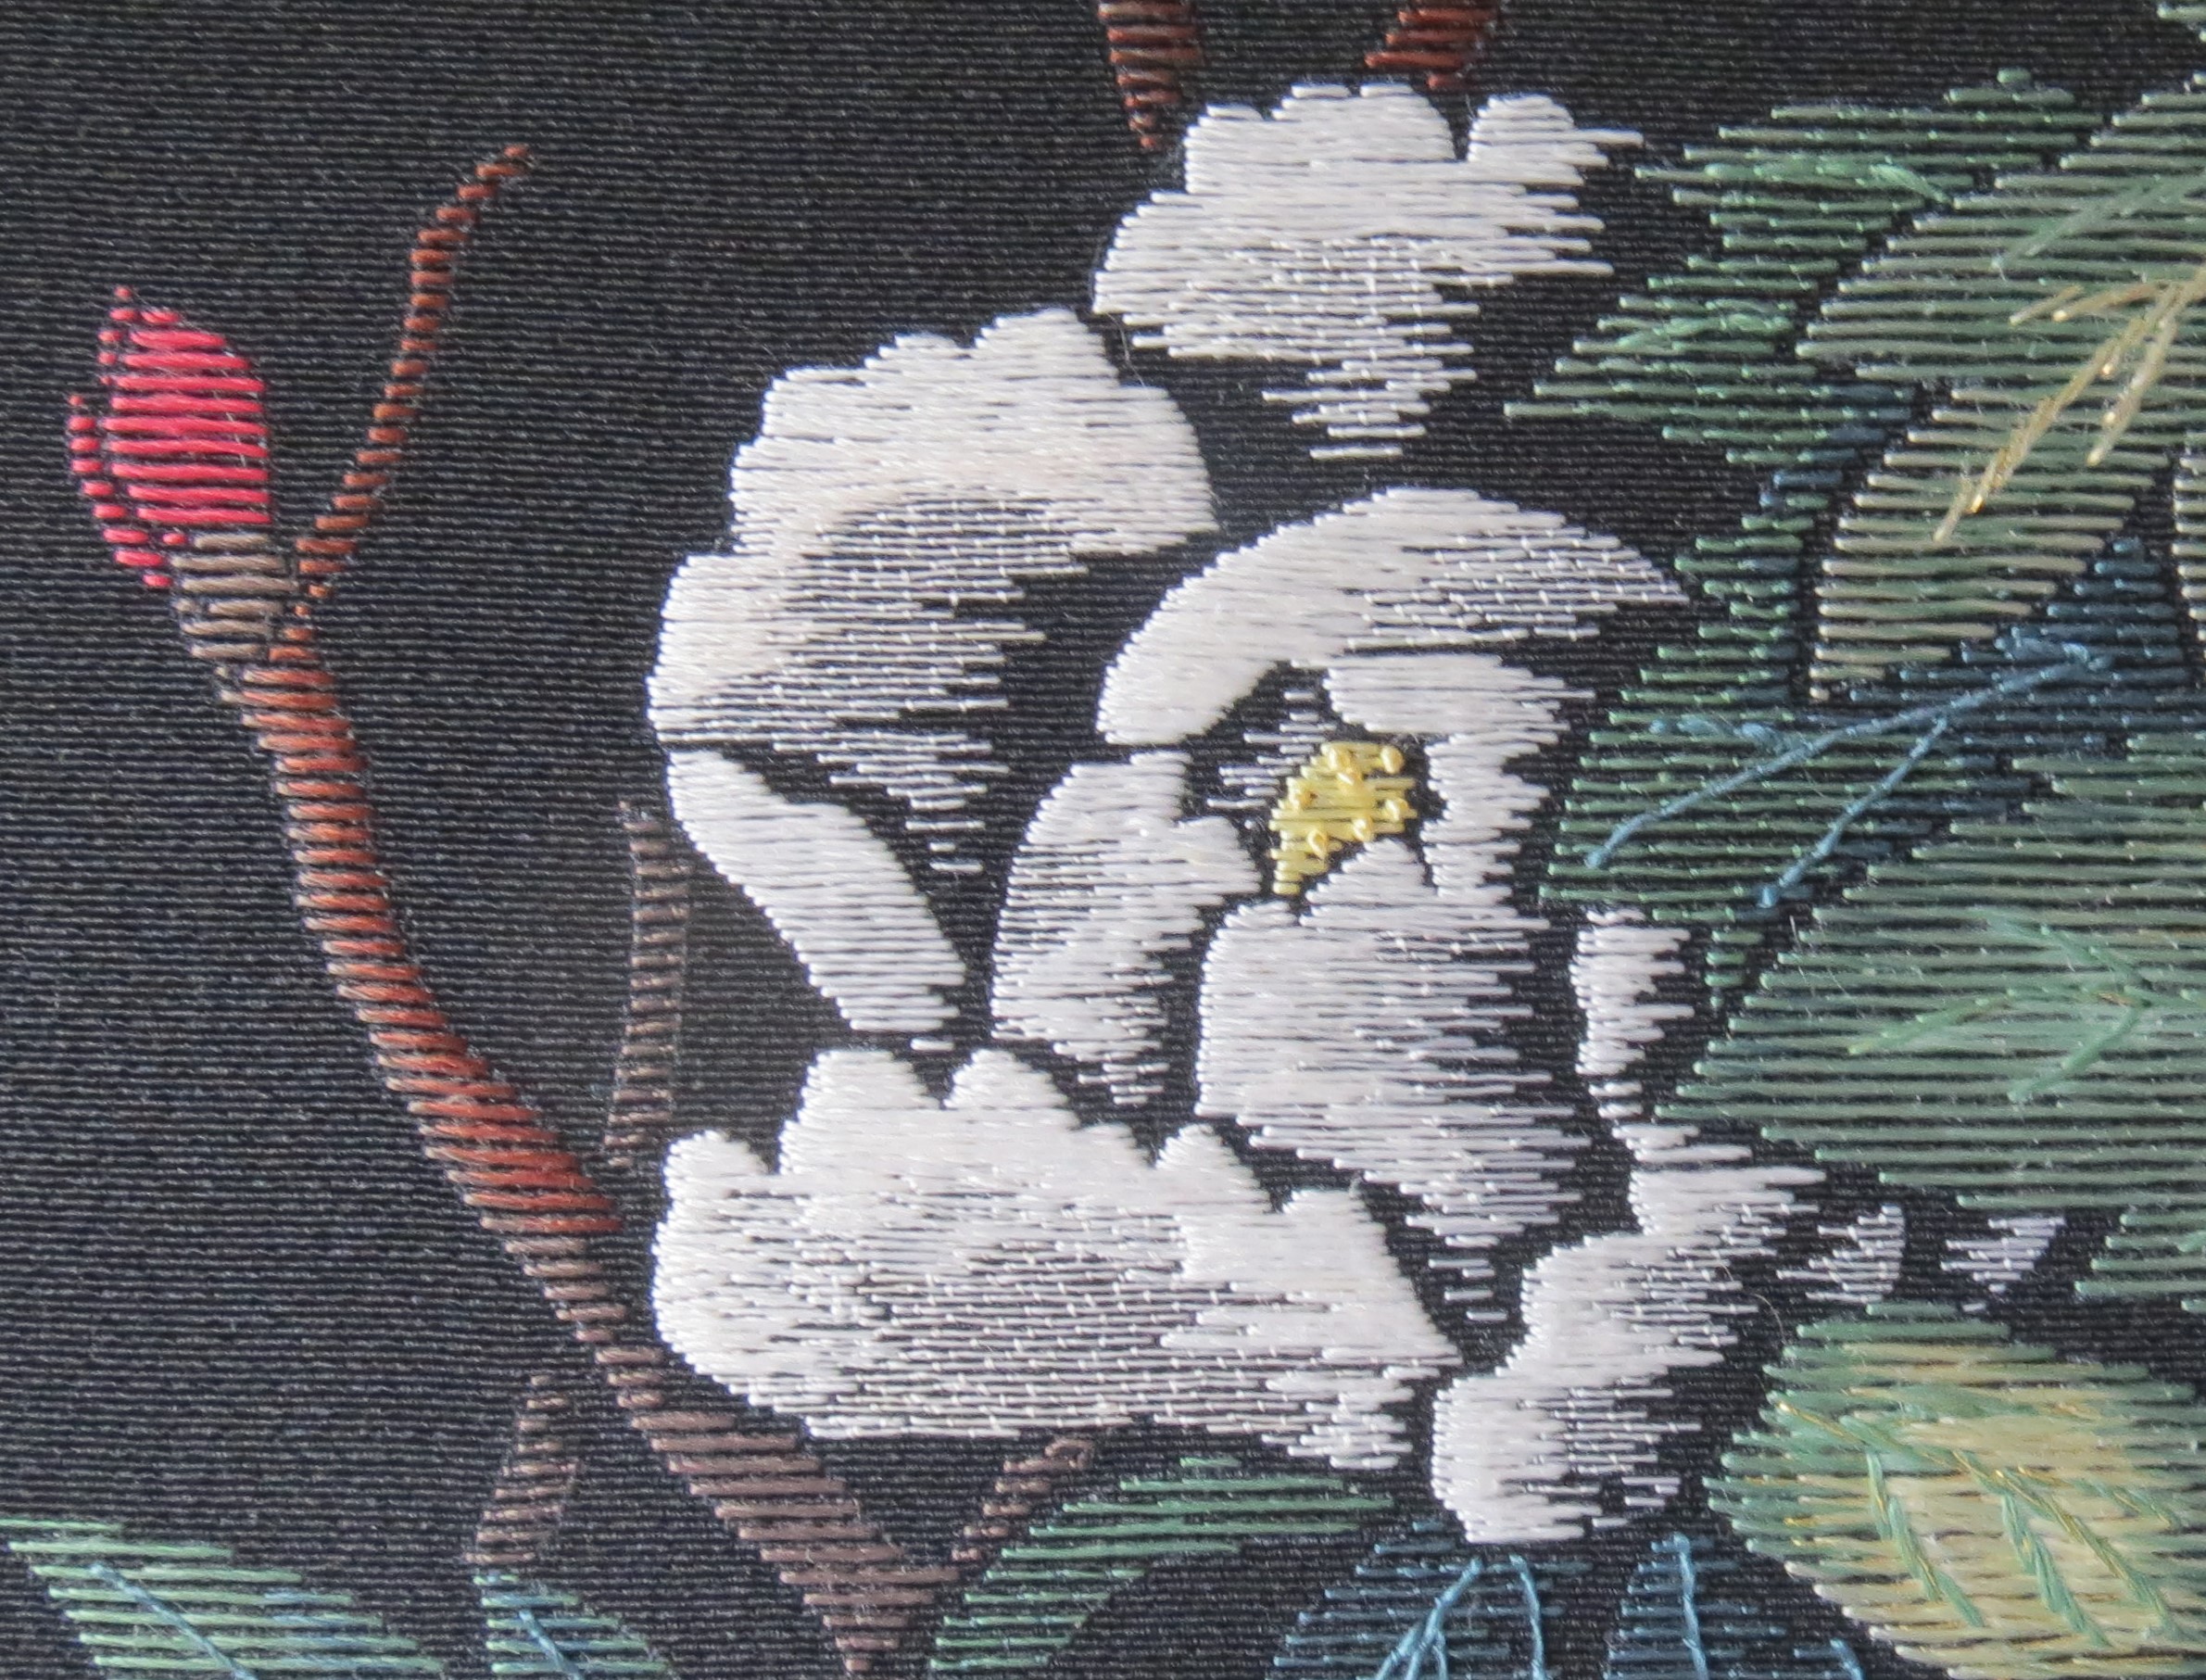
The anther or pollen on the open flowers are worked in Japanese knots, I like to leave these to last so that my working thread does not catch on them as I stitch. First, I stitched a yellow weft foundation in the centre of the flower. Randomly spaced knots where worked on top.

© JEC/Carol-Anne Conway

On the smaller bloom on the right, I had originally worked the shadow area in pink and the centre of the flower in white. I decided to rework these areas based on what I had done on the full bloom and bud. The pink area was removed and redone in a thinner white thread. The white centre was removed and redone in yellow with a few yellow knots on top.

© JEC/Carol-Anne Conway

Happy Stitching

Thursday, 24 September 2020

Queen of Flowers - bud

Where colour had played a large part in the other elements of this design, I wanted to form the bud solely using different thickness of thread and couching methods. The bud on the original background fabric is a deep pink but, having already moved away from the pinks, I chose to do a pure white bud. I put in the foundation threads for the entire bud leaving one point open space between the petals.

© JEC/Carol-Anne Conway

My intention was to make the bud appear round by using thicker threads and diagonal couching on the fullest parts.

© JEC/Carol-Anne Conway

Again, I used colour and various thicknesses of thread on the surrounding leaves to give an increased depth of field to the bud.

© JEC/Carol-Anne Conway

Happy stitching