Sunday 30 December 2012

Amsterdam Light Festival

We were lucky enough to catch the final few days of the Amsterdam Light Festival.  We took a stroll along the Amstel enjoying the contemporary light sculptures.  It seemed that all of Amsterdam had turned out to see the Festival before it ended.  It was difficult to see some of the installations for the crowds but it was a delight to see the families and especially the way the children interacted with the sculptures.

Published with Blogger-droid v2.0.9

Thursday 27 December 2012

Christmas Time

Every year it is the same. I imagine that in the time off over Christmas/New Year I will get oodles of stitching time. But between preparing for and participating in the festivities the time just melts away. In six days off I have managed a grand total of 2 hours and 15 minutes stitching.

The time has been fairly productive. Since I have completed most of the complete motifs now, those remaining are replicas of something I have already done. I don’t have to figure out what I want to do, merely repeat what I have done before. At the moment that is quite relaxing.

© JEC/Carol-Anne Conway

I like the way the gold lines flow through the design. From the beginning I intended to feature them so I am pleased that it appears to be working out that way.

Happy Stitching

Tuesday 25 December 2012

Happy Christmas to Me!

Okay, I received this a day or two ago and it is a pressie from myself but it is Christmas and it did make me happy!

This is a well travelled gift. To the best of my knowledge she began her journey in America, came to the UK and then spent at least a year with me. In April she returned to Atlanta before travelling to Japan where it was transformed. It journeyed once more to America before making her final trip home to me.

Ta-da! Floral Melody as she was always intended made up into a handbag.


I hope Christmas brings you something beautiful, something that brings you joy.

Happy Christmas

Saturday 22 December 2012

The Long and Twisty Leaf

No progress pics this time. I had outlined the leaf shape before I did the bronze paisley then realised that the bronze paisley is on top of this leaf so I had to work that before I could go on with this. When it came to filling the shape, I just sat down one morning and beaded away. It was one of those wonderful moments when everything fell into place.

© JEC/Carol-Anne Conway

I have used several shades of tricut beads again to blend from petrol blue at the base of the leaf to light green at the tip of the leaf. I have kept the dark shades on the inside of the curve to create shadow there but I have also added very dark, almost black, beads to the outer edge to create texture.

© JEC/Carol-Anne Conway

The leaf is quite broad so I have added padding to support the moriage. The padding is placed towards the inner curve and the dark beads on the outer edge are couched down so the shape is a-symmetrical.

Happy Stitching

Thursday 20 December 2012

Bronze Paisely – Part Three

Again, I have not used moriage around the outside of the paisley. The beads I used here are quite bright and I did not want them to stand out any more.

© JEC/Carol-Anne Conway

I’d left the centre of the side paisley to last because I did not have a clear picture of how I wanted it to look. I worked in the same way that I did the centre of the main paisley by picking out the details and seeding the remaining space.

© JEC/Carol-Anne Conway

I wanted this area to be a little quieter than other areas but I think it may be a bit too bland. I will leave it until I have done some more of the surrounding area and see how the various bits relate.

© JEC/Carol-Anne Conway

Happy Stitching

Tuesday 18 December 2012

Bronze Paisely – Part Two

The centre of this paisley is very small but so are the beads. A moriage with this many beads would collapse so I have supported them with some padding.

© JEC/Carol-Anne Conway

© JEC/Carol-Anne Conway

However the border is very narrow, there is neither a need, nor room for any padding here.

© JEC/Carol-Anne Conway

I used several different shades of tricut beads to blend the colour from deep petrol blue to light green.

© JEC/Carol-Anne Conway

Again, I outlined the shape before filling it in. This time I began with the border. No moriage here. There is very little room for it but also I wanted to make this part of the paisley less prominent than the main body.

© JEC/Carol-Anne Conway

Happy Stitching

Sunday 16 December 2012

Bronze Paisely – Part One

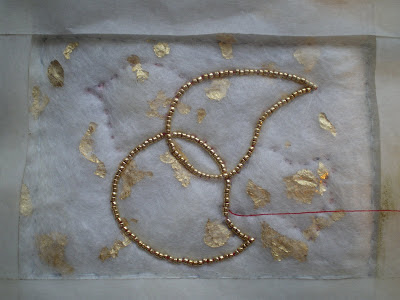
I have done most of the outlines in one of the three different gold beads but here and there I have added some highlights (using silver beads) or lowlights (using bronze beads).

© JEC/Carol-Anne Conway

Each shape is outlined first. I then pick out the details that I wish to keep before filling in the remaining space.

© JEC/Carol-Anne Conway

When I added the red beads, I felt that there was not enough contrast between them and the flowers.

© JEC/Carol-Anne Conway

© JEC/Carol-Anne Conway

I reworked the flowers using the same beads using white thread instead of red.

© JEC/Carol-Anne Conway

© JEC/Carol-Anne Conway

Happy Stitching

Friday 14 December 2012

Beaded Bird ATC

We often have a little competition for our Social Evenings at the Oxford branch of the Embroiderers’ Guild. This year we made ATC’s based on a sheet of wrapping paper. We could choose any of the motifs on the paper and embroider them anyway we liked. I choose a little bird motif.

I decided bead it using some of the beads left over from Floral Melody. I wanted something unique and unusual for the background fabric but did not want to do what I did last time, i.e. spend hours and hours making a fabric that would not even show in the end!

Rummaging through my stash, I found a pack of silk hankies. I used one hankie folded in half and half again to make four layers and trapped some gold leaf flakes beneath the top layer and tacked this onto a piece of vilene to give it some weight for beading.

© Carol-Anne Conway

First I outlined the wings with #15 gold beads ...

© Carol-Anne Conway

... then the head and tail with #15 bronze beads with a few silver beads for his beak and a Swarovski crystal for his eye.

© Carol-Anne Conway

Then I just ad-libed, filling the spaces with whichever beads took my fancy. I didn’t think that I could go far wrong because I already knew that the pallet of beads worked well together.

© Carol-Anne Conway

I would have like to use a few different techniques but this is a very small space and I thought that if might get messy if I tried to do too much. The finished card is just 2.5 x 3.5 inches.

© Carol-Anne Conway


Pictures of the ATC's made by other members will be appearing on the Oxford Branch Blog over the days leading up to Christmas with the winning being shown on Christmas Day.

Happy Stitching

Wednesday 12 December 2012

Toing and Froing

Most of the bird’s body is worked around and around in one continuous spiral. Where the neck meets the body, some shaping is required. This is done by stitching to and fro for several rows to get around the bend. Then you continue round and round gradually reducing the number of stitches until you reach the tail end of the body.

© The Essamplaire/Carol-Anne Conway

My first attempt seemed to be falling short of the bend so I had to unpick and try again..

© The Essamplaire/Carol-Anne Conway

© The Essamplaire/Carol-Anne Conway

The silver wire is one continuous thread from the top of his head to the tip of his tail. If you could stitch with a sufficiently long thread, the green silk could also be one continuous thread but of course it would not be practical to work buttonhole stitch with a thread several meters long. Instead, when one length runs out you simply join in another and continue as if it were the same thread. The loose ends get covered by the needle lace body as it grows.

© The Essamplaire/Carol-Anne Conway

© The Essamplaire/Carol-Anne Conway

Happy Stitching

Monday 10 December 2012

Progress Report - December

I am definitely not getting as much stitching time as I would like, especially at the weekends, but I am managing to fit in a little time most mornings to work on my Pouchette. I am making slow but steady progress. It is a good thing that I enjoy couching because my design involves a lot of couching and it is taking a very long time to do all the outlines. I think that it will be worth it because it does emphasis the swirly gold lines in the way I imagined. The Pouchette had a day out at The Big Stitch last Saturday and I received some very nice comments about it.

© JEC/Carol-Anne Conway

In the evenings I have been working on the bird thimble holder. Another slow project! All of those tiny buttonhole stitches round and round and round! Actually, it is not all round and round, there was a little toing and froing for a while. I finally covered the entire body. It has taken me two months just to do that and that was only lesson one of four so I may be working on this little bird for some time yet.

© The Essamplaire/Carol-Anne Conway

Happy Stitching

Sunday 2 December 2012

The Big Stitch - A Huge Success!

Jane, Sue, Dee and I arrived at the Ashmolean shortly after 10.00 am armed with floor stands, frames and our basic stitching kit. By 10.30 we had everything set up in two galleries; one demonstrator in gallery 35, the West Meets East orientation gallery and another in the Threads of Silk and Gold Exhibition gallery. As I left Jane, to store our bags and coats in the Green Room, a small crowd was already gathering around her. Well before the official start time of 11.00 am I had to squeeze through people to give Sue and Dee their name badges and some leaflets. And thus it was for the rest of the day.

While Jane demonstrated in the morning, I had an hour or so to whiz around the museum and take a look at some of the demonstrations taking place. At every location small groups of people were clustered around the table bombarding the demonstrator with questions about the materials and techniques they were using, wanting to know where they could learn to do it or where to purchase supplies. The entire museum was buzzing with excitement and activity.

I took over demonstrating in gallery 35 so Jane could take a break before her guided tours of the exhibition began. It was difficult for Jane to break away as her crowd of observers fired question after question at her and even before I had a chance to set out my frame and equipment the wave of questions continued in my direction. I began stitching at approximately 12.30 and when I next paused for breath and glanced at my watch it was 3.30. I say I began stitching, in reality I did very little stitching, less than one inch of staggered diagonals, what I actually did was talk, talk, talk. Having demonstrated a few times before I was prepared for this but on this occasion the level of interest exceeded anything I have experienced before. It was exhilarating!

Although the crowds thinned a little after that we did not stop demonstrating until 5.00 pm, a full hour after the official end of the program and even as we packed away our equipment a trickle of visitors continued to come over to take a look.

I remembered then that I had passed by the World’s Longest Embroidery earlier in the day and had said that I would return later to make my mark but I had not had another opportunity.

Mr X Stitch and the World's Longest Embroidery

If I have any regrets about the day, it is that I did not have time to attend any of the talks or workshops. There were some that I was really interested in attending but I on reflection I think that little could have exceeded the fun I had talking to so many interested people about what I most enjoy doing ... except one moment. As I toured the museum in the morning I came across the area where younger visitors were given an opportunity to stitch for themselves. A dozen or so children were sitting on the floor with their parents stitching into paper plates. To see the fun they were having was the most uplifting moment of the day. If a spark of interest was ignited in only a few of the dozens of young people that learnt to stitch that day, that alone made The Big Stitch a huge success.

Young Embroiderers (sorry it is a bit blurred!)

As we carried our frames and stands towards the exit we came across Clare and Aimée from the Ashmolean. It was Clare, Assistant Keeper of Japanese Art who first contacted me about the exhibition and Aimée who told me about their plans for The Big Stitch and invited us to come along and demonstrate Japanese embroidery. I swear they were both floating 6 inches off the ground and the grins on their faces told me that they had enjoyed the day every bit as much as we had. Aimée told me that the number of visitors on the day had gone through the roof and a glance at the brim full donation boxes suggested that the day had been a good for the Ashmolean in more ways than one. I had also been told by a sales assistant in the gift shop that she had never before experienced such a busy day.

I have not heard yet how the talks and workshops were received but I can only imagine they were as well attended as all of the demonstrations. A good day for the museum, a good day for the Embroiderer’s Guild, a good day for the demonstrators and a good day for the visitors ... what greater success could you hope for than that?

So where do we go from here ... can we do it again? Rumour has it that the Ashmolean is already interested in repeating it. What about other museums? I would definitely be up for demonstrating at the Victoria and Albert. How about some of the National Trust properties? Perhaps there is an opportunity for both parties to raise some much needed funds and awareness. And if we could combine an event like The Big Stitch with a trader’s hall the likes of the Knitting and Stitching shows ... after all one question that I heard asked over and over again was “Were can I buy ...?”

I had a brilliant day and I can’t wait to do it all again!

Happy Stitching