Showing posts with label Flower Circle. Show all posts

Friday, 9 August 2013

Flower Circle – A Circle of Friends

It seemed to me that the Flower Circle was a quick project. In terms of time on the frame, for me at least, it was a quick project. My Japanese embroideries are usually on the frame for a year or more; this piece was on the frame for a mere 2 months and 4 days! So I was somewhat surprised when I totalled my time sheet to find that I had put in 74 hours of stitching. That just shows how 15 minutes here and there, and an hour or two at the weekend can add up!

© Shizuka Kusano/Carol-Anne Conway

The Flower Circle was also stitched by several others and the completed pieces were displayed together in the same room as the recent exhibition of Kusano-san’s work in Ferndown. Since I began learning Japanese embroidery in 2005, the stitchers of those other versions have become some of my dearest friends. We have spent many pleasant hours together; stitching, chatting, pawing over books and the internet, and admiring each other’s work.

© Shizuka Kusano/Carol-Anne Conway

When I returned home with my Flower Circle, it occurred to me that the Flower Circle reminds me of the friends I have made through Japanese embroidery. Although unique and individual, like the flowers themselves we all have one thing in common – our love of Japanese embroidery. Within the circle one flower might be closer to some than others, and some even overlap. Our group is like that, because of proximity or other interests, one person might be more closely associated with another but sometimes more, or all, of us are able to come together. And sometimes life might mean we do not have as much time for Japanese embroidery and our friends as we might like and we fade into the background like my purple flower. But a circle is an amazing thing. It is eternal with no beginning and no end. And made of the right stuff a circle is very hard to break, put under pressure and it may bend and distort but it remains intact.

© Shizuka Kusano/Carol-Anne Conway

I have decided to rename my Flower Circle "A Circle of Friends".

Happy Stitching

Saturday, 27 July 2013

Flower Circle – Finished

I was still dissatisfied with the stitching on the outlined flower and slightly concerned about whether the purple flower upset the balance of the design but there was no time left for me to make any changes. As it stood I only had two days to do the finishing, remove Flower Circle from the frame, and to lace it onto a board.

© Shizuka Kusano/Carol-Anne Conway

I had allowed 24 hours with the frame resting in a prominent position so I would spot any glaring mistakes before I began the finishing process. Every time I passed the frame I stopped to take another look at the it and, although I still had doubts about the purple flower, I was rather pleased with the overall effect. Mostly, I was pleased that I felt I had done what I originally intended to do – maintain the balance of the original design.

© Shizuka Kusano/Carol-Anne Conway

The reason for my haste and lack of time for making any alterations was that my Flower Circle, together with eight other versions, was to be show to Kusano-san during her visit to the UK. It was a great honour to be able to show her our work and an even greater honour to have her critique the pieces. Kusano-san was complimentary about all of the Flower Circles. She was very kind not to mention some of the substandard stitching on my piece. Instead she commented that colour scheme and choice of techniques was well balanced – I was thrilled as this was something I had strived for. Kusano-san also commented on the purple outlined flower and the Flutterbies flower, saying that they added an air of mystery to the piece. I cannot claim that that was my intention but I am pleased that those two flowers caught her attention.

© Shizuka Kusano/Carol-Anne Conway

© Shizuka Kusano/Carol-Anne Conway

It was extremely generous of Kusano-san to give us the design and encourage us to stitch it in our own way. I wonder if she remembered doing that. She certainly seemed delighted to see them. This has been a unique and special project for those of us who took part. Mine will always remind me of the time a group of us drove from Manchester to Edinburgh and back in a day for the opportunity to see Kusano-san’s work and of our second, amazing, encounter with her.

© Shizuka Kusano/Carol-Anne Conway

© Shizuka Kusano/Carol-Anne Conway

Happy Stitching

Thursday, 25 July 2013

Flower Circle – Leaves

When all of the flowers were complete I lent my frame against the wall so that I could look at it from a distance. I wanted to evaluate the balance of the composition and consider how I should stitch the leaves. In the end I decided I wanted to keep them as light and airy as possible but also to pick up again on the gold used elsewhere in the design. To contrast with the twisted gold on the flowers, I couched #3 gold around the outline of the leaves. I often use red couching thread for couching gold but on this occasion I made a 1 into 2 twist from the same red/orange silk that I had used for the pollen of some of the flowers. When the outlines were finished I again rested the frame against the wall. I felt that the simple outline was not quite sufficient so I added a central vein to each leaf. This time, when I leant the frame against the wall, I was satisfied.

© Shizuka Kusano/Carol-Anne Conway

© Shizuka Kusano/Carol-Anne Conway

© Shizuka Kusano/Carol-Anne Conway

Happy Stitching

Monday, 22 July 2013

Flower Circle – Flutterbies

For the third of the large centred flowers I had a slightly different plan. It was a combination of something I had seen in the Kurenia-kia exhibition and a homage to one of my favourite Kusano-san designs. I have already referenced Hana utsuroi (Transient Flowers) in my Shibori Samuri. In her piece Kusano-san fills some of the butterfly wings with flowers. In my Flower Circle I filled one of my flowers with butterflies!

I traced the outline of the remaining flower and played around drawing butterflies into the space. When I was happy with the design I retraced it onto tissue paper. I thought that the butterflies were a bit small to stitch transfer so decided to transfer them with shell powder. I have not had much success with this method in the past but while in Atlanta I was able to observe how Uematsu-san did it. The shell powder is mixed with a little water. I observed that Uematsu-san used less water that I do making a slightly thicker solution. I also observed that Uematsu-san painted more of the solution onto the reverse of the tracing than I did. When the paper was completely dry this left a heavier deposit of shell powder. I carefully placed the tracing onto my fabric – I had traced the outline of the flower so that I could position the tracing accurately. Then with a book pressed to the underside of my fabric I firmly rubbed over the tracing paper with the back of my thumb nail.

© Shizuka Kusano/Carol-Anne Conway

This certainly transferred a goodly amount of shell power that showed clearly on my fabric but, oh my, the outlines were very thick on those tiny butterflies. I could just make out enough of the shape to give me an impression of each butterfly and as they are so small I decided to stitch them freehand using the 'lines' to guide me.

© Shizuka Kusano/Carol-Anne Conway

© Shizuka Kusano/Carol-Anne Conway

They are a bit asymmetrical but I figured that they looked like they were flitting around. I was slightly concerned about the residue of shell powder but a good beating with my velvet cushion removed all trace of the powder and I was ready for the next step.

© Shizuka Kusano/Carol-Anne Conway

At the Osaka exhibition I had seen some motifs that had another motif stitched inside them with sugabiki (fuzzy effect) over the top. I thought the effect was very lacy and delicate. As with the other large centred flowers I filled the petals with sugabiki but this time I only stitching in every other weft valley so that the butterflies would still be visible under the #1 gold thread.

© Shizuka Kusano/Carol-Anne Conway

I then filled the flower centre in the same way but stitching into the valleys that had been left unstitched on the petals to give a staggered effect. I hoped that this would differentiate the centre from the petals but the effect was too subtle so I went back and stitched into the remaining valleys with the shell gold thread.

© Shizuka Kusano/Carol-Anne Conway

© Shizuka Kusano/Carol-Anne Conway

Finally I outlined the petals and the centre of the flower with couched twisted gold.

© Shizuka Kusano/Carol-Anne Conway

Happy Stitching

Thursday, 18 July 2013

Flower Circle – Outlined Flowers

I saw the remaining two flowers with small centres as being more in the background, especially the one in the centre of the ring. I wanted to stitch them in a minimal way so that they would recede but again I wanted to stay true to their original appearance. I decided to outline them but this time with a broader outline. I’m not sure if this stitch qualifies as matsui-nui (staggered diagonals) or if it is a narrow diagonal foundation.

I had a lot of difficulty getting the angle of the stitching to work, especially at the points of the petals. I was not entirely satisfied with the stitching but decided to leave it for the time being and restitch it only if time allowed.

© Shizuka Kusano/Carol-Anne Conway

To really emphasise that this flowers is the same as the other small centred flowers I stitched the centres, the stamen and the pollen in the same way.

© Shizuka Kusano/Carol-Anne Conway

© Shizuka Kusano/Carol-Anne Conway

I wanted to further emphasis that the fourth of these flowers was farthest in the background. I also wanted to experiment with an idea that had been floating around in my head for a very long time. Many of the kimono and obi we see use more than one textile technique. The weaving, dying and embroidery all combine to create a comprehensive design. Kusano-san uses this concept a lot in her own work. It is not unusual to see a piece of kanoko shibori appliquéd onto her ground fabric and hitta-gake stitched elsewhere on the same piece. Where the background has a woven effect that might be picked up in a stitched version of the same effect. I wanted my background flower to appear as if it had been woven into the fabric so I stitched it entirely in a silk that matched the ground colour as closely as possible.

© Shizuka Kusano/Carol-Anne Conway

Having worked out most of my difficulties with diagonal stitch on the previous flower, I felt I stitched this one better. Perhaps I should have done this one first as the stitching is less noticeable! Because I wanted the flower to appear woven I did the centre, the stamens and the pollen in the same purple and used a single straight stitch for the pollen rather than Japanese round knots.

© Shizuka Kusano/Carol-Anne Conway

The effect is pretty much what I had intended and in that respect I am pleased with this flower. However I was concerned that it appeared as a hole in the centre and unbalanced the design. Again I decided to leave it for now and consider restitching it if time allowed.

Happy stitching

Tuesday, 16 July 2013

Flower Circle – Matsui-nui and Midare-sashinui

Four of the flowers have five overlapping petals with a small circular centre and long stamens. I did not want to do all four flowers in exactly the same way but I wanted to maintain the balance of the design so I wanted to stay true to their original appearance. I based two of the flowers on another of the embroideries I had seen in the Kurenai-Kai exhibition in Osaka. This one was featured on the postcard of the exhibition so I had a small picture to refer to.

I first outlined each of the petals with Matsui-nui (staggered diagonals).

© Shizuka Kusano/Carol-Anne Conway

I then partially filled each petal with Midare-sashinui (random realistic effect).

© Shizuka Kusano/Carol-Anne Conway

I used two shades of pink starting with a two rows of very pale pink.

© Shizuka Kusano/Carol-Anne Conway

I then used a slightly darker shade of pink towards the centre of the flower to give texture but faded out the stitches as I thought fully filled flowers would be too dominant for background motifs.

© Shizuka Kusano/Carol-Anne Conway

To give some continuity with the sugabiki flowers I stitched the centre and the stamens in twisted gold. The centre has two layers of silk padding.

© Shizuka Kusano/Carol-Anne Conway

Finally I added the pollen. I chose a colour that I though contrasted well with the purple background and made a soft 4 into 1 s-twist.

© Shizuka Kusano/Carol-Anne Conway

Happy Stitching

Tuesday, 25 June 2013

Flower Circle – Mushiro-nui and Sugabiki

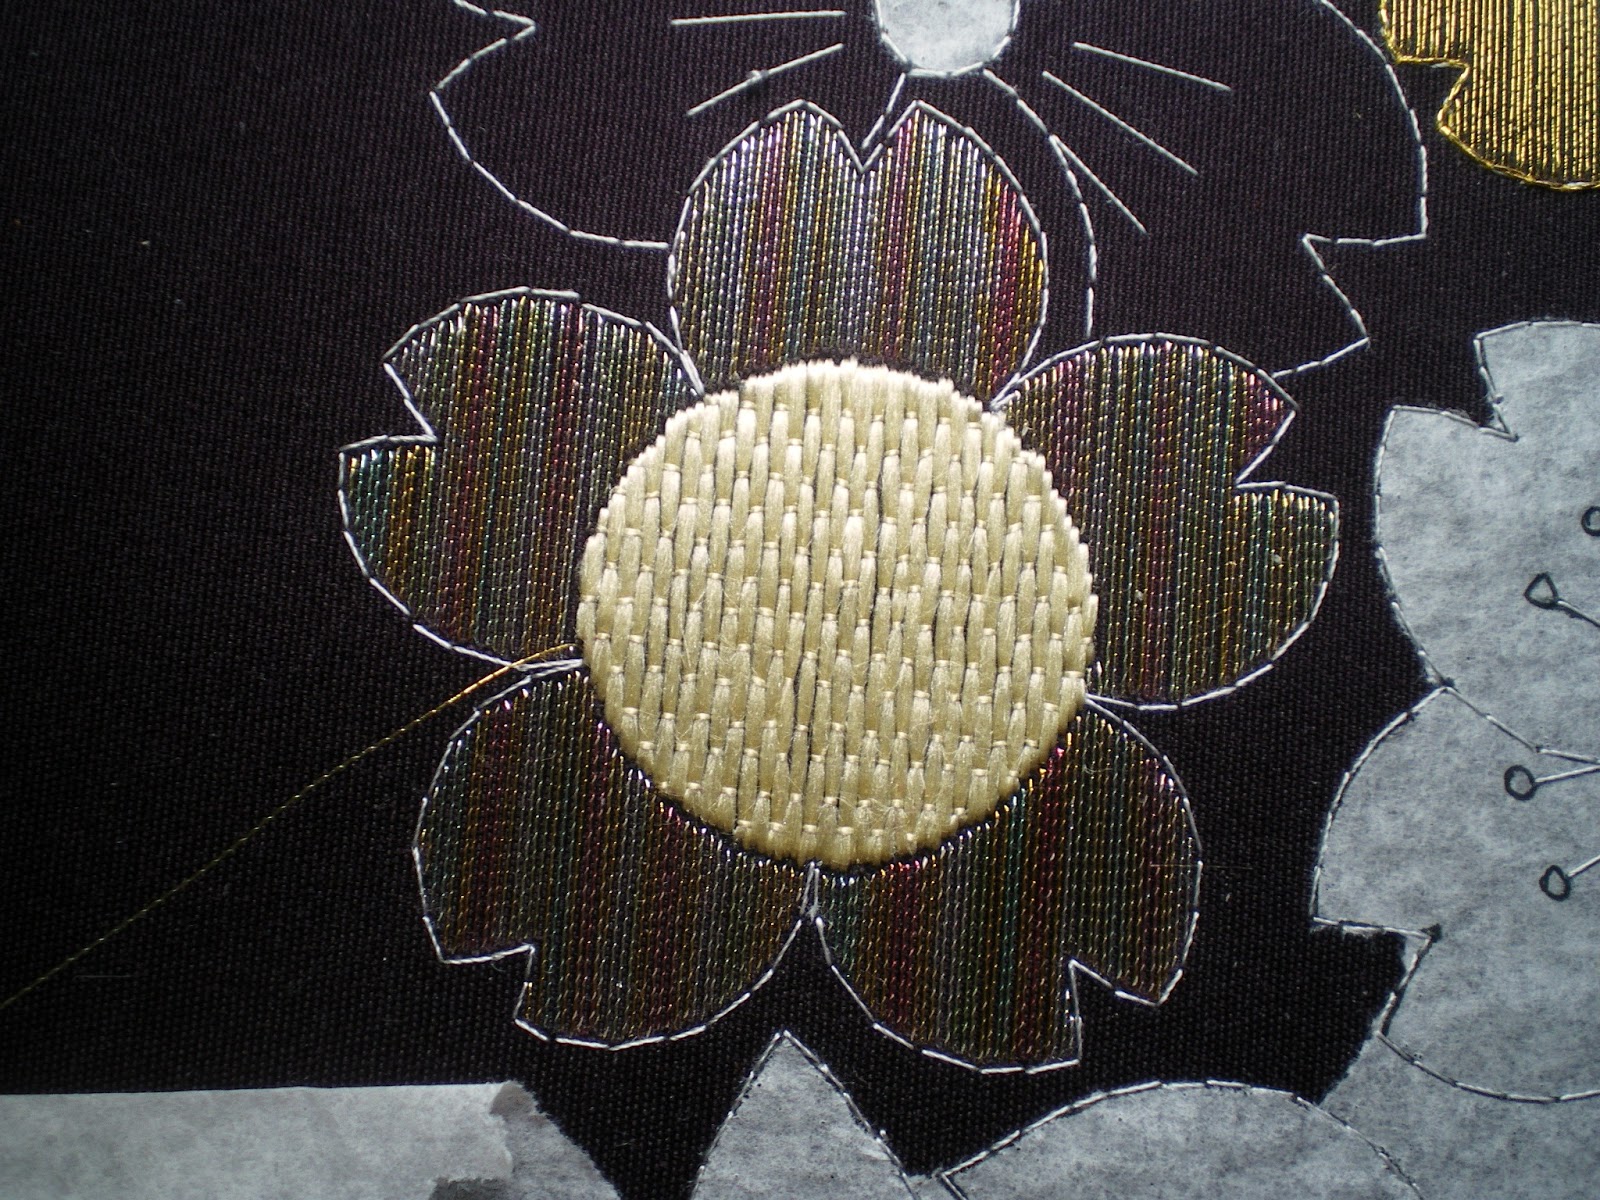
When I was planning to work the Flower Circle entirely in gold work, I thought that I would do the large circular centres in maze pattern couching. On my last day in Japan I visited an exhibition of work by the tutors and students of Kurenia-kia. I saw some techniques that I had not seen before and wanted to try to replicate some of these in my design. Unfortunately, photography was not permitted so I had to rely on my notes, my memory and a postcard of the exhibition. One of the techniques was a variation on mushiro-nui (woven effect). It is not terribly different from the version taught by the JEC but I thought it was very pretty.

© Shizuka Kusano/Carol-Anne Conway

I don’t know why it did not immediately occur to me that I could have worked this version in more or less that same way that I have been taught. Instead, on my first attempt, I filled the entire circle with a flat silk foundation using two strands and then struggled to work the holding stitches.

© Shizuka Kusano/Carol-Anne Conway

When I stitched the second flower centre I made two stitches, then left room for two stitches, stitched two more, etc. I then worked the holding stitches over these foundation stitches before filling in the gaps and working the holding stitches over those. It was much simpler that the first flower.

© Shizuka Kusano/Carol-Anne Conway

I had planned from the outset to work the petals of these flowers in sugabiki (fuzzy effect). I had seen this done in metallic threads on Embroidery Sculpture and thought it very effective. Sugabiki is usually worked in every other weft valley but I stitched #1 gold into every valley so that the effect would be more gold than purple. It is normal to use a holding stitch on any stitch 1 cm or longer but I did not want to disturb the solid sheen so have omitted the holding stitches.

© Shizuka Kusano/Carol-Anne Conway

Finally, I outlined each petal and the centre of each flower. On the gold flower I used JEC twisted gold. On the shell gold flower I wanted a matching outline so I twisted together two strands of shell gold.

© Shizuka Kusano/Carol-Anne Conway

Happy Stitching

Friday, 21 June 2013

Flower Circle – Hitta-gake

The first time I used hitta-gake (tie die effect) was on Suehiro. I used white silk to stitch the best foundation I had done so far and when I realised what I would do to that foundation I nearly cried. As it turned out, I enjoyed stitching hitta-gake and was reasonable pleased with my first attempt.

© Shizuka Kusano/Carol-Anne Conway

I next used hitta-gake on the Shibori Samurai on Flutterbies. That time I was not so pleased with my foundation layer but I felt that the hitta-gake was executed better. On both of these designs the hitta-gake has a white foundation on a white ground fabric. I have always thought that it might be more effective on a dark background.

© Shizuka Kusano/Carol-Anne Conway

Hitta-gake features a lot in Kusano-san’s designs. Sometimes she uses the stitched version and sometimes she appliqués kanoko shibori fabric onto her ground fabric. I decided to fill the two outline flowers with hitta-gake as homage to Flower Circle’s designer.

© Shizuka Kusano/Carol-Anne Conway

I began with a flat white silk foundation using 2 strands to ensure good coverage of the ground fabric.

© Shizuka Kusano/Carol-Anne Conway

For the hitta-gake I choose a silk that matched the ground fabric as closely as possible. I wanted the finished effect to give the impression that kanoko shibori had been died into the fabric.

© Shizuka Kusano/Carol-Anne Conway

The JEC use two stitches in the centre of each lattice to represent the dot that is characteristic of kanoko. Kusano-san does this in a few different ways but she very often uses a sagara-nui (Japanese round knot) for the dot and I choose to do mine that way. I am still a bit hit and miss with sagara-nui but I think I am getting better and this gave me a fair amount of practice at them.

© Shizuka Kusano/Carol-Anne Conway

Happy Stitching

Tuesday, 18 June 2013

Flower Circle – Preparation

We are a little spoilt by the Japanese Embroidery Centre who transfer many of their designs onto the fabric for us but I have had to transfer one or two designs from other sources in the past. I prefer to use the stitch transfer method. First I trace the design onto a piece of tissue paper. After positioning the tracing on the fabric, I hold it in position with small magnets while I stitch over lines using white couching thread and Japanese running stitch. (I was later to regret my choice of thread and wish that I had used a fine YLI thread instead.) This method allows me to follow the design very accurately and to make adjustments to any tracing errors. The Flower Circle design is almost all curves so I have used a fairly short stitches to give smooth lines.

© Shizuka Kusano/Carol-Anne Conway

Stitch transfer gives me time to familiarize myself with the design and think about how to I want to stitch each element. By the time I had finished the transfer I felt I understood the balance and flow of the design. I hope to maintain that balance as I embroidered it. The Flower Circle consists of nine cherry blossoms of three distinct designs but all with broadly the same outline. Two are a simple outline and three have a large circular centre surrounded by five separate petals. The remaining four have five overlapping petals with a small circular centre and long stamens.

Japanese running stitch is worked differently from any other stitch I know being a cross between running stitch and back stitch as evidenced on each side. On the front it looks like back stitch; on the back it looks like running stitch.

© Shizuka Kusano/Carol-Anne Conway

I remove the tissue paper from each motif (and a small area around it) as I come to stitch it. I leave the remaining tissue paper in place to protect the fabric while I work.

© Shizuka Kusano/Carol-Anne Conway

Happy Stitching

Monday, 10 June 2013

Kusano San Design

Forgive me blogger, I have not posted very much this year. I have quite a lot to blog about but little time to sit down and actually write anything. I need a gadget that will transcribe my thoughts into posts. So what have I been up to? Well, I have had a fabulous holiday that I really want to write about while it is still fresh in my memory. I have taken advantage of the fine weather we have been enjoying in Oxford to get the garden tidied up. All of the hedges have been cut, the lawns mown (several times) and the flower beds weeded. J and I have finished building a patio and made a smaller patio to use as a bbq area. We are now preparing the site to start digging a pond. I have also been working with some neighbours to clear an overgrown stream that runs alongside our gardens. We’ve been pulling out nettles and cutting down brambles and ivy. Last weekend we planted some marginal plants along the cleared bank. It already looks much better and last week I spotted a grass snake sunbathing on the cleared bank - bonus! I have also been stitching but, as usual, not as much as I would like.

In May 2011, some Japanese embroidery friends and I travelled to Edinburgh for an exhibition of embroidery by Shizuka Kusano. We had all admired her work ever since we first pawed over her book "The Fine Art of Kimono Embroidery". The exhibition was the first time that Kusano-san’s work was shown outside of Japan so it was a very rare opportunity for us to see it and to meet its charming and gracious creator.


During the exhibition, one of Kusano-san’s students was demonstrating Japanese embroidery. One of our friends, Colleen, said how pretty the design was. To our amazement, Kusano-san presented us with a copy of the design and encouraged us each to stitch it in our own way. Another exciting development that came out of that visit is that Kusano-san is returning to the UK this June. An exhibition of her work is to be held on 26th to 29th June at The Bridge House Hotel, 2 Ringwood Road, Ferndown, Dorset, BH22 9AN. When we knew that Kusano-san would be making this visit we decided to stitch the design as a group project. As Kusano-san wished, we have each done our own interpretation of the design, pushing ourselves to do something new with it. For some this has meant working with colours they would normally avoid, for other it has been an opportunity to try out new techniques.

Our tutor, Margaret, provided a selection of obi fabric in a variety of colours. I choose a deep and very regal purple. My original idea was to do the design entirely in gold work and the gold looks stunning against the purple. However, after studying pictures of Kusano-san’s work and visiting an exhibition of work by the tutors and students of Kurenia-kia, I saw many interesting techniques that I wanted to incorporate in my design – more than I would be able to include.

© Shizuka Kusano/Carol-Anne Conway

Over the next few weeks I intend to blog about what I have done so far and about my race to finish in time for my piece to be displayed in celebration of Kusano-san’s visit alongside the beautiful designs already completed by some of my friends.

Happy Stitching