Showing posts with label Casket Keepsakes. Show all posts

Tuesday, 5 April 2022

Pomegranate and Grapes

Autumn is the last but by no means the least of the Casket Keepsakes. As with each of the kits, there are two elements and each is a needlework accessory: a Pomegranate Thread Winder Keeper and a Bunch of Grapes Scissor Keeper. Both are exquisite!

The supplies for this kit are every bit as lovely and thoughtfully prepared as the previous kits. Very little preparation is required before you can get on with the important stuff – stitching!

Pomegranate Thread Winder Keeper

I have a growing fondness for the Casket Keepsakes that are pouches cunningly disguised as something else. My interest in them began with the Frog Purse in the Ashmolean Museum that I saw on a study day, several years ago, and a yen to reproduce it but little idea of how to go about it. In each of the seasonal kits, one of the accessories is a pouch, each constructed in a slightly different way and I have loved making them all. In the Autumn kit the pouch is disguised as a Pomegranate. The embroidery on this piece is probably the simplest but it is no less charming for that. The front consists of three pieces with the two side pieces folded back to show the mother of pearl sequin and bead pomegranate seeds. The gathered top of the pink silk pouch sticks out above the top of the embroidered front and back and looks absolutely like the top of a pomegranate.
© Amy Mitten/Carol-Anne Conway

Grape Scissor Keeper

When every piece is gorgeous, it doesn’t seem right to have a favourite but I am just going to say it, this piece is my favourite! Each of the grapes is stitched in a different technique and several different threads are used to create them. They are so much fun! The same techniques are used on the front and back of the scissor case, except that the grapes on the back are stitched flat and those on the front are stitched over felted balls so they are very dimensional! The leaf is made separately and attached over the top of the grapes.

The construction of the scissor case is the simplest of all of the accessories. The front and back are laced together leaving an opening at the top for the scissors. One of the grapes on the front contains a secret something to prevent the scissors falling out.
© Amy Mitten/Carol-Anne Conway

Although this is the last of the Four Seasons Casket Keepsakes, Amy has released other Casket Keepsakes which I predict will be every bit as fun to stitch and make as these were. I

Happy Stitching

Saturday, 1 January 2022

On the Seventh Day of Christmas, Embroidery Gave to me ...

Butterfly Wings and Beetle Juice

The third in the series of Casket Keepsakes, both in order of release and the order in which I stitched them, is Summer. This kit contained two more needlework accessories – a beetle thimble holder and a butterfly needle case.

The design for the butterfly wings is preprinted onto the silk ground fabric which is prepared in the same manner as the silk for the Winter Keepsakes. There are four wings with embroidery on either side, so eight wing sections in total. The foundation stitching is satin stitch in Amy’s hand dyed silk. The front of the wings are then embellished with metallic threads, sequins, beads, and discs of shell that attached using Shisha Stitch. Only the outer edge of the wing backs are embroidered, a piece of felt in which to store needles, is appliqued to the centre of each wing. The front and back of each wing are joined with lacing stitches that are covered with couched pearl purl.

The abdomen is made from fabric covered straws. Long parallel stitches are made along each segment of the abdomen. These stitches form a warp thread through which rounds of thread are woven to cover the abdomen. One half is woven with heavy twisted silk; the other with chenille. The chenille is extremely delicate and shredded easily. The straw abdomen serves as a vile for needles and is closed with a wooden spindle.

The head is made from a large wooden bead prewrapped in metallic thread, with two tiny bronze beads for the eyes.

A paper template is supplied for making the legs using covered wire that is bent to match the template and then covered in Hedebo stitches. This was a new stitch for me and it took me two or three attempts to get the hang of it. There are three pairs of legs for the butterfly.

The wings are joined to form a needle book and then assembled with the legs and body into a butterfly.
© Amy Mitten/Carol-Anne Conway

The beetle wings are embroidered onto a piece of green linen. A “thread” is constructed by wrapping a heavy twisted thread around a wavey metallic. This is then couched, in slightly spaced rows, across the wing. Although a little fiddly, this is quite simple to do but the effect is quite stunning, and very difficult to adequately capture in a photograph. The outline of each wing is then worked in backstitches over the wrapped metal trim. The pieces are cut out and assembled into two separate wings.

The thorax is worked over a paper template covered in sticky back plastic that is formed into a cone. A silicon ring is first couched to the cone. Buttonhole stitches are worked over the ring. The remaining threaded used to work the buttonhole stitches is then used for the horizontal bar. Rounds of detached buttonhole stitches are worked through the stitches on the previous row and under the horizontal bar, increasing as necessary, to cover the cone.

The head is fashioned from bronze kid leather with two gem stones beads for the eyes. I think the head is quite ingenious; I could not see how it could work until I attached it to the thorax and it morphed itself into a beetle’s head.

The beetles legs are made using the same techniques as used for the butterfly legs except that the six legs are made as a single piece together with the body. The wings are attached to the body which is then molded around the thorax head structure before the thorax is joined to the wings/body. The thimble is stored in the thorax which is closed with a pair of finger looped braids.
© Amy Mitten/Carol-Anne Conway

Of all the pieces in this series, it was the one that least caught my attention. It is such an ingenious casket toy and so pretty in real life that it is, thus far, my favourite Casket Keepsake.

Happy stitching

Wednesday, 29 December 2021

On the Fourth Day of Christmas, Embroidery Gave to me ...

Two Spring Blossoms

Spring is the second in the series of Amy Mitten’s Casket Keepsakes but the first that I stitched. Like Winter, this kit consists of two casket toys, each a needle work accessory cunningly disguised as a flower. A carnation and a cornflower.

Each flower has a Calyx, a front and back to each, which is worked in tent stitch on Laurel green linen. Details and an outline are worked in backstitch; the outline will be used when assembling the pieces later. One of the flowers holds a tape measure wound around a spindle. The spindle emerges from the front of the calyx through an eyelet outlined in buttonhole stitch.

The next step is to make the petals, lots of petals, which are needlelace, lots and lots, of needlelace. The needlelace is worked on paper templates. There are lots of them, one for each petal. There are dots on the templates, lots and lots of dots, that indicate where to place couching stitches. It is best to pierce holes at this point prior to stitching. I fashioned myself a tool to do this step by pushing the eye end of a needle into a champagne cork.
© Amy Mitten/Carol-Anne Conway

The carnation has four large petals. The needlelace is worked over rows of vintage metal thread that is first couched into place with a contrasting thread. The thread is couching in one continuous length worked up and down along the length of the petal. The working thread is then couched along the outline of the petal, over the previously couched down lines of vintage metal thread. Then, with the same thread, you begin the first row of detached buttonhole stitches working over both the outline and the first row of vintage metal thread. Subsequent rows of button hole stitch are worked through the loop of the buttonhole stitch in the previous row and under the next row of vintage metal thread. And you keep working back and forth along the rows making detached button hole stitches until you have complete the entire petal - on all four petals.
© Amy Mitten/Carol-Anne Conway

The cornflower petals are worked in a similar manner but the metallic thread is first laid in a zigzag pattern across the petals and the detached buttonhole is worked back and forth across the petals rather than up and down. The cornflower petals are smaller than those of the carnation but there are more of them, twenty in total.
© Amy Mitten/Carol-Anne Conway

I will admit it, the detached buttonhole stitching was a bit monotonous but after a while I got into a rhythm and my tension and consistency improved greatly by the time I had finished all of the petals.

As with the Winter Keepsakes, the assembly is as much fun as the embroidery. The carnation is a thread winder keeper with a silk pouch contained within the gathered petals. The cornflower is a small tape measure with the end of the tape forming the stem.

Happy stitching

Monday, 27 December 2021

On the Second Day of Christmas, Embroidery Gave to me ...

Two Winter Warmers

I have collected a number of kits by Amy Mitten. Amy was first brought to my attention through an online course that I was doing called “The Cabinet of Curiosities” . During that time, there was a competition called a “Mirror to My Art”. Amy’s winning entry, a Mermaid Mirror consisted not only of a mirror but and entire etui! The design is reminiscent of the C17 Stuart caskets and mirrored panels that I was learning about on the course and won not only the competition but also the hearts of everyone who saw it. Shortly after this Amy started to release a series of embroidery kits called Caskets Keepsakes based on the toys and keepsakes sometimes found in the embroidered caskets. The first in the series, but not the first that I stitched, was Winter, a set of two needlework accessories fashioned into miniature bellows.

We are blessed with a number of extremely talented needlework designers who are creating some inspired, well thought out, creative embroidery kits. Amy is one of them. Each kits contains all the materials you need (in generous amounts) starting with the design printed onto the fabric when appropriate and very detailed instructions. In Amy’s case the instructions are online but come with a PDFs that you can print out, if required.

For Winter, there is a minimal amount of preparatory work: pressing the muslin backing fabric and the preprinted silk fabric; reinforcing the eyelets with fusible fabric; basting the silk and backing fabric around each of the six design areas; cutting them apart and mounting the first piece into an embroidery ring. There is a similar amount of preparation for the silk fabric that will form the “pouch” on one pair of bellows.

One pair of bellow is pin/needle keep; the front is embellished with a fire that is stitched with a selection of Amy’s hand dyed threads and antique metallics with the flames outlined in silk wrapped purl.
© Amy Mitten/Carol-Anne Conway

The other side of this ornament is embellished with a flaming heart. The heart is padded with wool felt then embroidered with layers of stitching beginning with a satin stitched foundation. The next layer of stitches form horizontal bars over which detached buttonhole stitches are worked in gold metallic thread. The flames and rays of light surrounding the heart are also worked in gold metallic.
© Amy Mitten/Carol-Anne Conway

Both the front and back are finished with an edging of looped gold metallic.

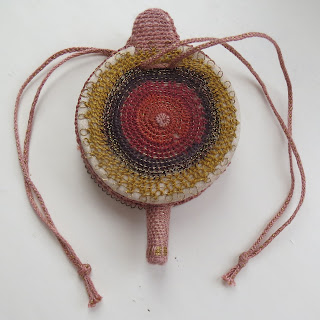
The second pair of bellows are a winder keeper. The front is decorated with a radiating circular design that is worked on a paper template covered with sticky backed plastic. The circles are stitched in detached buttonhole over a gold metallic bar, the gold metallic is first stitched around the perimeter of the circle in small loops. The working thread changes every few rows to create the radiating effect. When complete, the disc of embroidery is removed from the template and appliqued onto the prepared silk front.
© Amy Mitten/Carol-Anne Conway

The other side of this piece is decorated with a spoked circle. The spiraling bar of gold metallic is couched directly onto the prepared silk ground with long diagonal couching stitches. Again, the couching thread changes every few rounds to create a radiating effect. The outer edge of the circle is finished with the same looped metallic thread used on the pin keeper.
© Amy Mitten/Carol-Anne Conway

Half the fun of these keepsakes is finishing them and the instructions for how to do this are as detailed as the embroidery instructions. The nozzle for the winder keeper is made from a silk covered straw. The silk pouch is gathered and secured to the nozzle and the two finished sides of the bellows which are then joined at the base with lacing stitches either side of the nozzle. The pouch is closed with two handmade finger looped braids threaded through the eyelets of the pouch and front and back of the bellows. Most of the Casket Keepsakes feature finger loop braiding but that deserves a post all of its own!

The vial within the needle/pin keep is also made from a straw that is inserted into the bellows that are made from foam core and is sandwiched between the embellished front and back made earlier. The two pieces are laced together using button hole stitches that are covered with a silk ribbon. A second layer of button hole stitches are then worked over the ribbon. The finishing touches are a few pearl head pins inserted through the ribbon edge into the foam core and a supplied wooden spindle to close the needle vial.

Happy stitching.