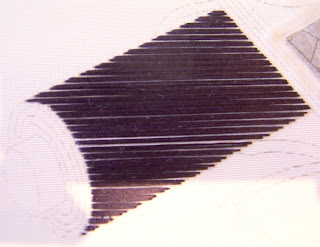
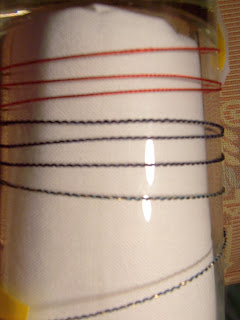
I really like couching, in fact, I would nearly go so far as to say it is my favourite technique. Whilst I was stitching, I was wondering why I like it so much. Perhaps it is its versatility; there is no thread that you cannot couch. All those gorgeous knobbly threads and bright shiny metallics that would disintegrate if you attempted to stitch with them - couch them. And why stop at thread; if you can't stitch through it, stitch over it - couch it. There is no shape that you cannot couch; from the neatest straight line to the tightest curves; if you can draw it, you can couch it. But I think for a slow stitcher like me the real attraction is speed stitching. Now speed is not everything, but when you are used to taking a year to complete a project, being able to work up a design in one evening is exhilarating.
Having gone on about all the exciting things that you can couch, you may be disappointed to see that I have used none of these. I have established a theme for my TAST projects and I like to stay "on theme". The central circle is bayeaux stitch; the layer of satin stitch is held by perpendicular rows of couched thread. The circle is outlined by strung beads, the thread is couched between the beads. The lattice is simply perpendicular rows of laid thread couched where they intersect with small crosses. The other circle is a pair of threads (tapestry wool) couched in a spiral and the border is narrow satin ribbon couched with a combination of Cretian and Chevron stitches.
I like this little design, it was fun to work and I am pleased with the finished article.
Part of the excitement of this challenge is exploring stitches, both those that you are familiar with and those you have never worked before, but it is equally exciting to THINK about your stitching. I say again, thank you Sharon for introducing this challenge and all the effort you put into it for our benefit.
Happy Stitching
Thursday 29 March 2007
TAST Cross Stitch (PS)
I found the green Aida with cross stitch, it is now in the window sill. It is smaller than I remembered and now is it faded and fraying around the edges. It has only 4 rows of stitches; a row of cross stitches in mauve; two rows of half cross stitch, one slanting to left, the other to the right; and a row of crosses with one leg in mauve and the other in pink.
Mum is certain that I stitched all those years ago and she has been proudly displaying it ever since. It also has a function. A clay model trout stands on it. This is a real work of art, created by my older brother when he was at school.
:)
Mum is certain that I stitched all those years ago and she has been proudly displaying it ever since. It also has a function. A clay model trout stands on it. This is a real work of art, created by my older brother when he was at school.
:)
Tuesday 27 March 2007
TAST Cross Stitch
My mum has a small piece of green Aida decorated with cross stitch that one of my brothers or myself stitched at infant school. It was always on display on top of the TV until they bought a new TV that has a black plastic moulded top that you can’t display things on. I wonder where it is now! When I visit her on Thursday, I must ask who stitched it and take a fresh look at it.
I’ve done a few counted cross stitch kits, including a bell pull with an owl and cherry blossoms that my Dad asked me to do. It took me ages and I might not have completed it but Dad rarely asks for anything so I really wanted to finish it for him.
I have seen some beautiful examples of cross stitch but never really thought the stitch itself to be very exciting until I bought a book called The Liberated Canvas by Penny Cornell. I love this book; it did make me look at canvas work in a whole new light but I have never gotten around to experimenting with some of the ideas in it. I’m not a liberated stitcher. I have a neat orderly mind that refuses to do random, so instead of just giving it ago, I agonise over HOW to do random.
When cross stitch came up for week 9 of TAST, I was determined to be liberated. I started cautiously with regular stitches worked in vertical rows but mixing colours, threads and sizes within the rows. I am quite pleased with the result, it has an organic look and I like the subtle colour changes. It reminds me of stalactites.
I also wanted to experiment with irregular stitches. I tried hard to just stitch, constantly changing colours and threads; altering the size and shape of the stitches. Whilst I succeeded in doing that, I don’t think the result is a success. As I was stitching, J said that it looked like a mish-mash and I agree with him.
I look at random ‘pictures’ created by textile artists and I see beauty. This may sound daft, but there is usually some order to their work, the way the colours flow through it, for example. I look at my little sample and I see a mess, there is no focal point, no flow or movement. NO DESIGN. I don’t think this is a case of me being over critical of my own work. I try to be objective, especially in the case of TAST, which I view as a learning process. If anyone has any thoughts on how to make random a success, I would be interested to hear them.
Happy Stitching
Labels:
Broder Medicis,
DMC linen,
DMC Perle cotton,
felt,
TAST
Friday 23 March 2007
Chrysanthemum - 2
© JEC/Carol-Anne Conway
I completed the stitching on the petal to the right of the centre petal. This one has less padding than the two either side of it so that it recedes slightly. When two or more elements of a motif are adjacent to each other, like these petals, the foreground elements are always stitched first. So that they remain separate, a technique called “one point open space” is employed. This simply means that a narrow space (the point of a needle) is left between the elements.
Whilst stitching this petal, I had to observe four principles.
1) Gradually rotate the angle of each stitch to maintain a consistent angle to the centre of the petal
2) Space the stitches so that they just touch and don’t bunch up
3) Keep a neat edge to the shape of the petal
4) Keep an even gap between the adjacent petals
I found it difficult to place each stitch correctly and maintain an even twist on the thread. I don’t think I have stitched this petal as nicely as the others; in particular the first stitch at the tip of the petal looks strange. I think that I may redo this petal!
Happy Stitching
Thursday 22 March 2007
Scroll - 2
Sometimes, after work, my eyes are too tired to stitch in the evening. That has been the case since returning from Bournemouth but yesterday, with the house to myself; I switched off the TV and worked on my Japanese Embroidery. I couched the in-fill stitches on the side of the scroll.
Couching features quite a lot in Japanese embroidery in various forms. "A line of Held thread" is exactly what it sounds like; a line of thread held in position with couching stitches. This technique is used to add details to motifs, like stamen on flowers or veins on leaves.
Metallic threads are used extensively. As in gold work, they are couched on to the surface of fabric. Traditionally gold is couched with red thread and silver with white or grey thread, however other colours are sometimes used to alter the appearance of the silver or gold.
Other decorative threads, such as the katayori and karayori that I learnt to make in Bournemouth, are also couched on the surface, usually with a fine twist of the same colour silk.
Many of the holding techniques use couching stitches such as the diagonal holding used on the gold leaf cloud. Fine twisted silk threads are laid across the foundation and couched at intervals in a similar fashion to Bayeux stitch. For the woven effect on the side of the scroll, the final stage is to couch the in-fill stitches between the perpendicular gold threads. Normally I would couch along the length of each thread, one at a time. For this technique the couching is worked across the rows of thread using a variation of backstitch. The stitch on the surface is just long enough to secure the thread; the stitch on the reverse is long enough to travel from one thread to the next. Each row is completed before moving into the next.
I'm very pleased with this element. I took a lot of care to make the stitches regular and stitch the gold perpendicular to the foundation. My only slight criticism is that the lines of couching stitches are not very straight. I found it difficult to separate the silk threads in the right place AND keep in a straight line whilst working the backstitching.
Happy Stitching
Couching features quite a lot in Japanese embroidery in various forms. "A line of Held thread" is exactly what it sounds like; a line of thread held in position with couching stitches. This technique is used to add details to motifs, like stamen on flowers or veins on leaves.
Metallic threads are used extensively. As in gold work, they are couched on to the surface of fabric. Traditionally gold is couched with red thread and silver with white or grey thread, however other colours are sometimes used to alter the appearance of the silver or gold.
Other decorative threads, such as the katayori and karayori that I learnt to make in Bournemouth, are also couched on the surface, usually with a fine twist of the same colour silk.
Many of the holding techniques use couching stitches such as the diagonal holding used on the gold leaf cloud. Fine twisted silk threads are laid across the foundation and couched at intervals in a similar fashion to Bayeux stitch. For the woven effect on the side of the scroll, the final stage is to couch the in-fill stitches between the perpendicular gold threads. Normally I would couch along the length of each thread, one at a time. For this technique the couching is worked across the rows of thread using a variation of backstitch. The stitch on the surface is just long enough to secure the thread; the stitch on the reverse is long enough to travel from one thread to the next. Each row is completed before moving into the next.
© JEC/Carol-Anne Conway
I'm very pleased with this element. I took a lot of care to make the stitches regular and stitch the gold perpendicular to the foundation. My only slight criticism is that the lines of couching stitches are not very straight. I found it difficult to separate the silk threads in the right place AND keep in a straight line whilst working the backstitching.
Happy Stitching
Wednesday 21 March 2007
Vernal Equinox
At 00:07 today the relative position of the sun to the earth passed from the southern hemisphere to the northern hemisphere, so for every one living north of the equator it is now SPRING!
I don’t know why, but I feel a little tinge of excitement over the equinox or solstice days. The winter solstice is my favourite day of the year, because from then on the days get longer. The summer solstice would be my favourite day for being the longest but for the disappointment of shorter days to come.
I feel a similar excitement for full moons and new moons.
Yesterday evening, driving home, I suddenly noticed the tiniest slither of new moon ahead of me. There was patchy cloud and I think that it had been hidden behind a cloud previously. It occurred to me that I have never witnessed the moment when the moon emerges from the earth’s shadow and the new moon first appears. Call me sad but I would find that exciting.
I have a certain empathy for the sun, the moon and all things celestial, perhaps that is why I find Stonehenge such a fascinating and alluring place. Pat, on Altering Thoughts stitched Stonehenge for the Up and Down Buttonhole TAST. It is lovely, and I wish that I had thought of it.
Happy Spring if live on the top half of our little planet. If you are down under, Happy Autumn.
Thursday 15 March 2007
TAST Up and Down Buttonhole and Barred Chain Stitch
With putting so much time in to finishing Phase II and then a week away on my course, I have not done much for TAST recently so tonight I've done a little TAST stitching. This weeks challenge is Up and Down Buttonhole, a stitch that I had tried for the first time on my buttonhole sampler back in week 2. Here is a detail of that stitch.
Instead of exploring this further I took a look at last weeks stitch, Barred Chain Stitch. I have never done this stitch before so first looked at Sharon B's stitch dictionary. I have done both chain stitch and twisted chain stitch so I thought this would be a doddle. I decided to add a border to my chain stitch sampler using waste canvas to keep me on the straight and narrow. I don't know about twisted chain stitch, I certainly got something in a twist. I took me several attempts to get going and then I every so often I would go wrong again. I think nearly every bit has been unpicked at least once.
Now I have completed the border, I like the way it looks. I would like to try alternating barred chain stitch but not tonight.
Happy Stitching
Chrysanthemum
The central motif on the main book is a fabulous chrysanthemum. Some of the petals are padded, with those in the foreground more heavily padded than the ones behind. Padding is either 1 or 2 layers of cotton, a single layer of cotton under a layer of self-padding (in this case twisted silk) or a single layer of self-padding. The entire motif is one shade of silk plus gold. The left-hand petals are stitched with twisted silk only. To the right of the centre petals, first the tip of a petal is gold, then gradually more of the petal is stitched in gold until, on the far right, the entire petal is gold. This is a real beauty; I only hope that I stitch it well enough to do it justice.
I took several photographs to show how the padding is built up, but they are so out of focus that they are useless. This is the only usable photograph that I have of the first petals.
I am really pleased with what I have done so far. I took a lot of care with the stitching. The centre petal is the most heavily padded; it really stands out from the background fabric. When the petals immediately to the left and right are padded and stitched it may not stand out so much, but seen in isolation it looks lush!
Happy Stitching.
I took several photographs to show how the padding is built up, but they are so out of focus that they are useless. This is the only usable photograph that I have of the first petals.
© JEC/Carol-Anne Conway
I am really pleased with what I have done so far. I took a lot of care with the stitching. The centre petal is the most heavily padded; it really stands out from the background fabric. When the petals immediately to the left and right are padded and stitched it may not stand out so much, but seen in isolation it looks lush!
Happy Stitching.
Wednesday 14 March 2007
Scroll
The side of the scroll is covered with woven effect. This is created in several stages. The first step is to stitch a weft foundation with a difference. You lay two stitches and then miss one before laying two more. The whole motif is covered in this way before the next step can commence. Incidentally, this colour was not in the original selection. It is a beautiful, deep purpley blue.
The second step is to lay stitches perpendicular to the foundation. I have used two strands of #1 gold. These stitches are tied down at intervals in the gaps left in the foundation layer.
The third layer of stitching is to lay weft foundation stitches between the original foundation stitches.
These stitches will be held down with a 1-2 twist in the foundation colour thus creating the woven effect.
Happy Stitching
© JEC/Carol-Anne Conway
The second step is to lay stitches perpendicular to the foundation. I have used two strands of #1 gold. These stitches are tied down at intervals in the gaps left in the foundation layer.
© JEC/Carol-Anne Conway
The third layer of stitching is to lay weft foundation stitches between the original foundation stitches.
© JEC/Carol-Anne Conway
These stitches will be held down with a 1-2 twist in the foundation colour thus creating the woven effect.
Happy Stitching
Tuesday 13 March 2007
Higaki Foundation
© JEC/Carol-Anne Conway
The foundation for the Higaki is a horizontal foundation stitched in flat silk. I really like this shade of brown. All the colours are really growing on me.
© JEC/Carol-Anne Conway
Each page is stitch separately and the foundation is horizontal to the page being stitched not the fabric. When all the foundation is in place, temporary holding is used to stop it from shifting.
© JEC/Carol-Anne Conway
The higaki design is traced onto tissue paper with is tacked over the foundation. Later the design will be stitched through the tissue paper.
Happy Stitching
Monday 12 March 2007
Gold Leaf Holding Stitch - 2
The hotel did not have internet connection but to tell the truth, after a days stitching I was too tired to blog. I have had such a lovely week stitching, learning and chatting with friends. I will try to blog what I have learnt over the next few days. My photographs have not come out too well. There was not much natural light in the class room and my camera struggled to focus some of the time.
I completed the holding stitches on the gold foil foundation. Can you see them? It is really difficult to couch threads after you have done your best to hide them!
One thing that I was particularly looking forward to learning this week was twisting decorative, non-stitchable threads.
The red thread is a 5-1 karayori. For Karayori the same number of threads are used in both under-twists, in a 5-1 twist this is 2.5 plus 2.5. Both sets of threads are twisted as tightly as possible before being over-twisted together. As you over-twist you can see bobbles forming like a string of beads.
The blue thread is a 5-1 katayori. Katayori is an unbalanced twist, in this case 4.5 plus 0.5. 4.5 threads are first twisted very tightly and then over-twisted with the 0.5 thread. As you over-twist a knobbly thread emerges.
The green and gold thread is also a 5-1 katayori but in this case 4 strands of silk and 1 strand of #1 gold is twisted with 0.5 silk. The same knobbly effect is achieved but with the added sparkle of gold specks.
Happy Stitching
© JEC/Carol-Anne Conway
I completed the holding stitches on the gold foil foundation. Can you see them? It is really difficult to couch threads after you have done your best to hide them!
One thing that I was particularly looking forward to learning this week was twisting decorative, non-stitchable threads.
The red thread is a 5-1 karayori. For Karayori the same number of threads are used in both under-twists, in a 5-1 twist this is 2.5 plus 2.5. Both sets of threads are twisted as tightly as possible before being over-twisted together. As you over-twist you can see bobbles forming like a string of beads.
The blue thread is a 5-1 katayori. Katayori is an unbalanced twist, in this case 4.5 plus 0.5. 4.5 threads are first twisted very tightly and then over-twisted with the 0.5 thread. As you over-twist a knobbly thread emerges.
The green and gold thread is also a 5-1 katayori but in this case 4 strands of silk and 1 strand of #1 gold is twisted with 0.5 silk. The same knobbly effect is achieved but with the added sparkle of gold specks.
Happy Stitching
Sunday 4 March 2007
Gold Leaf Holding Stitch
As some of the foundation stitches are quite long, they need some form of holding stitch. On this element they will be held with diagonal holding stitch. First I twist a 1-2 thread. A length of green silk used for the foundation is divided into four. Two sections are undertwisted before they are overtwisted together. The final thread is even finer than one of the original quarters as a result of twisting.
Long diagonal stitches are stitched across the entire foundation area at an angle that best ‘hides’ the holding thread in the twist of the foundation threads. The holding stitches are themselves held with short stitches in the same fine twist. This technique is similar to Bayeux Stitch except in this case the intention is for the holding stitches to hardly show. In Bayeux Stitch the holding threads are a decorative feature.
Now, I am rather excited. My Japanese Embroidery course begins tomorrow. Later today I will travel down to Bournemouth for 5 days of uninterrupted stitching heaven. Anyone who has ever been on a residential course or a stitching retreat will appreciate how wonderful it is to totally indulge yourself in doing exactly what you want without the inconvenience of work, shopping, cooking, cleaning …. The only thing that stops you stitching is the annoying problem of having to eat or sleep occasionally! This will be the third time I've been, so I am looking forward meeting up with friends and talking to others who share my passion for embroidery rather that look at me rather quizzically when I talk enthusiastically about it. The only down side is five days apart from J. His week, of course, is entirely different. He gets to do my share of the housework which includes the thing he least likes doing – cooking. I hope to blog my progress while I’m away, if I can put my needle down for long enough and I can get an internet connection at the hotel. If not, I’ll be back in a week, until then,
Happy Stitching
Long diagonal stitches are stitched across the entire foundation area at an angle that best ‘hides’ the holding thread in the twist of the foundation threads. The holding stitches are themselves held with short stitches in the same fine twist. This technique is similar to Bayeux Stitch except in this case the intention is for the holding stitches to hardly show. In Bayeux Stitch the holding threads are a decorative feature.
© JEC/Carol-Anne Conway
Now, I am rather excited. My Japanese Embroidery course begins tomorrow. Later today I will travel down to Bournemouth for 5 days of uninterrupted stitching heaven. Anyone who has ever been on a residential course or a stitching retreat will appreciate how wonderful it is to totally indulge yourself in doing exactly what you want without the inconvenience of work, shopping, cooking, cleaning …. The only thing that stops you stitching is the annoying problem of having to eat or sleep occasionally! This will be the third time I've been, so I am looking forward meeting up with friends and talking to others who share my passion for embroidery rather that look at me rather quizzically when I talk enthusiastically about it. The only down side is five days apart from J. His week, of course, is entirely different. He gets to do my share of the housework which includes the thing he least likes doing – cooking. I hope to blog my progress while I’m away, if I can put my needle down for long enough and I can get an internet connection at the hotel. If not, I’ll be back in a week, until then,
Happy Stitching
Saturday 3 March 2007
Valentine Themed Heart
A month or two ago the Hand Embroidery Group launched a valentine themed heart swap. I really would have liked to take part but knew that I would struggle to complete my heart in the time frame. I pieced a heart to see how much I could get done before signing up, but as I had thought, other commitments meant that I could not spend much time on this.
The print on the right and the small triangle of red in the middle are scraps from a dress I made 3 or 4 years ago. The dark red satin is from a bag of scraps I bought from a local dress maker.
When I have had some spare time I've gradually added a little more stitching to the heart. The poppy on the left is something that I did a couple of years ago with a theme pack of Mulberry Silks called, funnily enough, 'Poppy'. I knew that I had some of these thread left over and wanted to use some of them else where on the heart but it took me a long time to find them. Anyway, I eventually found them, eventually finished the stitching and tonight I finally finished the heart. A bit late for the the swap, but this is my first QC heart and another finished project.
Happy Stitching
TAST Fly Stitch
I am getting a little behind with TAST but finally I have finished my Fly Stitch sampler. This is not a stitch that I knew much about beyond the basic Fly Stitch. I started by looking at Sharon's Stitch Dictionary to see what variations there are and then started exploring.
I've worked on 18 count canvas with Broder Medicis. I started with a row of open Fly Stitch followed by a row of closed Fly Stitch. I love the braid effect of the closed stitches and looking at it now, wish that I had tried this with alternating colours instead of a single colour.
The next few rows are experiments in making patterns with the stitch by combining them vertically or horizontally, either in the same direction or alternating the direction. I love the different patterns that this creates. I especially like the honeycomb effect in the green thread and the red squares below that.
The final few rows are variations of Reverse Fly Stitch, Threaded Fly Stitch and Wrapped Fly Stitch.
Once again I have really enjoyed exploring the stitch, discovering the patterns and effects that can be achieved with a deceptively plain stitch.
Get well soon Sharon. I think that we are all missing you, but want you to take all the time you need to recover fully.
Happy Stitching
Subscribe to:
Posts (Atom)