Sunday, 28 February 2010

Another Bite at the Cherry.

Himotaba was finished. I'd punched the air, woo-hooed and skipped around the room (Yes, I do know how sad I am) but still I had this nagging doubt. The comments left on my previous post seemed to echo my thoughts and Jane was able to express them clearly. The tassel was too 'mean' for a double central cord.

© JEC/Carol-Anne Conway

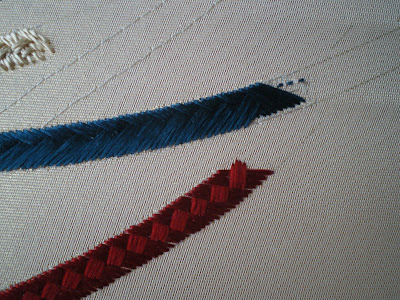
So what to do now? My big problem was that despite my reservations I had gone ahead and done the finishing, including gluing the back with wheat starch. For fear of getting paste on the fabric, I applied a very thin layer along the lines of the tassel. None the less, I was concerned that if I attempted to remove the stitching it would damage the fabric. Fortunately, Susan provided me with idea that might 'beef' up my tassels without reverse stitching what I had already one. For Phase V, Susan stitched the Kumihomi Cord clutch bag. The tassel on the back of the bag is almost identical to the tassel on Himotaba. The two major differences are that the Kumihomi Cord tassel has twice as many strands as Himotaba one and the tips of the pink tassel change to gold. I really like the gold tips but really did not want to risk removing any of the pasted stitching, however, I did think that I could stitch an additional line of staggered diagonals between the existing lines. I spent from Sunday to Friday debating with myself whether or not to do this.

On Friday morning, I decided I should do it. An hour later I had stitched 3 lines between the existing lines and there was no going back. Which of course is the ideal time for the internal critic to chime in and tell me that I had made a BIG mistake.

© JEC/Carol-Anne Conway

Another 24 hours later, I decided that there was no going back, so I had to live with my decision and finishing stitching between all of the lines.

© JEC/Carol-Anne Conway

The more I stitched, the more confident I became that I had made the right decision and when I finished I was much more satisfied with the tassel.

After seeing Susan's tassel with it's gold tips, I was very tempted to stitch mine in a similar way but still I did not want the tassel to completely dominate the design. I hope that the version I have settled on provides the right balance of a tassel befitting a double central cord but one that does not detracted from the other cords.

Happy Stitching
Wednesday, 24 February 2010

The Cherry on the Cake

I like to save something 'special' for last, especially on longer projects. If there are boring or tedious parts on the design, having something to look forward to helps to keep me motivated, although that is not usually a problem for me with Japanese embroidery. I might save something that is done in a technique that I have not done before or one that I particularly enjoy. Or it might be a part of the design that I find especially attractive or something that will add that finishing touch; the cherry on the cake.

In Japanese Embroidery, things are generally stitched in a certain order. Foreground objects are stitched before those behind them. As far as possible, begin with the elements furthest away and work forwards, similarly start with the elements on the left-hand side and work towards the right. This prevents the right hand (which is always on top of the fabric) from resting on parts of the design already stitched. As the 'best bits' are generally in the foreground it is not always possible to save them for last but on Himotaba there is a tassel on the right-hand side (the design is mounted on the frame sideways on) with nothing behind it. For me this, was the obvious 'special something' to save for last.

© JEC/Carol-Anne Conway

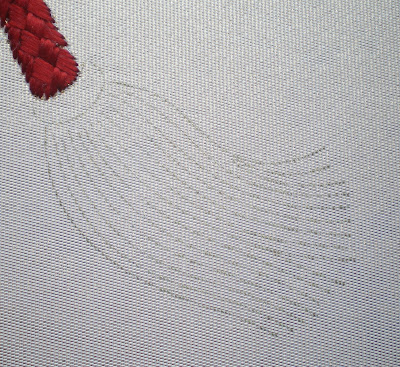
There are two versions of Himotaba. On the original version, cord #1 ends in a small tassel. On the extended version that I am stitching, as well as longer cords, there is a longer, more elegant tassel.

The head of the tassel is padded with two layers of padding cotton before stitching with 2 strands of flat silk in the diagonal direction.

© JEC/Carol-Anne Conway

The box chart gives the two options for stitching the tassel, the first is to stitch the tassel strands with a line of staggered diagonals using .75 strand of flat silk the alternative is to cover the entire tassel in diagonal layer using 1.5 strands of flat silk to give a solid shape. I have seen 2 or 3 versions of Himotaba that combine a flat silk foundation with stitched strands, and one that has round knots at the end of the tassel to give a 'frilly' effect. For some time, I was tempted to use one of these variations. After much thought, I felt that the tassel is already a prominent feature of the design; the eye is automatically drawn to it, I felt that a more flamboyant tassels would detract from the cords and so decided to go with the simplest treatment.

© JEC/Carol-Anne Conway

I am still in two minds about it. I do like a bit of bling and feel that the tassel is crying out to be the star of the show but on the other hand, I don't want it to hog the limelight.

Happy Stitching.

Sunday, 14 February 2010

Happy Valetine's Day

I took part in a St Valentine's Day travelling page swap on the Embroiderer's Guild Forum.

The design of my page is quiet simple. Two elements, two techniques, two threads.


The word 'Valentine' is stitched in gold but I wanted it to appear light. I've spaced the satin stitches so that a little fabric shows through.


One of the first techniques that I learn was lattice holding. Although the lattice of thin threads is there to hold the foundation stitches in place, the quilted look is very attractive. I've wanted to experiment with adding some padding to enhance the effect, at the same time I wanted keep the shape of the heart crisp and precise. I cut a heart shape out of paper and bonded that to a piece of wadding that I then carefully trimmed to the same shape. I attached the paper/wadding heart to the background fabric with small close stitches both to secure it in place but also to reduce the loft of the wadding around the edges. I then stitched a vertical layer in flat silk. Vertical layer is the name given in Japanese embroidery to a satin stitch worked on the vertical axis of a motif. I worked the stitches with slightly less tension than I would normally so that they did not flatten the wadding. I did the same with the lattice stitches but when I added the tie stitches at each intersection of the lattice, I applied as much tension as possible. I wanted the stitches to sink fight into the wadding.


I am really pleased with the way this page turned out. The heart is clearly defined but it has a softness about it. I may use this technique again and even see if I can enhance the effect still more.

Happy Stitching.

Saturday, 13 February 2010

Inching Towards the Finish Line

The finishing line is definitely in sight. It's not that I have had enough of this Phase but as a project nears completion I feel a strong urge to get it finished. Added to that, my next Japanese Embroidery class is in 3 weeks time and the piece I am stitching at Phase VI is at the very top of my wish list. I am trying to keep that out of my mind, stay focused on this Phase, and not rush the little that remains.

Today was a good stitching day, apart from the odd reverse stitch here and there, everything has moved forward.

As well as using gradually finer threads, partial or missing stitches are used to create the effect of fading out.

I had thought that the fade out on cord #3 would be particularly impressive. As it turned out, the colour of the thread is so close to the back ground that the effect is a little lost. Even so I am pleased with it. The colour of the cords above and below it are really strong; I like this quiet spot between them.

© JEC/Carol-Anne Conway

Just a few stitches were needed to finish cord #5. Even thought this is stitched in flat silk, the same techniques are used to fade out the end of the cord. The bulk of the cord is stitch with 2 strands of flat silk. Through the last 2-3 inches this decreased to 1.5, 1 and finally half a strand of flat silk.

© JEC/Carol-Anne Conway

The ends of both of these cords pass under other cords. It is important to compensate for the section of cord that is not visible for the fade out to look realistic.

Two more cords finished. The finishing line is definitely in sight.

Happy Stitching

Thursday, 11 February 2010

Going Backwards

I seem to be going backwards more than forwards on this Phase. I decided cord #3 needed a little reverse stitching. This time it was not the stitches that I was dissatisfied with but the twisting of the thread. It looked uneven. The 2-ply thread is made by first undertwisting each ply and then overtwisting them together. Using the same amount of silk in each ply and giving each the same amount of undertwist results in an even, regular twisted thread. If the plies have a different amount of undertwist, the resulting cord will be uneven. This fact can be exploited to create decorative threads and even exaggerated by using plies of differing thicknesses.

For this cord I am using a 4 into 1 twist. That means that each tread is made from 4 strands of flat silk, 2 in each ply. I twisted enough thread to nearly complete the cord (hopefully). The end of the cord is intended to look like it is fading out and gradually finer threads are used to help achieve this effect. I also twisted the threads I will need to stitch this part of the cord.

After I had reverse stitched and twisted the new threads I had little time left to actually stitch. When I stopped to go to work I had less stitching done than when I started. That is very disheartening.

© JEC/Carol-Anne Conway

That was two days ago. I was able to do another 30 minutes stitching this morning and am now a little further ahead but it was very difficult to tear myself away from the frame with so little of the cord remaining.

© JEC/Carol-Anne Conway

If I get some stitching time tomorrow I may just finish this cord.

Happy Stitching

Monday, 8 February 2010

Shiny, Happy Needles

Hand made Japanese needles are more expensive than mass produced needles; the Japanese Embroidery student is taught to look after them. Whenever needles are not being used they are kept in our needle felt. This 100% wool felt contains natural lanolin which helps protect them from the elements. Even so, with use the natural oils in our fingers and dust build up on the needles. A good indication that a needle is dirty is that it 'squeeks' and does not pass through the fabric as freely as normal.

Needles can be cleaned with a lightly abrasive material such as ScotchBrite or finishing grade glass paper. This will remove the film of dirt without roughening the surface or blunting the tip of the needle. After scouring with abrasive and before stitching, the needles should be polished with a scrap of fabric to remove all tracres of dirt. Dirty needles appear blackened; clean needles are shiney and silver coloured.

In Japan, the Festival of the Broken Needle is help on Frebruary 8th. I don't have any broken needles but I did have dirty ones. I have spent the evening cleaning my needles and takibari, giving thanks for their service and drawing on their spirit to improve my stitching skills.

Happy Stitching

Sunday, 7 February 2010

Fourth Time Lucky

I nearly met my match in cord #4 and some sections of this cord have been stitched four times. Things would appear to be going well and then suddenly the angles would be wrong and I could not work out how to place the next stitch. Three times I cut through two or three inches back to where I felt certain the angles were correct and started again. I don't think that any technique, Japanese Embroidery or otherwise, has challenged me so greatly and more that once I wondered if I had met my match.

© JEC/Carol-Anne Conway

This is the first time that the frustration I have felt trying to stitch something to my satisfaction has nearly eclipsed the pleasure of stitching. But to give up on this cord would be to give up on the whole Phase and I was not about to do that.

The curve on this section of cord is very slight and I think because of that I was not compensating for it. Not adjusting for the curve was throwing the angle of the stitches out.

Finally, I think I have the stitches at the correct angle and I was able to fade out the final section of the cord.

© JEC/Carol-Anne Conway

I don't think that this is perfect but I think that it is good enough. I certainly don't want to stitch it for a fifth time, nor do I think that I could do a better job if I did. I declare this cord FINISHED.

Happy Stitching

Saturday, 6 February 2010

Fish Face

The face was without doubt my favourite part of this project. Even though the eyes were stitch first, only now did the full character of this little character finally emerge.

Just look at those puppy-dog eyes. Who could resist them!


Even the lower face is very pretty, and after all of those belly scales the gay stripes including all the different beads were light relief.


With his face and body fully beaded all that was needed was a tail and fins. Multiple layers of stranded beads, topped off with daggers and fire polished beads.


The beading is complete but he still needs lining. That will have to wait; for now my fishy friend has gone travelling. He came with me to Manchester to meet one of his cousins but on the journey home he leapt out of his bowl and stowed away in the boot of Sue's car all the way to Romsey to visit another cousin. He will be staying there until March but I know that he will be safe and happy with his Aunty Sue.


Happy Stitching

Monday, 1 February 2010

Show time

Last weekend I was at the Stitch and Creative Crafts Show at Manchester Central demonstrating Japanese Embroidery. I always enjoy these weekends. I get to spend time with friends, do some stitching, meet lots of interesting people and tell them what I love about Japanese Embroidery.

This time there was an other Japanese orientated stand, Festival of Japan, where Jill was demonstrating how to dress in a kimono. As her model had not arrived in time for the first demonstration, I volunteered my services.


Well, I couldn't pass up the opportunity to actually wear these fabulous garments, could I!