However much you like a designer's work, you like some of their designs more than others. I have several of Jenny’s kits in my stash and there are others that I would happily add to it. When the Blackwell Roundel was first released, it did not immediately appeal to me.
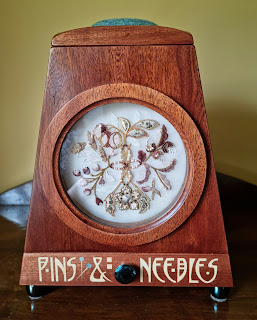
Later, when I saw it in the specially designed Pins and Needles Workbox, I saw it in a different light and it did make its way into my stash. I had not planned to stitch it so soon but when I heard from Jenny that the handmade Workbox I had ordered was soon to be available, and I had just finished Amy’s Summer pieces, it seemed like the perfect time to frame up the Roundel.
© Jenny Adin-Christie/Carol-Anne Conway
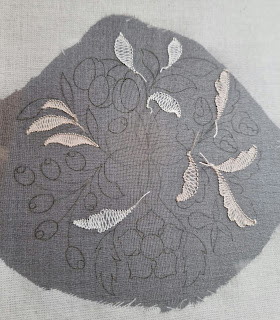
The Blackwell Roundel is a little different from everything else I’ve done and includes some techniques that I have either not done or done very little of. To start, it is stitched entirely on a delicate silk organza ground, a fabric I have not stitched on before. The embroidery begins with a series of connected eyelets called “beading”. I have made eyelets before but very few and never on such a delicate fabric. I was pleased and surprised at how well they turned out.
Some of the leaves are depicted using double back stitch shadow work. I have tried this before but not at all satisfactorily. That may have been because my ground fabric was not translucent enough but nor did I really know what I was doing. On the organza and with Jenny’s excellent instructions, I had much more success.
© Jenny Adin-Christie/Carol-Anne Conway
The next step was a completely new technique for me, shadow applique. The silk is attached to the underside of the organza using pin stitch. The surplus fabric is then cut away as close to the pin stitch outline as possible. A real heart-in-mouth process as I worried about accidently snipping through the organza!

© Jenny Adin-Christie/Carol-Anne Conway
At this stage, the design is removed from the frame and a second layer of silk organza is placed behind the first and both layers framed up for the rest of the embroidery.
© Jenny Adin-Christie/Carol-Anne Conway
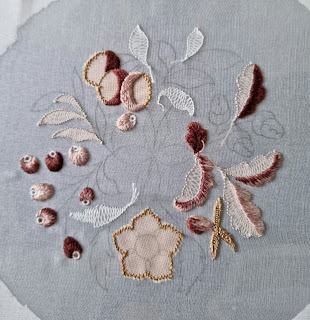
The remaining embroidery was all in stitches I am familiar with but there is always something to be learnt from Jenny’s instructions. The supplied threads are gorgeous and this kit included some silk gimps, which are becoming a bit of a favourite, and a beautiful silk-wrapped plate that is pleated to form the centre of the wild rose. Every element is embellished with pearls, seed beads, and/or metal purl threads.

© Jenny Adin-Christie/Carol-Anne Conway
The whole design was a delight to stitch and, not surprisingly, far more beautiful in reality than any photograph could suggest. The completed piece is designed to be stretched over an open space allowing you to see through the organza and with the embroidery casting a delicate shadow. A laser-cut mounting disc and spacer rings are supplied with the Pins and Needles Workbox to mount the embroidery and lift the glass off the work. Also included are the materials to create the pin cushion.

© Jenny Adin-Christie/Carol-Anne Conway
Happy stitching

4 comments:
I fell in love with this Rondel the moment I saw it and waited anxiously for the kit to come out. It's sitting in my sewing room, waiting for me to start it. It's a much more complicated piece of work than I've tried before. Your post has made me both more excited about it and a little more scared to actually get going on it.
Love it!
Hi Kathy, please do give it a go. I was nervous about the organza and a couple of the techniques but the organza is very nice to stitch on (I had mine drum tight in a hoop) and Jenny's instructions are very clear for each step. I was a very enjoyable stitch.
That turned out very well - although I must admit to twitching a little when I read about cutting the applique close to the pin stitch - far too reminiscent of the anxieties I had over cutting away the unneeded padding for Akhenaten!!
I have this kit as well and started it. I really should get back to it to complete it. How will you finish it?
Post a Comment