Monday, 15 September 2025

Hanayama - The Flower Mountain

Last month I wrote about learning Japanese Embroidery. The various techniques are taught in Phases.

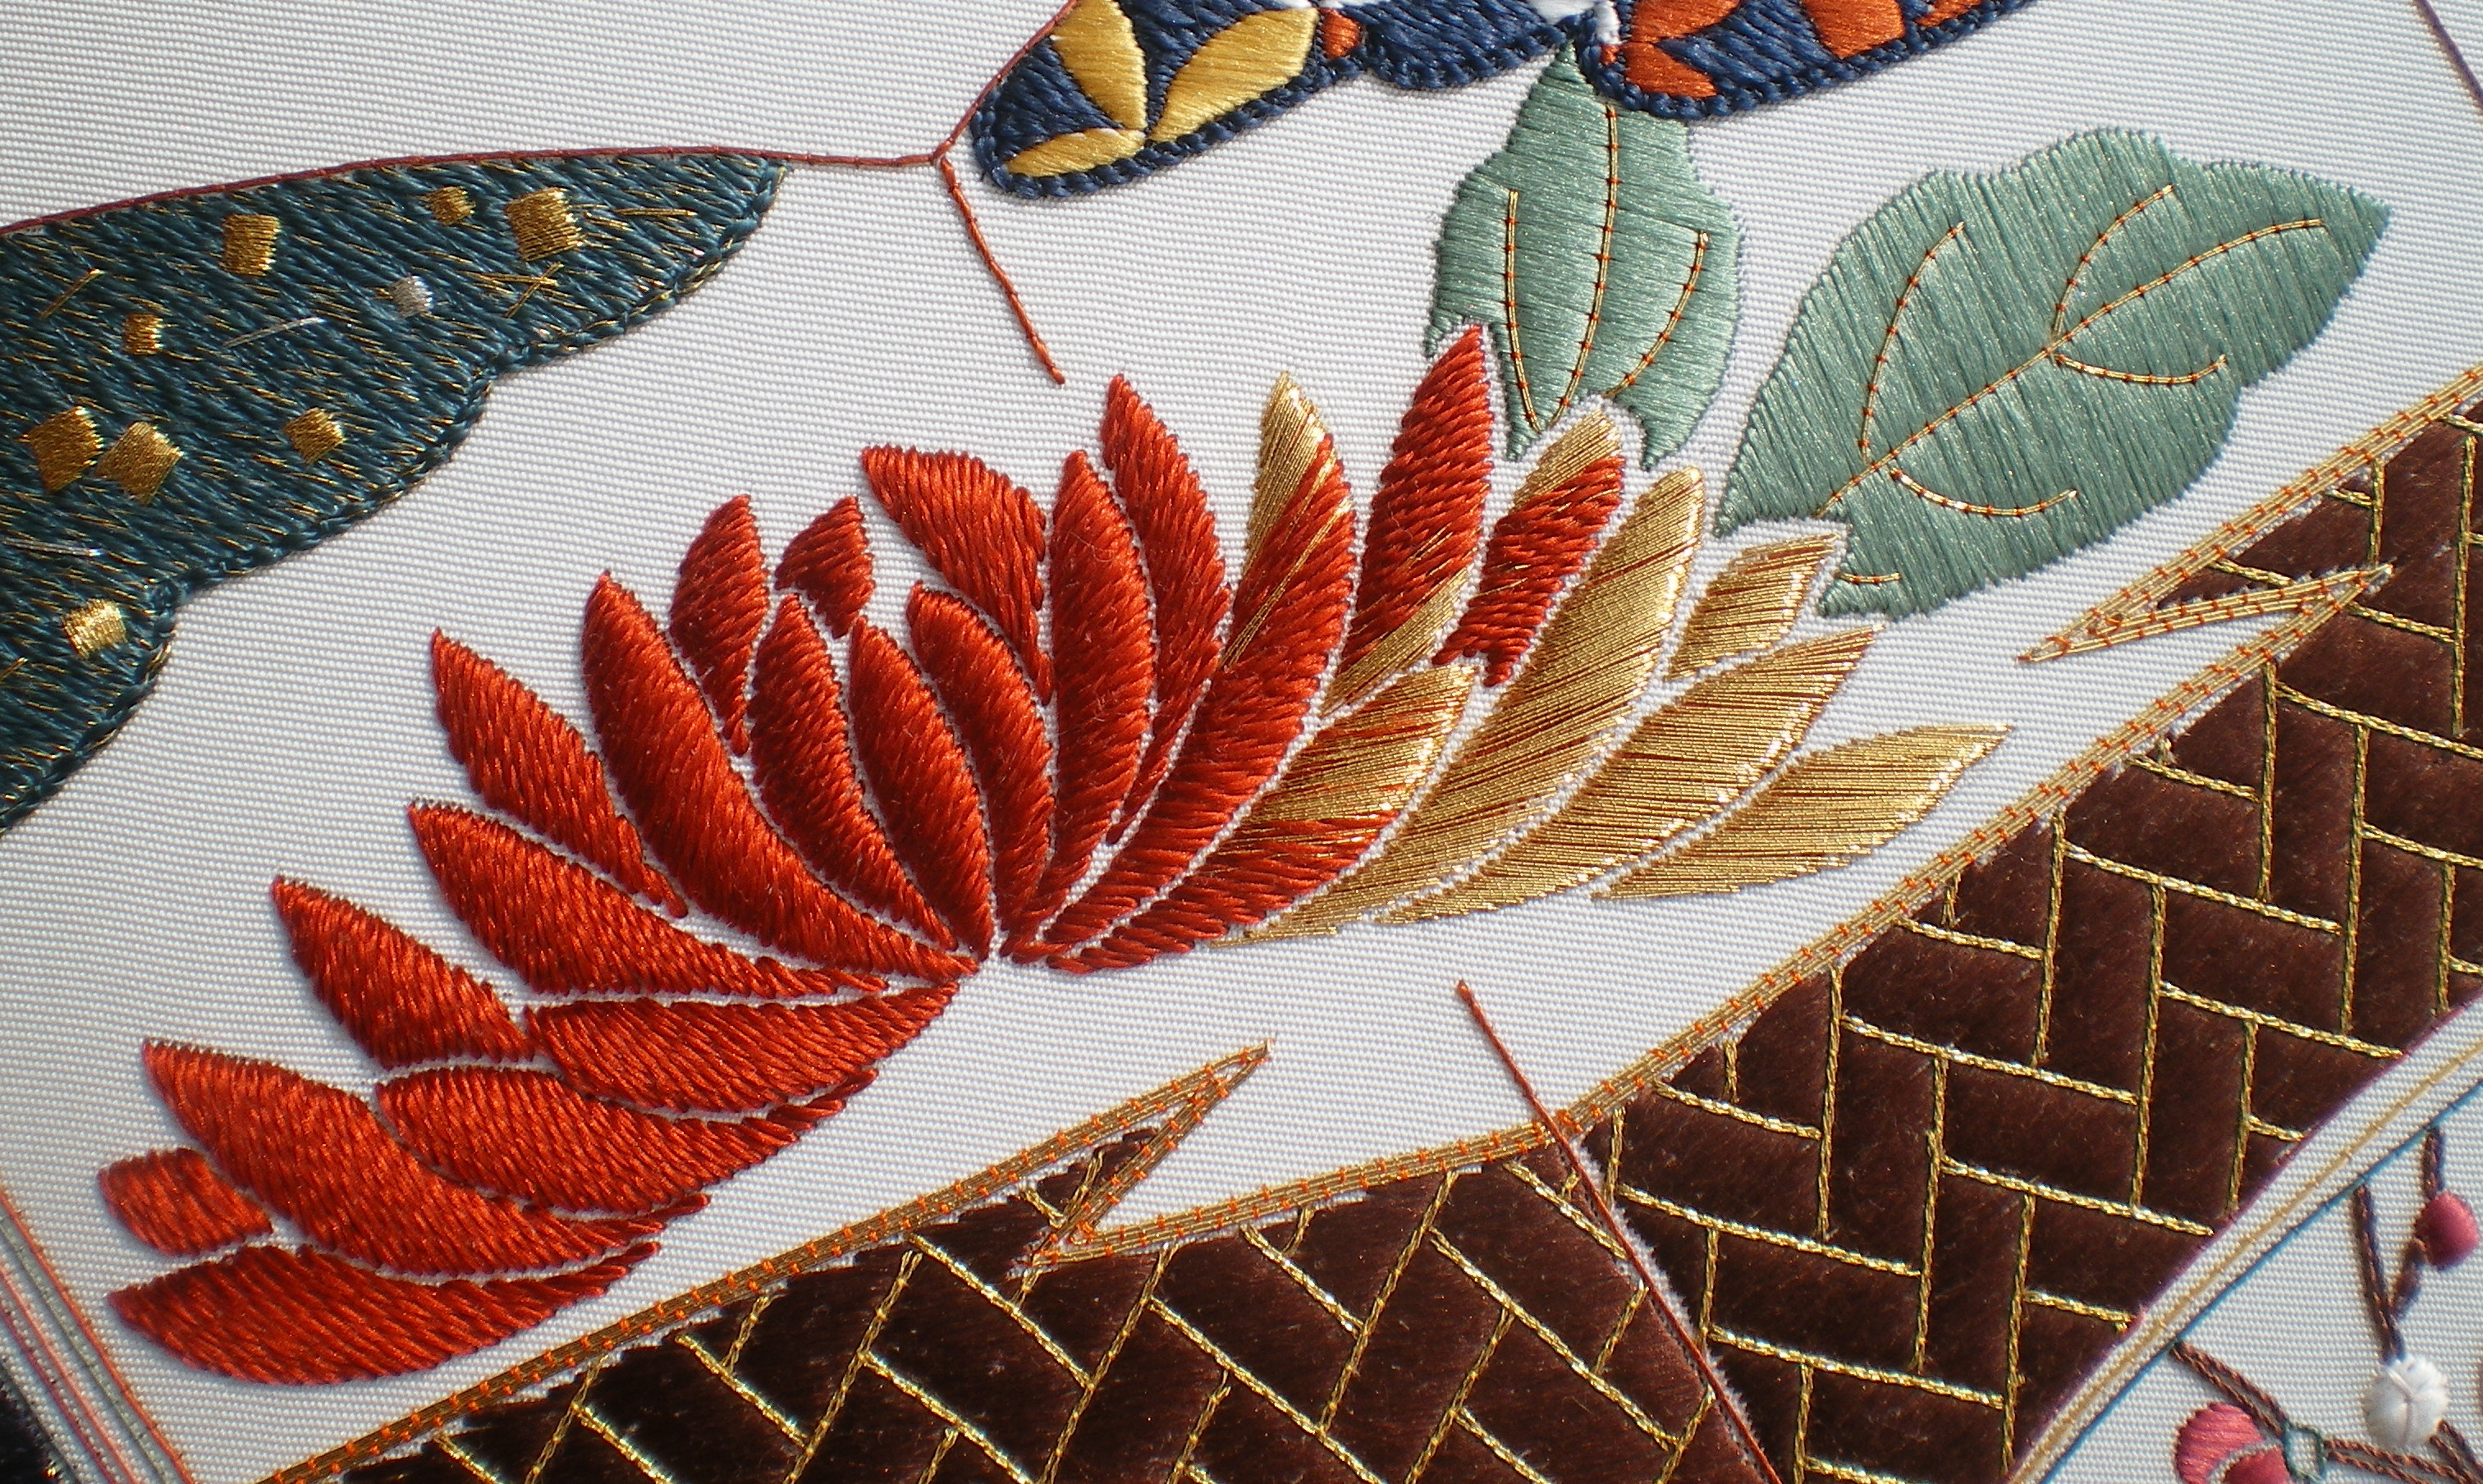
For Phase I, I stitched Hanayama - The Flower Mountain. This design introduces some of the basic techniques of Japanese embroidery, including laying weft and horizontal foundations, lattice holding, Japanese knots, and couching.

© JEC/Carol-Anne Conway

Japanese Art is full of symbolism and meaning. As I learn the embroidery techniques, I am trying to learn as much as I can about the motifs that I am stitching.

Each of the five mountains contain one design element: cherry and plum blossoms; chrysanthemums; maple leaves; pine trees; and kikko (tortoise shell). These motifs symbolise the seasons; spring, summer, autumn, winter and the cosmos (eternity). I don't fully understand why the cosmos is often depticted together with the four seasons. I think that it is related to the never ending sequence of one season following another.

Happy Stitching

Sunday, 23 February 2025

Introduction to Tudor Embroidery - Finished

The five finished samples were combined into a single display. The background was quartered with the Ecclesiastical Flower Motif, the Berkeley Grape Vine, the Goldwork Rose, and the Bacton Marigold in each of the four corners, and the Broiderers’ Crown Roses on a roundel of black velvet in the centre.
© Cynthia Jackson/Carol-Anne Conway

Various metallic threads were combined to conceal the joins between the fabric grounds. A flat gold was threaded into a coil of fine gold wire which was then overstretched and flattened. This was positioned and couched over the join. Different weights of lizarine were then couched along each side of the flat wire. Only a small segment of the looped wire remains visible creating a subtle effect against the flat wire.

© Cynthia Jackson/Carol-Anne Conway

The ribbed silk faille used for the Bacton Marigold corner was gorgeous but you only had to look at it and it frayed. This meant that I needed additional embellishments to cover the join between the faille and the velvet … and I had to stitch very gingerly to prevent further fraying.

© Cynthia Jackson/Carol-Anne Conway

The central roundel was treated in a different way. The flat wire was crimped and carefully coaxed around the curve. This was outlined with gilt brilliant twist – a two-ply cotton thread that is covered with a thin gilt strip.
© Cynthia Jackson/Carol-Anne Conway

I learned a lot on this course and it only served to heighten my interest in historical embroidery.

Happy stitching!

Sunday, 16 February 2025

Broiderers' Crown Roses

The final motif on the Tudar Embroidery Sampler uses techniques found on an extraordinary extant embroidery studied and reproduced by Cythia. It is perhaps befitting that this exquisite “crown” belongs to the Worshipful Company of Broiderers.

© Cynthia Jackson/Carol-Anne Conway

Cythia gave a lecture on her studies, together with detailed photographs of every aspect of the crown, and a detailed description of her reproduction. In October 2023, I was able to see both the original and the reproduction (and a second extant crown) at the Guildhall Art Gallery’s Treasures of Gold and Silver Wire exhibition.

© Cynthia Jackson/Carol-Anne Conway

Like the Ecclesiastical Flower Motif in the first sample, the elements are stitched onto linen that will be cut out and applied to the velvet background. They are stitched in stages, building up layers of silk and metallic threads. The first layer is a satin stitch foundation using silk.

© Cynthia Jackson/Carol-Anne Conway

Over this flat metallic threads are first attached perpendicular to the foundation and then secured and embellished with silk couching stitches.

© Cynthia Jackson/Carol-Anne Conway

On one of the flowers another layer of metallic threads, this time passing thread, is applied and couched. Variations in the couching patterns and/or using various shades of silk for the couching, creates different effects.

© Cynthia Jackson/Carol-Anne Conway

The elements are finished with an outline of coiled wire.

When finished, each element is glued before being cut out and applied to the background. The stems, including the central vein on the leaves, are stitched directly onto the ground.

© Cynthia Jackson/Carol-Anne Conway

I really enjoyed stitching these flowers and I think they are stunning! I will definitely be revisiting this style of embroidery.

Happy stitching

Sunday, 9 February 2025

Or Nué Beetle - part 2

Continuing in the vein of revisiting unfinished stories … Or Nué Beetle - part 1

My beetle would be somewhat different from Arleen’s model so I had to invent some of the elements, such as the thorax and the head. So far as I could remember, these were also enamelled on the brooch that had inspired my design. It was somewhat fiddly filling these tiny shapes with or nué but it did not take very long to complete.

© Carol-Anne Conway

The next thing I had to work out was how to make my beetle not just three-dimensional but free standing. For this, I turned to Beetle Juice by Amy Mitten for inspiration. I created a frame for the body from which the legs extended. These I covered in Hedebo stitch. I then padded the body before applying silvered leather both on top and underneath. Once I had cut the body away from the calico foundation, I covered the join with silver pearl purl.

© Carol-Anne Conway

I had to work a lot of things out to make my or nué beetle just the way I had imagined. I am really pleased with how he came out. I entered him into a local art show. When they asked what he is called, my husband immediately responded Ring, so Ringo he is!

© Carol-Anne Conway

Thanks to Arlene, Amy Mitten, and an unknown enamel artist for the inspiration.

Happy Stitching!

Sunday, 2 February 2025

Fanciful Story, Chapter Seven - I've Got You Covered

Some of the stitching on this project was challenging but I rarely find stitching daunting. I relish learning new techniques and working with new materials. The finishing process is less my forte and often takes me outside my comfort zone. I have mounted several of my embroideries for framing and am relatively comfortable with that process. Fanciful Story is a book cover which is something that I have not done before.

The first issue I encountered was that the dense stitching had shrunk my carefully measured surface area. I needed to make some small adjustments to get everything to fit.

The first step was to separate the pages from the cover of the supplied book in order to lave the embroidery around the cover in much the same way I would cover a mount board.

I needed to adjust this a couple of times to allow the covers to close around the pages (because of the shrinkage I mentioned earlier). When I was finally happy with the fit, I pasted in new end papers. For this, I used a hand-marbled paper that I had purchased several years ago. At the time, I was looking for marbled paper for a different project but I could not resist this flame marbled paper. I was very happy that the scale of the marbling and the colours were a perfect fit for this project.

© Rachael Kinnison/Carol-Anne Conway

Recovering the book was extremely challenging and tested my patience but, in the end, it was worth persevering.

© Rachael Kinnison/Carol-Anne Conway

The End.

Happy Stitching

PS: Fanciful Story is one of a series of limited-edition Heirloom Embroidered Ornaments designed and sold by Rachael Kinnison of Diamond K Folk Art.

Sunday, 26 January 2025

Fanciful Story, Chapter Six - Bedazzle

I completed this project about a year ago so it is high time I finished its story.

The wrapped Ceylon stitch ribbons are quite a statement in themselves but this little book cover is about to get a whole lot blingier!

The space between and around the ribbons is covered entirely in real gold spangles, each attached with an antique opal glass bead.

I began by working around the edges of the spaces to be filled, starting in the corners or awkward spaces and adjusting the spangles between to leave the minimum space between but not overlapping as much as possible.

© Rachael Kinnison/Carol-Anne Conway

I then filled the remaining space trying to avoid obvious rows forming. The beads were so tiny that I could not fit the needle through some of them however I had been supplied a generous amount so this did not become an issue.

© Rachael Kinnison/Carol-Anne Conway

For various reasons, it took me nearly two months to apply all of the spangles but it was a process that I enjoyed. Like couching, I settled into a rhythm and found it relatively relaxing.

© Rachael Kinnison/Carol-Anne Conway

In the images, the wrapped Cylon stitch ribbons become a little lost among the spangles. I real life they are more evident. The overall effect is bedazzling!

Happy Stitching

Wednesday, 1 January 2025

Happy New Year 2025

2024 was a good year, although not for this blog, I di not manage a single post, not even my Happy New Year post. Before writing the post for the current year, I like to read what I wrote in the previous one. I had to go back to 1 January 2023. It all seems a very long time ago ! I finished by saying “Bring it on 2023, I am excited to see what you have for me!” I did not plan to review 2023 in this post but I think a few things are worth at least a mention. I finished Kusadama! I attended Teacher Class and became and accredited Japanese Embroidery Tutor. I joined Jane as a teaching assistant for her classes in Lancaster and have a small but growing number of students learning Japanese Bead Embroidery. A planned trip to the Netherlands on the Harley were rapidly revised when I tripped and broke my elbow two days before we travelled. Fortunately, my husband was able to change bookings from the bike to the car and arrange a vehicular pass for the city or Ghent where we had booked overnight accommodation for one leg of the journey. And we fulfilled a fifty year dream to visit Egypt. Ever since seeing the Treasures of Tutankhamun exhibition in London, I have wanted to visit the Land of the Pharaohs. We did a twelve day tour taking in upper and lower Egypt and not only did the trip not disappoint, it exceeding my expectation. It is difficult to select highlights from a trip that brought something new and sensational every day but one standout moment was something that I did not think was going to happen. We had hoped that The Grand Egyptian Museum would open in time for our visit. It didn’t. I thought that this meant we would not see the Treasures of Tutankhamun. Although I had seen them all those years before, I did not remember seeing the funerary mask, and hoped that I would get to see it again. Much to my delight, it was still on display at the Egyptian Museum in Cairo and by good fortune, at the moment I stood before it, everyone else moved away leaving me alone with this iconic symbol of ancient Egyptian civilization for several minutes.

Family and Friends

2024 was a fabulous year for family. Two of my nephews got married. Two very different occasions, both perfect, and both my favourite moments of a great year. Looking ahead we will be travelling to the Netherlands to be with my sister-in-law and her husband when they celebrate another mile stone in their relationship. I have another wedding to look forward to, this one of a friend. Wendy is the sister of someone I was dating many years ago. Our friendship lasted way beyond the relationship but somehow we lost touch somewhere along the line. One day, I received a PM through social media and we picked up where we left of, as good friends do. I am thrilled to be invited to her wedding in the Summer.

Work

The past two years at work were not what I expected! Somewhat bored and unfulfilled, I was considering retiring. A new boss reignited my passion for the company and our product and encouraged me to take on a challenging new role. As he put more and more trust in me, my confidence and enthusiasm for the role grew. Unfortunately, he has decided to move on to new projects and I am feeling uncertain about progressing without his support and encouragement. What will this year bring … I will have to wait and see!

Embroidery

If there was a downside to my renewed enthusiasm for work, it is that it impacted on my embroidery time. I put a lot of energy into my work and worked a lot of extra hours. That said, my embroidery was not neglected.

However, as often is the case, when I reviewed what I HAVE done over the last two years, I was surprised to see just how much there is. Most of them are not (yet) recorded on the blog. I add those to my growing list of things to add to the blog!

In no particular order
The Elizabethan Valentine by Katie Strachan
Ringo, a raised embroidery beetle based on a design by Arlene White
Fanciful Story by Rachael Kinnison
Topaz, based on Topaz by Alfons Mucha
Cherry Fall, playing with beads.
Deep Dive into Stumpwork by Well Embroidered (Sara Rickards)
Phoenix and Pine (briefly, and I really would like to get back to this)
Spooling Around, a 6 x 6 canvas for the Textiles in Oxford Showcase
Summer Hydrangea, JEC Phase XI
Orchid Broach, a raised embroidery orchid based on a design by Jenny Adin-Christie (with kind permission)

My current sewing room project is the Summer Hydrangea.
My current sofa project is Black and White + 1, a piece based on White Blossoms by the JEC reimagined as a 6 x 6 canvas for the Textiles in Oxford Showcase, 2025
My next course will be A Garden in Gutter Lane by Cynthia Jackson. I am very excited about this course 😊

I have continued to assist Jane with her Japanese embroidery classes in Lancaster and we have a small, but growing, number of students learning Japanese bead embroidery. Starting in January I will be teaching Japanese embroidery and bead embroidery in Oxford, assisted by Jane. I am very grateful to Jane for her support and guidance in setting up this first class and I am very excited for this new venture to begin.

So, bring it on 2025, I am excited to see what you have for me!

Happy Stitching!

Tuesday, 21 November 2023

Fanciful Story, Chapter Five, Wot No Knots!

Inspired by early embroidered book covers she had studied, Rachael added rosettes of Elizabethan Louped Fill to the spine. The originals may have been impressive but they do not photograph well and I was not overwhelmed by them. And maybe I have been influenced by the notion that they would be fiddly to stitch!

I considered substituting the rosettes with either a Josephina Knot or one of the Interlacing Stitches that I had learned on the Goldwork Sampler. But in the end, I decided to give the rosettes a go. I was right about them being fiddly but I was way more impressed with my little rosette than I imagined I would be even if my photograph does not do it justice.
© Rachael Kinnison/Carol-Anne Conway

I decided to leave the second rosette until after all the other embroidery is complete and wish that I had done the same for this one because I KNOW that my thread is going to keep catching on those loops!

The spine is embellished by couching gilt rococo along each long edge and adding a few spangles above the letters and numerals.
© Rachael Kinnison/Carol-Anne Conway

This is now ready for the final embellishment!

Happy Stitching

Thursday, 9 November 2023

Fanciful Story, Chapter Four, Sumptuous Scarlet Silk Satin Stitches

The border and lettering on the spine of Fanciful Story are stitched in a padded satin stitch.
© Rachael Kinnison/Carol-Anne Conway

When I put this image on Facebook a couple of weeks ago, a friend commented “Nothing Beats Silk” I totally agree! The silks in this project are by Au Ver à Soie who offer a good range of silk threads.

The padding is a row of teeny-tiny chain stitches worked in Soie Perlée, a 3-ply twisted filament silk. Filament silk is unwound from the cocoon in one long continuous strand that, when twisted, results in a soft smooth thread that is more lustrous than spun silk threads.

The satin stitches are worked in Soie Oval which is a low-twist filament silk that is very smooth and shiny! You can see in the image above that while these two products are made from the same raw material, the lower twist thread is much more lustrous than its twisted counterpart.
© Rachael Kinnison/Carol-Anne Conway

Au Ver à Soie describe Soie Oval as flat silk but it is not the same as the Japanese flat silk I am used to which has absolutely no twist! In the image below you can see how the suga (filaments) of the Japanese flat silk (on the left) are separate and can spread. When stroked and laid correctly this gives the optimum shine.
© Rachael Kinnison/Carol-Anne Conway

If you zoom in you can see how one strand coils around the Soie Oval (in the centre) preventing the filaments from spreading. This makes for a slightly more manageable thread but it also results in slightly less shine. The Soie Perlée is shown on the right, for comparison.

Happy Stitching

Thursday, 5 October 2023

Fanciful Story, Chapter Three, So Long Ceylon Stitch – it’s a Wrap!

It seems to have taken me a very long time to do all of the wrapped Ceylon stitch. As with most techniques, I felt that it got easier and/or I got better at it with practice. I would even go so far as to say that I now quite like working wrapped Ceylon stitch but for now, I am happy to move on to something different.
© Rachael Kinnison/Carol-Anne Conway

There are several factors to mastering a stitch or technique (not that I am claiming to be a master of anything).

The first is understanding the method. For me, the ideal way to learn a new stitch or technique is to have someone who knows it well demonstrate it. If that is not an option, I am able to manage with well-written instructions.

The second is practice, there really is no substitute. The more you practice, the better you get!

As mentioned in my previous post, the right tools can make a big difference and this can be something as simple as using a suitable needle.

Increasingly, I believe that understanding the thread you are using is fundamental.

The wrapped Ceylon stitch is worked in gilt passing thread In this design. Passing thread consists of a fine wire wrapped around a thread core. It feels like a wire but does not behave as a drawn wire would. We naturally twist the thread as we stitch adding or reducing overtwist to the thread which causes the thread to twist or buckle. I treat passing thread like any other twisted thread and twizzle the needle to maintain the correct overtwist throughout.

Passing threads are both expensive and delicate. For this reason, it is often couched to the surface of the fabric. When it is stitched, it is generally used for stitches that are predominantly on the surface. Wrapped Ceylon stitch is worked in two stages. First, the Ceylon stitch or ladder stitch is worked. This shows mostly on the surface with short parallel stitches on the reverse. The second step is to wrap the rungs of the ladder. Except for starting and fastening of the thread, this is worked entirely on the surface.
© Rachael Kinnison/Carol-Anne Conway

Happy Stitching

Monday, 17 July 2023

Fanciful Story, Chapter Two, The Right Tools

They say a bad worker always blames their tools. It is meant as a rebuke for someone who does not take ownership of their shoddy work but when it comes to poor quality tools or the wrong tools for the job, the worker may have a point! Take the humble needle. It is usually the least expensive tool in an embroiderers’ workbox but arguably the most important. I have a vast selection of needles, but I did not always appreciate the importance of using the right needle for the job and I certainly did not know which to use when.

I say, “usually the least expensive”, my favourite needles, Japanese handmade needles, are not inexpensive but I think they are a good investment. I bought my first set of needles 18 years ago. I have since acquired more, but I am still using my original set and cannot distinguish between those and newer needles. Stored and maintained correctly, I expect these to last my lifetime.

Japanese handmade needles are made of steel, have a strong core but are exceptionally smooth and flexible. The needles are polished length ways, resulting in near invisible fine lines running the length of the needle. This minimizes friction allowing the needle to pass through the fabric smoothly. The point of the needle is also designed to pass through the fabric smoothly. The eye of the needle is round, and hand finished to remove any burrs that might snag or abrade the thread. The eye end of the needle is flattened making it narrower than the shaft, so the thread is the same width as the shaft and passes through the fabric more smoothly. This design is particularly beneficial when stitching with flat silk, but it is also very gentle on metallic and fragile threads. These are my go-to needles for certain types of gold work.

The ribbons on Fanciful Story are worked in wrapped Ceylon Stitch in gold passing thread. The thread consists of a fine gold wire wrapped around a silk core. The gold is delicate and snaps easily. It requires delicate handling, so my immediate thought was to use one of my Japanese handmade needles. Now I would say that two of my strengths are patience and perseverance. These come in handy for some of the more challenging embroidery projects I favour. Ceylon stitch and its wrapper variations seriously tested my patience when I first encountered them on the Tudor and Stuart Goldwork Masterclass. I barely remembered the lessons I had learnt from that experience, but I did recall that it was crucial to not apply too much tension to the Ceylon stitch ladder.
© Rachael Kinnison/Carol-Anne Conway

I had little time for stitching the past two weeks but even so, my progress on the ribbons was painfully slow. I was really struggling to find any rhythm or flow with the stitch. I was doing reasonably well with the ladder foundation but wrapping the rungs was proving extremely difficult and this was the part that ought to have been easiest. It took some time for me to realise that the problem was my needle, specifically its sharp point! When I switched to a needle with a rounded tip the process went much more smoothly although the gold wire snapped more readily than with the Japanese needle. I do have a Japanese needle that I have ground away the point for working these types of stitches but that is currently employed in another project. There is no reason that I could not use it on both except I have some crazy and restrictive stitching rules that I cannot dismiss. That is a whole different post!

I would not say that I am flying along now, it is still a tricky and frustrating technique, but I am managing much better now that I am using the right tools.

Happy Stitching

Thursday, 15 June 2023

Fanciful Story, Chapter One, In the beginning

Fanciful Story is one of a series of limited-edition Heirloom Embroidered Ornaments designed and sold by Rachael Kinnison of Diamond K Folk Art.

I first heard of Rachael through the Cabinet of Curiosities. Rachael is an incredibly talented artist who creates awe-inspiring historically based embroidered items. She generously shares her knowledge and designs through kits and courses. Rachael began producing the Christmas ornaments kits in 2016. I think I first became aware of them in 2018 when Rachael offered an amazing ornament called Peaceful Kingdom. Which I did not purchase at the time (why?) and is now sold out.

Fanciful Story was produced in 2020 and is the first that I purchased. I purchased the 2021 and 2022 ornaments when they were released and was able to obtain the 2017 and 2019 ornaments before they sold out. I would dearly like to add the 2016 Flemish Fantasy and 2018 Peaceful Kingdom ornaments to my collection.

Rachael designed Fanciful Story as a combination of an embroidered book cover and studies of her favourite embroidered jacket at the V&A museum. Because Rachael was curious to know how this jacket might have looked when new, how heavy it must have been, and how the fabric moved when covered with gold, I and a few other lucky embroiderers get to go on that journey with her.
© Rachael Kinnison/Carol-Anne Conway

When finished, this miniature book will be encrusted with 1260 real gold spangles, each attached with an antique opal glass bead, surrounding bows and swags stitched with gilt smooth passing thread and a stunning central Tudor rose.
© Rachael Kinnison/Carol-Anne Conway

I prepped and began stitching Fanciful Story in October 2020 soon after I received the kit but it went into hibernation when I began Kusudama. When I completed Kusudama in April, I brought Fanciful Story out of hibernation with the intention of resuming work straight away but, as often happens, I went into a post-project slump lasting over a month. Last week I could hear Fanciful Story calling to me from my sewing room and we have now enjoyed several mornings together. The passing thread felt unwieldy after 30 months of stitching with silk, but I am beginning to get my hand in and already feel my Ceylon stitch on the swags and bows is improving.
© Rachael Kinnison/Carol-Anne Conway

I think I have a great many more mornings to work on this before it is complete but I think I am going to enjoy them!

Happy Stitching

Sunday, 1 January 2023

Happy New Year 2023

2022 has not been a bad year, certainly nothing (really) bad has happened and if you can get through a year and say that, it can’t be bad!

Stitching wise, it has been a great year! I have stitched nearly every day; I have stitched some wonderful projects; and I have thoroughly enjoyed every moment of my stitching.

I was offered a place on Jenny Adin-Christie’s Workshop days. Actually, I was offered a place a few years ago did not then feel able to take up the offer. When the offer was renewed this year, I thought I would make it work, no matter what, and I am so pleased that I did. Jennyland is a little bit magical.

Workshops are held in at cabinat the end of her garden. The first time I went there I was filled with a sense of déjà vu. On my first trip to Japan, we went in search of the Misuyabari needle shop. Misuyabari is in a busy market, down an inconspicuous allay way that leads to a small Japanese garden. Leaving the suburban street where Jenny lives, walking through her garden, and arriving in Jennyland gave me the same sense of entering Narnia. And that is only the start of the magic! Jennyland is full of wonderous things to inspire any lover of needlework. And Jenny is the Fairy godmother of all stitchers, making our stitching dreams come true!

In blogging terms, I started well. It is a bit of a Catch 22. If I am not stitching, I have nothing to blog; if I am stitching a lot, I would rather be stitching than blogging! Having said that, I blog mainly to keep a record for myself, a diary of sorts, and would like to keep it more up to date.

At the very least, I thought that I would have posted more of the Techniques of Japanese Embroidery. Much of my stitching time has gone into Kusudama and I am really enjoying it. Something has happened in the last two years where I feel my stitching has reached new levels; I understand things that I did not totally get before; I feel the needle, the thread, the stitches, more than ever before. I think that sounds nuts but it that is how I feel when stitching. I think I know why but I don’t feel ready to say it. It is still too raw!

So, looking forward! What is install for 2023? My priority is to finish Kusudama. What then? That certainly is not the end of my Japanese embroidery journey. Where will it take me next? I have a few WIPs that I would like to complete and several items in my stash that I would also like to tackle but there are also many things outside of JE that I really want to explore. My interest in historic embroidery grows and a project that that I signed up for several years ago whispers very loudly in my ear now that Kusudama is nearing completion. The greatest question is how do I balance these very different areas of embroidery interest?

One priority is to reconnect literally with my Japanese embroidery family. We have stayed in contact virtually, but lockdowns and distance have kept us apart for too long.

Bring it on 2023, I am excited to see what you have for me!

Happy Stitching!

Wednesday, 17 August 2022

Bacton Marigold

Every week of the Tudor Embroidery course we had a lecture, some of which were related to one of the five samples we stitched. One such was a lecture on the Bacton Altar Cloth by members of the BAC Research Group.

The Bacton Altar Cloth is a heavily embroidered cloth of silk and silver that is believed to have possibly once belonged to Queen Elizabeth I. At some point in its life, it was cut and pieced to form a cover for a small table or alter, most likely after it was donated to the parish church of St. Faith, Bacton. Prior to 2015, when the BAC was removed from display, it was hung in a frame on the north wall of the church for 106 years. After extensive conservation, the embroidery went on display at Hampton Court Palace. The BAC Research Group were able to view and photograph the cloth in detail while the cloth was undergoing conservation and on display.

By studying their own images and examining contemporary printed sources, the group aim to independently categorize and interpret the motifs. In the lecture, they shared their observations, unanswered questions, and evolving understanding of the cloth. Members of the group have also attempted to recreate some of the botanical motifs. Our fourth sample was based on a marigold on the cloth.

The fabric for this sample is a gorgeous ribbed silk called faille. While I loved the fabric, it did cause me some problems later on. Once again, the design was transferred using the prick and pounce method.

For all outlines, I used a combination of two colours, two strands of each. I started with stem stitch, i.e., a ‘/’ diagonal stitch and intended to use this throughout but switched to a ‘\’ diagonal stitch when stitching the lefthand side of the petals.

The stem, leaf, and flowers are filled with various seeding techniques.

For the stem, I used seed stitch with four strands of silk. I tried to keep the stitches as small and consistent in size with approximately a stitch size space between each. I tried to make placement and stitch direction random but found it difficult to ignore the obvious weft threads in the fabric. My ‘method’ for random seeding is to make one stitch in a space and then place six stitches around the first stitch in a vaguely hexagonal shape. For each pair of stitches in the hexagon, I place a third stitch to make a more or less equilateral triangle. I continue to make every pair of stitches into a triangle. I vary the angle of each stitch by angling them more or less towards the centre of the triangle. I use an additional filling stitch any time I think the spacing is increasing, or miss a stitch if I think they are becoming too close.
© Cynthia Jackson/Carol-Anne Conway

I used double seed stitch in the leaf, again four strands of silk. I stitched one stitch directly over the other. As this made each stitch slightly larger, I spaced the first slightly further apart than for the single seed stitches. I found this much more difficult to keep consistent than single seed stitch. If I do this again, I will try placing the second stitch at a slight angle to the first.
© Cynthia Jackson/Carol-Anne Conway

For the bud, I used seeded knots. I made a soft 'S' 4 -> 1 twist. Throughout, I have used a combination of two colours in the needle. For these twisted threads, I used 1 strand of each colour on each ply.
© Cynthia Jackson/Carol-Anne Conway

The calyx is also filled with seeded knots but here I twisted 2 ->1 using one ply of each colour. At first, I double-spaced the knots but I thought they were too far apart so I filled in a little.
© Cynthia Jackson/Carol-Anne Conway

The petals of the flower are worked in single seed stitch, eight strands of silk, four of each colour. I hoped eight strands, closely seeded would give more saturated colour to the petals, which it has. I think the larger, fuller stitches also have more shine on the silk, which I like.
© Cynthia Jackson/Carol-Anne Conway

This was great fun to stitch! It was somewhat time-consuming but once I got into the rhythm of stitching randomly, it required less precision than something like satin stitch. I enjoyed doing the seeded knots and like how they look but they were even more time-consuming. I wanted to try different options and see how each looked. It is interesting to see the different textures and effects of each.

Happy Stitching

Wednesday, 29 June 2022

Or Nué Beetle - part 1

During the pandemic, I took part in a few online courses. I kept finding myself on a course with some of the same people. Not surprising, really, as we have similar areas of interest. To share our progress with the course samples, some of which I have yet to do, and to stay in touch, we formed a Facebook group and meet once a month via Zoom. One member of the group had previously designed a stumpwork beetle and, over the course of a few months, had shared with us her design as a stitch-along. I did not intend to join in as I had lots of other things in progress but was enjoying seeing what the others were doing. One day I was looking at images of beetles online and came across an enamelled beetle brooch that caught my eye. I have not been able to find it again but the image stayed in my mind. When I completed one of my ongoing projects sooner than expected I decided to use one of the techniques I had learnt in one of the courses to make a stumpwork beetle somewhat like the enamelled brooch.

I used the template provided by Arlene for the basic wing shape but rather than embellishing organza wings with beads and gold threads, I planned to create my wings using or nué. I’ve known about this form of goldwork for some time and learned more about it in two of the online courses I did during lockdown but I have not yet stitched my samples for either workshop. The wings of the enamelled brooch, as I remember it, had brightly coloured flowers on a black background. Rather than draw a design I looked through my stash for a suitable piece of fabric and settled on one with a design of small summery flowers. Although I have a black metallic thread in my stash, I decided to use a silver passing thread for the base. I then selected a few silk threads that were close to the fabric and worked in harmony with each other. The threads I used are Devere’s 6 thread silk – some of those that I received in an Advent Calendar.

Wire is often used in stumpwork as the foundation for three-dimensional shapes such as leaves, petals, or wings. The wire is first tacked to the fabric around the outline of the shape. The entire wire is then covered with buttonhole stitches. If the shape is to be filled with needle lace, the buttonhole stitches are made around the wire without catching any of the base fabric so that the shape can be detached when complete. The fabric forms the base of my wings so the buttonhole stitches are used to attach the wire to it.

Or nué is a form of goldwork using couching where different coloured silk threads are stitched over the metallic base threads to form the design. Traditionally, the metallic threads are worked to and fro in straight lines although contemporary goldwork artists sometimes work the base threads in circles or more organic lines following the shape of their design (otherwise known as Italian shading). The metallic threads are often worked in pairs but, because the wings are small and the details quite fine, I worked with a single thread, to and fro.
© Carol-Anne Conway

At first, I attempted to replicate the printed design precisely but after a few rows, I realized that the base fabric did not show at all and focused instead on creating a pleasing design, adding stitches, for example, to make the leaves more pointed, or omitting them to create space between flowers.

It took rather less time to fill the wings than I expected and I was more pleased with the look of them than I imagined.

Happy Stitching Or Nué Beetle - part 1 Or Nué Beetle - part 2

Sunday, 15 May 2022

5 Diagonal layer: irregular shapes (naname-nuikiri: kiku)

For each of the three layer/foundation stitches that we have looked at so far, the orientation of the stitches has been unequivocally defined and, in each case, the stitches are all parallel to each other. For Diagonal layer (D) the orientation is determined by the motif being stitched and the stitches radiate slightly to accommodate the shape being filled. Exactly how this happens depends on whether the shape is regular (such as a cord) or irregular, such as chrysanthemum petals.

Chrysanthemums, both round petal and pointed petal, have cropped up in a few of my Phase pieces, beginning with Hanayama, and at each phase, I think I have learnt more about stitching diagonal layer on an irregular shape.
© JEC/Carol-Anne Conway

The first thing to consider is the direction in which the central line of the petal curves. The stitches are always laid in a clockwise direction, meaning that for some petals stitching begins at the tip of the petal and works towards the centre, while for others stitching begins at the centre and works outwards.

The first stitch lies along the outline of the shape in the right diagonal direction (top right to bottom left). The following stitches rotate gradually around the curve of the shape. A filler stitch can be used when needed to avoid leaving a gap at the outer edge but I have rarely found these necessary on gently curved shapes such as petals. A filler stitch is a stitch that does not extend the full width of the shape but should be at least two-thirds of the length of full stitches. The end of the filler stitch slightly tucks under the previous stitch and is further concealed by the following stitch so that it blends with the surrounding stitches.

Generally, the stitches should be at a consistent angle to the central axis of the shape and a slightly steeper angle is considered more elegant. On Hanayama, the chrysanthemums were possibly the motif I struggled with most and the stitching with which I was least satisfied. Looking at them now, I would say the main issue (if you completely ignore the utterly inconsistent one-point open space between the petals) is that the angle of the stitches is too shallow.

While there are no chrysanthemums on Suehiro, diagonal layer is used on one of the cords. This, however, is a regular shape and I will review that in a separate post.

The large chrysanthemum on Venerable Friends is a focal point of the design and I recall taking considerable care with it. There are still issues with the one-point open space but, because many of the petals are padded, these are not nearly as evident. What is evident is that I have, in most cases, angled the stitches more steeply so the curves are more elegant. The tips of some petals are a little square and all of them would benefit from a more evident “one-point outward” stitch at the tip.
© JEC/Carol-Anne Conway

I used diagonal layer on the Pink Lady, the butterfly that represents Mum on Flutterbies. I think the improvement in my stitching is evident but then a lot of love and care when into this entire piece.
© JEC/Carol-Anne Conway

Chrysanthemums feature heavily on Sake Boxes, affording me plenty of opportunities to practice diagonal layer. I was not terribly satisfied with the first few round petal mums that I stitched but I recall that I stitched these during a heatwave and that I found the silk more difficult to work with than usual. By the time I stitched the last of the mums, I felt that I had made significant progress. I particularly like how pointy most of the petals are.
© JEC/Carol-Anne Conway

© JEC/Carol-Anne Conway

On Kusudama, I have been focused on achieving and maintaining the correct twist but I have tried not to lose sight of all the other details that I have been working on, the one-point open space between the petals, the shape of the petals, and the angle of the stitches. While I still see room for improvement, it is good to see improvement over those on Hanayama.
© JEC/Carol-Anne Conway

Happy Stitching