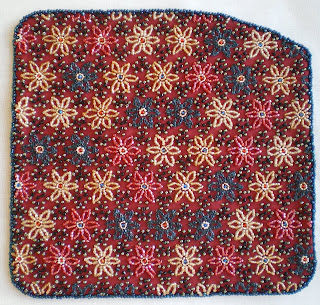
Before I describe whatI did, I would like to remind readers that I am a student of Japanese Embroidery, not a tutor. I like to show you what I have done. The best way to learn these techniques is from a tutor; mine is a Kurenai-Kai Graduate Authorised tutor. A full list of authorised tutors is available on the Japanese Embroidery Centre web site. The book "Japanese Embroidery Through the Millennium", also available from the JEC, has detailed instructions for all the Japanese Embroidery techniques that I have used.
If you decide to try this finishing process on your own embroidery there are a few things you should bear in mind:
- if you are not absolutely certain that the products you have used are colour fast, stitch a small sampler incorporating a little of everything used and test the process on that to see if any of the colours bleed;
- it goes without saying that water and electricity do not mix; I cannot stress strongly enough to unplug the iron before putting it anywhere near a wet towel;
- equally obvious are the risks to both your hands and your embroidery of being in close proximity to a hot iron; the towel also gets extremely hot during this process.
If you do plan to try this technique, please exercise all appropriate caution.
So back to the bead embroidery. I began as with the silk embroidery by examining the front for missing or lose beads. I then examined the reverse for loops of thread. Loops occure when the thread becomes over twisted; the thread begins to twist around itself and can form a knot. I did not cut of these threads; if the knot comes undone at a later date, the beads will come undone. Instead I secured each loop with a stitch, pulling it taught and snug to the back of the fabric. I then trimmed any long thread tails to 2mm.

© JEC/Carol-Anne Conway
Using a spray bottle filled water, I sprayed the back of the work, wetting the threads thoroughly and left it to dry over night.
When completely dry, the process of making up the finished object can begin. For this project I cut 1 piece of foam and 1 piece of interfacing to the same shape as the beading but trimmed the foam to 2mm smaller than the beading on all sides. I attached first the sponge and then the interfacing to the back of my work with spots of glue around the edge of the design. I placed the work, beaded side down on a folded towel, placed moderate weight on the design (several books) and left it to dry over night. I'm not a fan of gluing textiles but this is in accordance with the instructions I recieved and the PVA glue has not come through to the front or marked the embroidery at all.


© JEC/Carol-Anne Conway
Next, I trimmed the excess fabric 1cm from the beaded edge and clip the curves. I turned the seam allowance to the wronge side and secured it with glue. Again, I weighted the work and left it to dry overnight.
I then cut the lining fabric to the same shape as the design but a little narrower allowing for the fact that it will be folded in halve when lined. I hand stitched the lining in place, using blanket stitch and easing to fit. I folded the work in half and stitched the bottom and side edges together, leaving the top open.
Finally, I stuffed the item to shape, steamed it for several minutes and left it to dry overnight.

© JEC/Carol-Anne Conway
Happy Stitching

4 comments:
oh wow - lovely!
Well done it look amazing I love the instructions will help me a lot. Can't wait to see it and I had better get on with some stitching. Happy Stitching Sue XX
Wow kiddo! January was a BIG month for you! Here's to a year full of big, beautiful finishes!
Wow - that's beautiful!
Post a Comment