Wednesday, 28 January 2009

... Finishing ...

The Japanese bead embroidery that I have recently completed also requires 'finishing'. For beadwork there is a slightly different but equally lengthy process.

Before I describe whatI did, I would like to remind readers that I am a student of Japanese Embroidery, not a tutor. I like to show you what I have done. The best way to learn these techniques is from a tutor; mine is a Kurenai-Kai Graduate Authorised tutor. A full list of authorised tutors is available on the Japanese Embroidery Centre web site. The book "Japanese Embroidery Through the Millennium", also available from the JEC, has detailed instructions for all the Japanese Embroidery techniques that I have used.

If you decide to try this finishing process on your own embroidery there are a few things you should bear in mind:

- if you are not absolutely certain that the products you have used are colour fast, stitch a small sampler incorporating a little of everything used and test the process on that to see if any of the colours bleed;

- it goes without saying that water and electricity do not mix; I cannot stress strongly enough to unplug the iron before putting it anywhere near a wet towel;

- equally obvious are the risks to both your hands and your embroidery of being in close proximity to a hot iron; the towel also gets extremely hot during this process.

If you do plan to try this technique, please exercise all appropriate caution.

So back to the bead embroidery. I began as with the silk embroidery by examining the front for missing or lose beads. I then examined the reverse for loops of thread. Loops occure when the thread becomes over twisted; the thread begins to twist around itself and can form a knot. I did not cut of these threads; if the knot comes undone at a later date, the beads will come undone. Instead I secured each loop with a stitch, pulling it taught and snug to the back of the fabric. I then trimmed any long thread tails to 2mm.

© JEC/Carol-Anne Conway

Using a spray bottle filled water, I sprayed the back of the work, wetting the threads thoroughly and left it to dry over night.

When completely dry, the process of making up the finished object can begin. For this project I cut 1 piece of foam and 1 piece of interfacing to the same shape as the beading but trimmed the foam to 2mm smaller than the beading on all sides. I attached first the sponge and then the interfacing to the back of my work with spots of glue around the edge of the design. I placed the work, beaded side down on a folded towel, placed moderate weight on the design (several books) and left it to dry over night. I'm not a fan of gluing textiles but this is in accordance with the instructions I recieved and the PVA glue has not come through to the front or marked the embroidery at all.

© JEC/Carol-Anne Conway

Next, I trimmed the excess fabric 1cm from the beaded edge and clip the curves. I turned the seam allowance to the wronge side and secured it with glue. Again, I weighted the work and left it to dry overnight.

I then cut the lining fabric to the same shape as the design but a little narrower allowing for the fact that it will be folded in halve when lined. I hand stitched the lining in place, using blanket stitch and easing to fit. I folded the work in half and stitched the bottom and side edges together, leaving the top open.

Finally, I stuffed the item to shape, steamed it for several minutes and left it to dry overnight.

© JEC/Carol-Anne Conway

Happy Stitching

Sunday, 25 January 2009

Finishing ...

I often stitch a design because I want to do the embroidery even if I have little or no interest in the finished article. Once the embroidery is complete, I move onto my next project and as a consequence, I have a large number of UFOs - Unfinished Objects.

Back in September, I wrote that Karahana was finished but not 'Finished' and she has remained in that state ever since but now I need the frame for my next Phase piece. I invest too much time and effort into my Japanese Embroidery to allow it to languish as a UFO. Besides I am rather proud of them and want to see them framed and hung.

I’ve mentioned 'finishing' several times. Many forms of embroidery benefit from some finishing, even if only a light press. In Japanese Embroidery the finishing process is rather long and more than a little scarey.

First I examined the embroidery; confirming that I truly have finished the stitching and checking for lose threads.

© JEC/Carol-Anne Conway

I then examined the back of Karahana and noticed two large loops of thread. Normally, I would trim long threads to 2mm but because these are couching threads I did not want to cut them and risk the gold work becoming lose. I dealt with those in different way.

© JEC/Carol-Anne Conway

Next I beat the work with a velvet pad to remove any dust or lose fibers.

The stitching on the reverse was then glued with wheat starch paste. In Japan these embroideries usually adorn a kimono or odi, the 'glue' secures the stitching and prevents it from too much movement. I used the wheat paste to secure the loops of thread behind a stitched area.

© JEC/Carol-Anne Conway

© JEC/Carol-Anne Conway

Next I used a damp towel to first wipe over the glued areas to evenly distribute the paste and then, with a clean part of the towel, I wiped over the rest of the fabric before ...


... I steamed the entire work from underneath by draping a wet towel over a hot iron. I have a cordless iron that make this process a little safer but a corded iron should be unplugged from the mains before putting it any where near a wet towel.

I began the drying process by holding a cool iron just above the stitching, which is protected with a piece of 'finishing paper'. I keep the iron moving continuously to prevent scorching the silk and hold my free hand below the work to check that the iron is not too hot. I then left Karahana in a warm place to dry thoroughly.

The first time I went through this process, I was horrified and I still have my heart in my mouth every time I do it. While working the embroidery I take every care to keep it clean and dry, silk is easily marked even by water. Can you imagine what it is like doing this to work that you have spent months lovingly creating?

© JEC/Carol-Anne Conway

Just when you think it is finally Finished, begins the process or removing your work from the frame and mounting it.

Can you see any difference between this and the first picture?

© JEC/Carol-Anne Conway

I hope not.

And here is the lacing on the reverse of the mounting board.


Now she is Finished!

Happy Stitching

Tuesday, 20 January 2009

The Final Bead

As I near the end of a project, I am always instilled with a sense of urgency. This is a desire to see the results rather than to finish working on it.

Over the past few evenings I have spent a longer beading than is good for me. By the time I stop, my neck and shouldeders are stiff and my eyes sore (especially as I spend the entire day on the computer) but the beads have totally seduced me and I just want to do it every spare moment. Even thought there is still a certain amount of 'finishing' to be done, securing the final stitch or adding the final bead to a project always gives me a 'woo hoo' moment when I punch the air and literally whoop with delight. Then I sit quietly and just look at the finished project for some time and savour the moment.

Not long ago I stitched the final bead onto my Phase I Japanese Bead Embroidery. I've had my 'woo hoo' moment and I sat in quiet contemplation with my work.

© JEC/Carol-Anne Conway

This has been a really enjoyable project; one that has totally absorded me for the past couple of weeks. All that remains to do now is the finishing and look forward to the next Phase.

© JEC/Carol-Anne Conway

Happy Stitching

Sunday, 18 January 2009

Totally Seduced by Beads

I really should be doing the finishing on Karahana, so I can take her off the frame and begin the prep work for the next Phase V but the beads keep calling to me and I cannot resist their pull.

On the first half of the design I had stitched more red flowers than blue, inevitably there were would be fewer red flowers on the other half. I wanted to stick with the method of random selection but did not want to risk all of the red flowers being grouped into one area. I continued with my random selection method but either returned a red bead to the bag, or manually selected red, a couple of times to ensure that the red flowers where not all grouped in one area.

With only the final few flowers remaining, I began to run out of beads and needed to calculate how many whole/part flowers I could complete with the remaining beads. Although the petal colour or the final few flowers was determined by the beads I had left, I continued to select the center colours randomly.

© JEC/Carol-Anne Conway

I am really pleased with how the colours are distributed.

Previously, I was concerned that the design was becoming lost when I added the green seed beads to the back ground. I hoped that the black tricut beads that fill the spaces between the leaves would help to give it sharpness.

© JEC/Carol-Anne Conway

I think that they have.

© JEC/Carol-Anne Conway

A photograph cannot do justice to these beautiful beads; the tricut beads, in particular, sparkle and glint like a twinkling Christmas tree. How can a girl resist?

Happy stitching

Friday, 9 January 2009

A Lose of Nerve

I kept selecting either red or taupe for the petals. When I drew dark taupe for the final flower in what will be the lower half of the back, I lost my nerve and chickened out. I overruled and manually selected blue for the petals.

© JEC/Carol-Anne Conway

Happy Stitching

Wednesday, 7 January 2009

Tackling Random Head On

Following our trip to Amsterdam, I had three free days before resuming work. The first, a bright sunny day, was spent gardening. The remaining two days were so cold and that the overnight frost remaineded all day, thus ruling out gardening. Yippee, some stitching time. My Japanese Embroidery was put away for Christmas to make room for the tree and out of harms way. Embroidery frames, excited children, food and drink are best kept apart!

In fact I had tidied away most of my embroidery things but never fear, I had kept my Japanese Embroidery easily to hand to whip out and stitch when ever the opportunity presented itself.

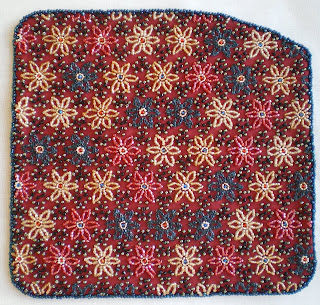
The flowers each have a center bead of either red or blue that is surrounded by a ring of either gold or silver beads. The six petals are beaded in one of four colours; red, blue, light taupe or dark taupe. The idea is to combine these elements randomly, and to arrange them in a random fashion. As previously stated, I am not really a 'random' type of girl, so I devised a plan to assist me in my quest for randomness. I put one bead for every flower into three small zip lock bags. In the first bag I put a mixture of the red and blue center beads; in the second, gold and silver beads, with slightly more gold than silver; and in the third bag a mixture of the four petal colours.

© JEC/Carol-Anne Conway

For each flower, I select one bead from each bag and use those colours, no cheating. Sometimes the same combination comes out for adjacent flowers, but whatever comes out, I use. I have an area that seems to have too much taupe (the light and dark are not that different from each other) but I trust that when all the flowers are worked, things will have balanced themselves.

Between the flowers, the background is filled with moss green seed beads and black tri-cut beads. I have begun to add some of the green beads and I think that the design is beginning to look a bit lost; perhaps it will sharpen up when the black beads are added!

© JEC/Carol-Anne Conway

The original fabric supplied for this Phase is a floral print in the colours of the beads, with metallic gold highlights. That fabric is no longer available and the design is now supplied on a plain red fabric. From what I have done so far, I think it looks much better on the original fabric. There is a picture of the design worked on the original fabric here.

Happy Stitching

Monday, 5 January 2009

Sumptuous Surfaces - eyelets

Following a very busy Christmas period, J and I headed for Amsterdam to spend the New Year with his sister. We like to get out and about as much as possible while there but I always take some stitching with me in case the weather makes staying indoors a more attractive option. Japanese Embroidery is not terribly portable nor is it a very sociable activity (unless shared with other Japanese Embroideries). I prefer to take something that I can pick up and put down easily. This year, I took my Sumptuous Surfaces sampler.

Between short forays in below freezing conditions, I filled an area of the first sampler with eyelet stitches.


Most of the stitches are worked in Mulberry Silks. I've tried to vary the size and shape of the eyelets as well as the threads. I started by scattering some larger eyelets around.


And then added more and more until I had filled the entire area. In a few gaps, too narrow to work an eyelet, I have worked a satin stitch block.


I am beginning to feel more comfortable with random. I suppose like most things, the more you practice it, the easier it becomes. Gradually I am becoming more willing to put my hand into the bag of threads and work with which ever presents itself.

Happy Stitching

Sunday, 4 January 2009

The Last Day of Christmas

My long Christmas break is coming to an end. At the outset, two weeks seems like a such a long time and I imagined that I would get so much stitching done. Now, on the final day before I resume work, it seems so little time and so very little of it has been spent at the frame! I have found time for stitching, mostly exploring Sumptuous Surfaces or practicing my Japanese Bead Embroidery, but the 'qualitity time' that I expected to spend on my Japanese Embroidery did not materialise.

In the weeks preceeding Christmas, I spent many a pleasant evening working on a gift for J's sister. In September, when I learnt to make these 'Fabulous Fob Dangles' at a beading class, I immediately thought that they would appeal to J's sister. Purple is a favourite colour of hers (and mine) so I ordered a selection of beads in shades of purple to make her a necklace festooned with these beautiful beaded tassels.


We interupt this blog to enjoy an extremely rare experience ...

Fifteen minutes later ...

A few years ago, a Princess came to stay the night.


She is still living here, dining on the finest cat food that money can buy. This is a very cat-friendly environment, living as we do at the end of a Cul-de-sac in a quite village. Beyond our garden is a school playing field, a happy hunting ground for a prowling pussy-cat. Tinkabell, or Smelly Cat as she is otherwise known, is most ungrateful for the luxurious life style she enjoys at our considerable expense, shunning all attempts at affection and even biting the hand that tries to groom her.

As I was writing this blog, completely unbidden, Tink decided to sit in my lap for the first time ever and remained there for 15 minutes, even permitting me to stroke her. Then, just as unexpectedly, she decided enough was enough and was gone ...

Mean while, back at the blog, the day aftger boxing day, I finally completed the lariat and wrapped it just in time to take with us to Amsterdam, where J's Sister lives and where we spent New Year.


Happy New Year.