Tuesday, 31 January 2012

Floral Melody - finished

Like most people, I associate the New Year with fresh starts and new beginnings but for the first few weeks of 2012 I am focusing on finishing.

First up, the big one! I had hoped to finish Floral Melody by Christmas 2011. I didn’t quite manage that deadline and FM had to go on hold over the festive period. It seemed to take forever for things to settle down and for me to get back into my usual routine but I eventually got there and Floral Melody eventually got finished!

© JEC/Carol-Anne Conway

It took 300 meters of thread, 138 hours of stitching time and goodness knows how many beads (and I have no intention of counting them). In addition to the beading techniques, one important thing that I leant at Phase 3 is that if there are two identical sides to a project, work on both sides simultaneously. If you complete one side then go back to work the other, you will certainly forget what you did first time around. Also, I needed to ensure that I had enough beads to do the same thing on both sides. I could have divided the beads up before I started, but I didn’t, so I needed to keep track of usage. Most importantly, I found that when I had completed the first side on Poppy Pouch, it felt like I had finished completely. I had to dig deep to find the resources to start afresh on the second side.

© JEC/Carol-Anne Conway

This time, I made sure that I worked on both sides throughout, ensuring that I never got too far ahead on one side. When the finish post was in sight, this time it really was the finish.

© JEC/Carol-Anne Conway

Over the past few weeks, I have focused most of my stitching time into this project and now that it is finished, I can reveal why. Phase V class is only taught in Atlanta by Matsukawa-san and I could only enrol for that class once Floral Melody was completely finished. In anticipation of finishing on time, I had booked my flight and reserved my hotel room but my heart was in my mouth until my place on the class was secure.

© JEC/Carol-Anne Conway

Last weekend I completed Floral Melody, sent of my booking form and have been accepted on the Phase V class. And tonight I have heard from my good friend and travel companion, Sue, that she has completed her Phase IV. For those unfortunate enough to have access to Skype, I apologise for the slightly disturbing image of me doing a happy dance earlier this evening.

© JEC/Carol-Anne Conway

Happy Stitching

Monday, 30 January 2012

Disco Donna

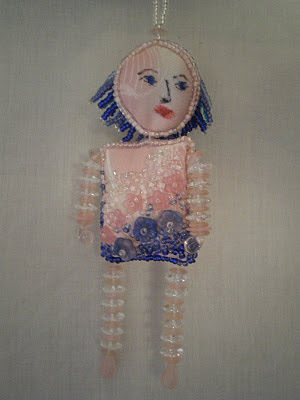
The December meeting of the Embroiderer’s Guild, Oxford Branch is always a social event. Sometimes we have a members competition were we are asked to make something in advance. This year we were given instructions for a "Disco Donna" and asked to make a fairy version.

I thought that I might have a go at improvisational bead embroidery for my Donna. In her book, One Bead at a Time, Robin Atkins, advises that you start with a fabric that you love, so I had a rummage through my stash. The problem is, every time I found a fabric I loved, I had earmarked it for another project, or I considered it "too good" for a frivolous project. Eventually, I found a small square of silk, that Susan Elliot had given me as a 'bonus' for being her first customer on ETSY. There was just enough to make a Donna, I had no preconceived plans for it and I LOVED it. Next job was to pull all of the beads and sequins that I thought might work with the fabric.


I drew two rectangles (for the body) and two circles (for the head) onto the fabric and outlined each shape with beaded back stitch. Then, following the advice given in Robin’s book, I chose a bead that appealed to me and stitched in onto the body and just kept selecting beads and stitching them on until I thought I was done.


I drew Donna’s face onto fabric with coloured pens. I should have guessed that the ink would bleed but I thought that this happy accident gave her a more quirky look.


I added the hair after I had assembled and stuffed the head and body.


And finally, I added the arms and legs.


My Donna is more ‘Disco’ than ‘Fairy’, but then so am I!

You can see all the Disco Donna Fairies that came to our Christmas party here.

Happy Stitching

Thursday, 26 January 2012

Doodle Page - Flower Bed

For my own doodle page I had selected a piece of fabric cut from a thread-bare Liz Claiborne blouse that had I had been saving for just such an occasion. I asked the other participates to embroider me a garden and to get it started I doodled an aster, inspired by Lesley Turpin-Delport in Just Flowers. Then I sent my page on its travels starting in Australia.

Sadly, after Dian added her embroidery and sent my page on the next leg of its journey, it went astray. I cannot be too upset; this is part and parcel for Round Robins and worldwide exchanges. My main regret is that I will never get to see Dian’s original embroidery in my garden. Jo who was next in the Round Robin, made a replacement page from fabric in her stash and Dian very kindly embroidered some flowers for my garden a second time. Not only that, but Dian also did a doodle of an aster similar to the one I had originally done.


I am very pleased to say that my page then completed the Round Robin without a hitch before coming home to me.


Thank you, Robins, for the beautiful garden that you stitched for me.

Happy Stitching

Thursday, 12 January 2012

Doodle Page - Why?

This was the last page to come to me and, for me it was the most challenging topic. I find abstract subjects difficult to connect to. This page arrived while I still had some still to do. I resisted the urge to open the package and see the page so I would not distracted by it.

When I finally saw it and read the notes that accompanied it, I was quite moved. Everyone had clearly put a lot of thought into it. The creator of the page had asked us 'Why?' thinking particularly about the dreadful natural disasters that had recently affected Australia, New Zealand, Japan and other countries in that region. What I found most interested is that nearly everyone did not attempt to suggest 'Why' but instead offered comfort and support. Arlene’s troubled world was filled with love, hugs and cups of tea!


I added Fatima’s Hand to protect us all from the Evil Eye.


I had almost dreaded this page, thinking that I would not know what to contribute to it. In the end I felt inspired by the subject and the thoughts of those who had stitched before me.

Happy Stitching

Wednesday, 11 January 2012

Doodle Page - Music

I have always enjoyed music but it was never a great passion of mine. I looked at what others had stitched and read the notes they had sent with the page. It was obvious that the artist/songs they had chosen to embroider had had some influence on them. I didn’t think that any artist or song had affected me so deeply. I tried to think what of my earliest recollection of music. I remember that my Mum had a china ornament, a Crinoline Lady, with a wind up base that played Swan Lake. I would sometimes sneak into her bedroom to wind the base and listen to the tickling music. Today, I mostly listen to Classical Music. I wonder if this early experience influenced my taste in music more than I imagined.


My Swan is outlined in stem stitch using flat silk. Her tutu is a katayori made from white silk and couched in a meandering line around her skirt.


Happy Stitching

Tuesday, 10 January 2012

Doodle Page - Triangles

I’ll be honest, when I heard that the chosen subject for this page was triangles I thought "how boring". However, when I first saw the page, I thought that it was really vibrant and interesting. I decided to add something a little quieter to counter the stronger elements that were already on the page. I chose the silver thread to link with the silver sequin waste and hopefully maintain balance.


Happy Stitching

Monday, 9 January 2012

Doodle Page - Japan

Of all the Doodle Pages, I think that this one was my favourite. The subject matter appealed to me of course, but I liked the scene that was developing when the page came to me.

My first thought was to do something in Japanese embroidery but I kept looking at the empty sky and thinking that I wanted to add some clouds and the sun. In the end I decided to use some of the kinsai techniques that I learnt from Midori-san. I cut masks from sticky back plastic. First I used a brush to stencil the clouds using silver paste, fading out towards the bottom edge. I then stencilled the sun with dark gold paste building up a solid covering. I make the sun look like it was shimmering I couched a twisted gold thread around the edge.


I liked this page so much I was reluctant to send it onto the next stitcher!

Happy Stitching

Sunday, 8 January 2012

TAST Fly Stitch 2

It seems a little strange to be doing TAST again. TAST was the incentive behind this blog in the first place. First time around I fully intended to do each stitch within the week that it was assigned but, of course, life and my natural propensity to take on more than I can realistically manage defeated me.

This time around, I intend to be far more relaxed about it. My aim is to complete some of the stitches that I missed first time around and, if I have the time, to experiment a little with stitches that I am already familiar with.

The first stitch for TAST 2012 is fly stitch. This is one of the stitches that I did in the first round, so I set aside one evening to play with the stitch.

I would have liked to show you the inspiration for my experiment but I cannot find the picture of it. It is a small sample of Japanese embroidery but the only image that I had to go by was my memory.

I began by working large fly stitches within a defined area.


I then divided the spaces between the stitches with more fly stitch.


And so on until I felt that the entire space was filled.


This certainly does not match up to my mental image of the original but I think that the effect is reasonably pleasing.

You can see what others have done with Fly Stitch by reading through the comments section of Take a Stitch Tuesday, Week 1.

Happy Stitching

Saturday, 7 January 2012

Progress Report – December

I have been setting myself goals and regularly reviewing my progress for a year now, so this month I want to review the last year and look ahead for the next 12 months.

My initial goals centred on my four Japanese Embroidery Frames.

At the beginning of the year Loving Couple was on Frame One. The embroidery was already done so I only had to do the finishing and mounting before taking LC to the framers. Next onto the frame was my Phase VII piece. I started Camellias at my Japanese Embroidery class in March. The long and short stitch techniques learnt at this Phase proved very challenging for me and I have not made much progress with it. I would like to start the next Phase in March, so my aim is to finish Camellias completely by the end of February. With everything else I would like to finish this spring, that may be a bit tight but this is my second highest priority deadline.

© JEC/Carol-Anne Conway

Embroidery Bridge Between East and West is on Frame Two. My goal was to finish this by the end of 2011. Not only have I not achieved that, I have done very little stitching on this piece during the past 12 months. Completing this piece was not my highest priority and other things came up that I wanted to do first. It remains a low priority but I would like to finish it. I don’t see that happening anytime in 2012.

© JEC/Carol-Anne Conway

I have spent far more time on Frame Three than any other. I have a bigger goal than simply finishing current projects that centres around this frame. In April Matsukawa-san will be teaching Phase V class in Atlanta. I want to be in that class but I cannot enrol until I have completed the beading on Phase IV. My goal was to finish Floral Melody by Christmas 2011. I did not make that deadline but I was really close. I estimate that I have 20-30 hours beading left to do. This is currently my top priority.

© JEC/Carol-Anne Conway

Floral Melody was on Frame Four at the beginning of the year. That frame has remained empty since I moved FM to Frame Three and I still have not decided what to put onto this frame next.

One of the 'things that came up' was Floral Glove. This took me far longer than I imagined it would but I thoroughly enjoyed the class, learnt a lot from it and am delighted with my finished etui.

© Thistle Threads/Carol-Anne Conway

Another 'thing' was Chinese Flower. This also has taken far long than I thought it would and is not yet finished. I am nearly there and would like to finish it soon, say by the end of February.

© Trish Burr/Carol-Anne Conway

Neither of these was something that I had planned to do but proved to be too tempting when I heard about them. They did however, fit with my learning plan for the year. They both included instructions for long and short stitch, the very technique that I was struggling with on Camellias. From those two on-line causes I think that I have learnt a lot about LSS and one of the things that I learnt is that the Japanese method is different from the western method. It will be interesting to see if all that I have learnt will be of help or a hindrance when I return to Camellias.

Other plans for 2012 include an on-line course with Tanya Berlin. This is another LSS project – I think that I am becoming a little obsessed with this stitch! The course begins in February which is not ideal timing for me but this was another 'unmissable' opportunity!

I have also enrolled for the Cabinet of Curiosities online course – yet another 'unmissable' opportunity. What embroiderer hasn’t dreamt of making their own embroidered casket? This is a big investment in terms of time and money but, if the two courses I have previously done with Thistle Threads are anything to go by, it will be well worth it.

Finally, I have also signed up for TAST 2012. I never did complete all of the stitches first time around and I would like to fill in the gaps. I don’t intend to as much as I attempted to the first time, except for maybe for a few stitches that I feel should be in my set of samplers.

I already know that I have taken on too much and will struggle to meet all of my goals but there is nothing that I want to cut from my list! It looks like being a busy year.

Happy Stitching

Friday, 6 January 2012

Small Flowers, 12

The space between the large motifs, the small flowers and the twigs and leaves is filled with silver beads using a technique called Tataki-ume. I have used this method on both Calm Flow and Poppy Pouch. On both of those pieces the beads are tightly packed to completely cover the fabric. On Floral Melody the beads are slightly spaced to allow the background fabric to show through. The spaces should be consistent so it is more difficult to do than the variation taught in the earlier phases. (n.b. Usually slight variations of technique have a different name but I don’t if that is the case here. I tried to research Tataki-ume on the internet but could only find references to food so I may have the name completely wrong!)

I discussed how the thread colour could affect the appearance of the beads in an earlier post and wondered if the silver beads would look better stitched with white thread. I did some stitch samples on the edge of the fabric using four different coloured threads; white, cream, pale blue and pale grey. I thought that there was a barely noticeable difference between the samples with the white and pale blue threads giving the brightest, most silvery effect. The pale grey thread gave the beads a darker, steelier appearance and the cream thread gave the beads a softer creamy look. In the end decided to stick with the cream thread that I had used throughout because it is the least noticeable against the back ground fabric.

© JEC/Carol-Anne Conway

As I started to fill the background, I was amazed at how the whole appearance of the design was altered.

© JEC/Carol-Anne Conway

All of the elements became unified.

© JEC/Carol-Anne Conway

Some of the small flowers that I had thought were strong accents, simply melted into the background.

© JEC/Carol-Anne Conway

And this is how Floral Melody looked when the entire background done!

© JEC/Carol-Anne Conway

As I said at the beginning of this series of posts, these small flowers, twigs, leaves and the back ground have taken several weeks to stitch. I certainly have not done them during the Twelve days of Christmas that these posts were sent to you! Even the posts were done in advance (mostly on Christmas Eve) and scheduled to be delivered one at a time while I was busy with Christmas celebrations and away visiting family in Amsterdam. When I returned, I was delight to see the lovely comments that had been left and thank you all for your kind words.

Floral Melody, when finished, will be a handbag with both sides beaded with the same design. Although one side is now finished, I still have some beading to do on the second side.

Speaking of the Twelve Days of Christmas, you probably know by now that Mary Corbet is running a TDoC give-away with some wonderful prizes on offer. If you did not know, do not despair, you have until January 9th, 2012, at 5:00 am Central Standard Time to visit Needle’n’Thread and leave a comment on the posts to have a chance to win.

Happy Stitching

Thursday, 5 January 2012

Small Flowers, 11

When all of the small flowers were completed, it was time to start work on the twigs and leaves that fill the spaces between the blossoms.

At first I was quite daunted by this. I have pictures of four versions of Floral Melody completed by other stitches and there is quite some difference between how they have done the foliage. I was not sure which version would suit my Floral Melody the best.

But once I had made a start, I just kept going ... and going ... and going. And before I knew it, all of the foliage was beaded and I hadn’t taken a single picture!

© JEC/Carol-Anne Conway

This is how Floral Melody looked with all of the flowers and foliage complete.

Happy Stitching

Wednesday, 4 January 2012

Small Flowers, 10

While checking that I had completed all of the small flowers, I noticed that I had missed a couple of things on the main motifs. Firstly, I had not finished the right-hand edge of this leaf.

© JEC/Carol-Anne Conway

When I had added the orange seed bead edge, I realised that I also needed to finish filling the centre of the leaf with the pearly seed beads.

© JEC/Carol-Anne Conway

Between two of the large leaves there is a partial leaf that I had missed completely.

© JEC/Carol-Anne Conway

I soon fixed that.

© JEC/Carol-Anne Conway

Now all of the flower motifs are definitely finished.

© JEC/Carol-Anne Conway

Happy Stitching

Tuesday, 3 January 2012

Small Flowers, 9

This is how Floral Melody looked before I added the small flowers.

© JEC/Carol-Anne Conway

I worked a couple of flower types at a time, starting with the largest. When I had completed all of the same flowers, I stood the frame up and reviewed my progress.

© JEC/Carol-Anne Conway

I wanted to make sure that I had enough beads to do all of the same flowers in the same colour way and that the overall effect was balanced.

© JEC/Carol-Anne Conway

The first few flowers were predominantly red or orange and at that stage the overall effect was very orange.

© JEC/Carol-Anne Conway

But gradually the smaller blooms, worked mainly in the blackberry, blue and green beads began to make their presence known.

© JEC/Carol-Anne Conway

This is how things looked with all of the small flowers added (including one that I forgot to write about!).

Happy Stitching