Sunday, 30 May 2010

Under Shoulder and Under Tail Feathers

Normally foreground elements are stitched before those behind them. The under shoulder feathers are in front of the fan shaped feathers and should have been stitched first. As I had covered the techniques used on the under shoulder feathers it was decided to skip these so that I had sufficient time to cover the techniques I had not done before. I stitched a row of Japanese running stitch along the outer edge to help me leave a one point open space between the elements.

The under shoulder feathers are worked in a weft layer with short stitch holding in the same colour.

© JEC/Carol-Anne Conway

The under tail feathers are worked in two parts. First the upper section is stitched in a vertical layer, leaving a one point open space between the individual feathers. Then the lower section is stitched in a weft layer, again with a one point open space to separate the feathers.

© JEC/Carol-Anne Conway

One point open space is one of the techniques I have found most challenging but I think that I am beginning to get to grips with it. It is immensely satisfying to feel that you are making progress.

Happy Stitching

Tuesday, 11 May 2010

Fan Shaped Feathers

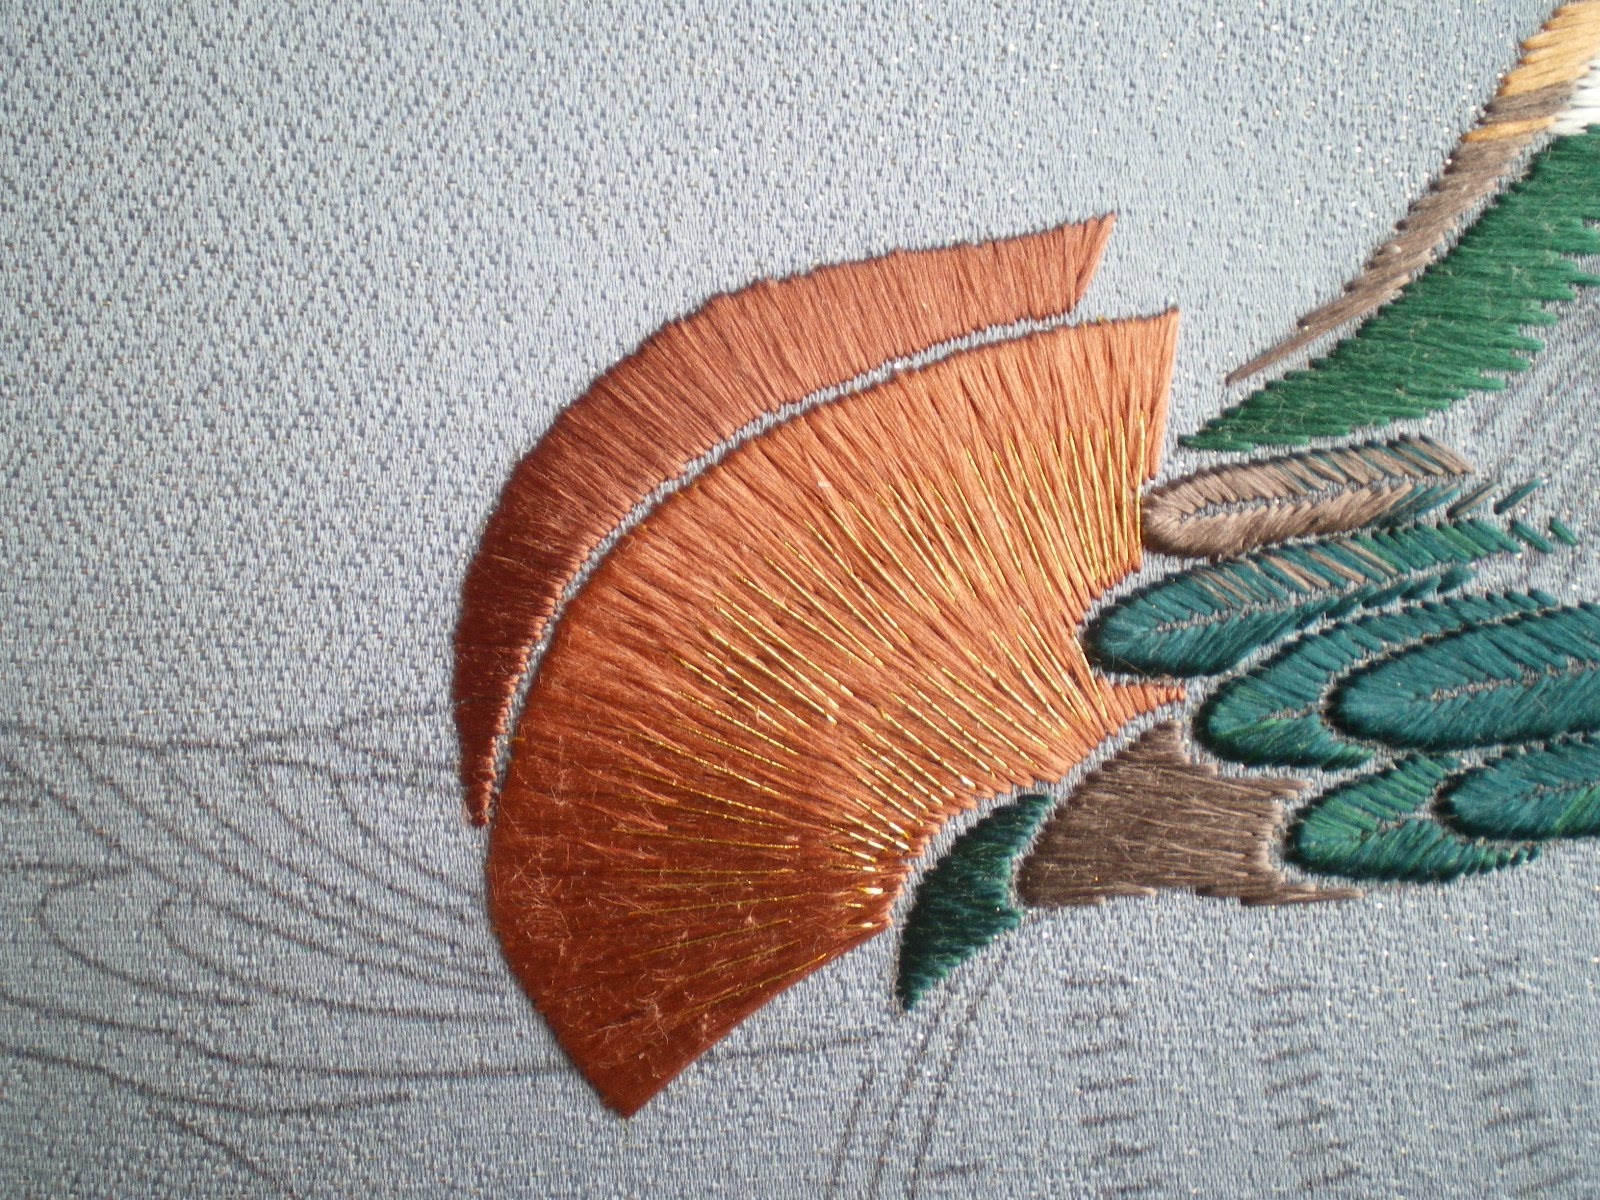
The fan shaped feathers are stitched in vertical layer. On every vertical layer I have stitched before the stitches are parrallel to each other; in this case they radiate around the shape. The angle of the stitches changes gradually and filler stitches are inserted to give a smooth, continuous foundation. The curved edge of the fan is outlined with #4 gold to slightly raise the edge and give a sharp outline.

© JEC/Carol-Anne Conway

As on the breast, the temporary holding stitches are curved to serve as a guide for the short stitch holding.

© JEC/Carol-Anne Conway

The rows of holding stitches alternate between 1 into 2 soft twist in the same colour as the foundation, and #1 gold. The stitches match the angle of the foundation stitches and the curve of the temporary holding stitches.

© JEC/Carol-Anne Conway

The background fan is one shade deeper that the foreground fan. The short stitch holding is worked in the same colour.

© JEC/Carol-Anne Conway

When a foundation radiates in this way, the light is reflected in different directions and gives the impression that the element has been stitched in several different shades of the same colour when, in fact, it is stitched in a single shade.

© JEC/Carol-Anne Conway

Happy Stitching

Thursday, 6 May 2010

Preening

The shoulder feathers are everything that I find most challenging in Japanese Embroidery.

To begin with they are stitched in a technique called separated layer. You stitch up one side of the motif, around the top and down the other side, gradually fanning the stitches to accommodate the curve. Then there is the one-point open space! A one-point open space should be exactly that – a space the width of the point of a needle between each element. In my case they range between non-existent and gapping chasms; this particular technique is the one that I am finding it most difficult to grasp. Not only is there a OPOS between feathers but also one down the centre of each one. And finally there is the size of the feathers. They are tiny and the smaller the motif the greater difficulty I have placing my stitches accurately.

And yet, I was really looking forward to this part of the design. Every time I have seen it stitched, I have been enthralled with these little delights. The outer edges of the feathers are slightly padded to lift them of the background fabric and the flat silk is blended to give an irridescence to the feathers.

The padding is tightly twisted cotton thread couched just inside the outline. The ends are tapered so that there is no sudden change in levels.

© JEC/Carol-Anne Conway

I took a lot of care stitching the separated layer, concentrating on the angle of each stitch, maintaining an even OPOS down the middle, and ensuring a smooth outline to the shape. When I finished the first feather, I was so delighted with it, I wanted to crow like a cockerel!

© JEC/Carol-Anne Conway

I only stitched the one feather during the course as there was much more I needed to learn before the end of the week. The remaining feathers were stitched after I returned home but with the same care and attention.

© JEC/Carol-Anne Conway

I am really pleased with them. Not just because of how they look but, and more importantly, because I didn’t think that I would be able to do these at all well.

© JEC/Carol-Anne Conway

Seeing how they turned out, I feel that I am making some progress and that is very satisfying.

Happy Stitching

Monday, 19 April 2010

Alice in Oxford

I'm very behind with my blogging, this is from 2 weeks ago!

The redecorating of the hall is in progress and currently a complete mess. The things that normally live in this area are strewn around the house, as are the decorating materials. I’m totally fed-up with the mess and muddle. The sooner the task is finished, the better. Despite the glorious sunshine last weekend, we agreed that the best thing to do would stay be to home and get on with it - so we went out to enjoy the beautiful Spring weather.

We parked just outside the city centre and walked to the start of our ‘walk’. Our route took us over Magdalen Bridge, were we paused to look over the parapet expecting to see the punts, but instead we found these rowing boats. They are very pretty but the punts are more traditional.


We continued down High Street but turned into the still cobbled Merton Street. Because the entrance of the road was closed to vehicles, this normally quiet road was virtually deserted (a vintage bus bringing guest to a wedding and a couple of disable badge holders were given access). Before we reached Blue Boar Street, we could hear the unmistakable sound of Morris dancers. There were several troops taking it in turns to dance while the others watched and enjoyed a glass of beer. It might have been fun to join them for a while, but we have seen Morris dancing many times and we had different plans for the day. We weren’t exactly late but we didn’t have time to linger.


We knew roughly were to go, but we wanted a get a guide leaflet to finalise our route and gain more information about what to look out for and I knew just the place to find one.


I don’t know if it is always this popular, or whether the recent release of Tim Burton’s film has generated new interest, but the little shop was packed with tourists. We quickly found what we wanted and set off our tour.

Incidentally, see the window above the red door and windows of Alice’s shop, behind that window is the very table where I proposed to my DH.


We retraced our steps up St Aldate’s to Tom Gate, the main entrance to Christchurch College, only to find that there is no public access via this gate and had to retrace our steps again, down St Aldate’s, to the gates to Christchurch Meadow then through the War Memorial Garden to the visitor’s entrance.


Sadly, the Great Hall was closed for a private function so we were not able to see Alice’s window but we did get to see the wonderful vaulted roof of the stone staircase which leads up to the Great Hall. Although the staircase is 16th century, the roof was added 150 years later. Many scenes of the Harry Potter films are shot in Christchurch College and it is on this staircase that Harry and his new friends are greeted by Professor McGonagall on their arrival at Hogwart’s.

From this angle, I think the columns and ceiling look like giant toadstools!


There are two Alice related things to see in the Cathedral, both stained glass windows. In the top right hand panel of the St Frideswide window (St Frideswide is patron Saint of Oxford) there is a depiction of the Binsey Treacle Well which will crop up again at the end of our tour.


To the right of the alter is the Edith Liddell memorial window. This window depicts St Catherine; her face is said to be a portrait of Edith, sister of Alice Liddell.


Tom Quad (the Great Quad) is the biggest quadrangle in Oxford.


Lewis Carroll’s rooms were in the upper floor in the corn of the quad to the right of Tom Tower.


As we were leaving Christchurch College, a custodian spotted our Alice Pamphlet and engaged us in conversation. A self confessed aficionado, he told us many things about Lewis Carroll that we had not heard before. I knew his real name is Charles Dodgson, but not that his pseudonym is derived from the Latin for his own name, Charles Lutwidge (even though I knew that my own name is derived from the name Charles!). I knew that Alice was modelled on a real person (Alice Liddell) but not the most, if not all, of Dodgson’s characters are based on people he knew. The Dodo is himself (Dodgson had a speech impediment that made it difficult for him to say his surname, so he referred to himself as Dodo. The Mad Hatter was based on a local hat maker who had a habit of sticking bills into his hat band so as not to misplace them but would promptly forget he had place them there and would search frantically for the lost bill. In Through the Looking Glass, Alice is in a shop owned by a Sheep. This character is based on a shopkeeper with a bleating voice. The shop, 83 St Aldate’s is now Alice’s Shop were we began our tour. The three sisters who live at the bottom of the Treacle well are the Liddell sisters; Lacie (an anagram of Alice), Elsie (LC, Lorina Charlotte) and Tillie (Edith’s pet name). How wonderful it would have been to tour the college with the custodian but he was on duty at the exit and we were running out of time.


We returned to our car via Merton Walk and the lovely Christchurch Meadow, then drove to our final destination, the Treacle Well in St Margaret’s Church yard, Binsey. Treacle is a medieval term for healing fluid.


Susan, of Plays with Needles is currently stitching an Alice in Wonderland block. Seeing her work reminded me that Alice was conceived in my home town and inspired to go and seek her out. I hope that you have enjoyed this short tour of Alice's Oxford.

Wednesday, 14 April 2010

Phase VI - Loving Couple

It wasn't a foregone conclusion that I would stitch Loving Couple at this phase. It is important to me that I like the design, after all, I usually spend a year or more stitching it but for me, what I will learn from stitching a design is equally important and I discuss this with my tutor before making my final selection. While I have always had a soft spot for Loving Couple, my husband really likes Eternal Grace, I would have been happy to stitch either. Margaret advised me the that there was more short stitch holding on Gracie (she is sometimes refered to as 'Grace of the Eternal Short Stitch Holding') but that the Ducks offer greater variety of short stitch holding techniques. There are lots of small elements on Loving Couple that are stitched relatively quickly. That makes this a good design for the 5-day course that I go to each year in Bournemouth.

******

With the crest and eye stitched Mr Duck begins to have character and personality.

The colour in the first photograph is awful, it was taken after dark in artificial light. The next one is better but the colours are still not true.

© JEC/Carol-Anne Conway

© JEC/Carol-Anne Conway

The breast seems to cause more angst than another part of this design, I was looking forward to it with more than a little trepidation.

The foundation is staight forward, a vertical foundation in flat black silk.

© JEC/Carol-Anne Conway

The guidelines are curved ...

© JEC/Carol-Anne Conway

and the holding stitches follow these curves.

© JEC/Carol-Anne Conway

My first attempt was awful (unfortunately I didn't take a photograph before I reverse sitched it). Margaret then demonstrated how I should be doing it and with the first 2 rows stitched by her serving as a guide, my second attempt was much improved.

© JEC/Carol-Anne Conway

I forgot to take step-by-step photographs of the side breast feathers. When I stitched the first row of white, I thought that I liked its irregularity but when I stitched the second row, I found I preferred that one. I think that I will rework the first row at a later date but for now I want to move on to the next technique.

© JEC/Carol-Anne Conway

Happy Stitching

Friday, 9 April 2010

The Journey

You often hear Japanese Embroiderers speak of their Journey. The journey refers not only to the choice of Phase pieces and practice designs they choose to stitch but also, and more importantly, their development of the three aspects of Nuido: the acquisition of technical skills and knowledge, the development of artistic sensitivity and awareness, and understanding the spiritual aspects of shishu.

I remember clearly the day my journey began. I have always found oriental art pleasing so I had particularly looked forward to a talk on Japanese Embroidery that Margaret gave to my branch of the Embroiderer’s Guild. Little did I know just how much impact that evening would have on me. Many fellow students have told me that the first time they saw JE, they fell in love with a particular design and their initial aim was to reach that Phase so they could stitch it. No one piece struck me in that way. I was more captivated by the techniques that Margaret spoke of and demonstrated. My motivation was a desire to learn the technical skills and a hope that one day, I too might be able to stitch half as well.

Of course, there are designs on my ‘wish list’ that I would one day like to stitch (and maybe a design or two already stashed!) but generally I only look one step ahead. That said one piece has quietly stayed in my mind from that first evening and I think that I have always know I would stitch ‘Loving Couple’ when I reached Phase VI.

Loving Couple is perhaps not the most impressive phase piece. Although Mr Duck is very handsome, the alternative Phase VI, Eternal Grace, could rival his beauty. The principle technique learnt, short stitch holding, is not one that I have wanted to learn over and above any other but I have always watched with interest when others have stitched this piece in class. I’m not sure why I have longed to stitch this unassuming design but as I was nearing completion on Himotaba, and the date of my March class drew closerer, I could feel my excitement building.

On the first morning of class I was sitting, with my needle threaded, eagerly awaiting my first lesson.

The Face

© JEC/Carol-Anne Conway

© JEC/Carol-Anne Conway

© JEC/Carol-Anne Conway

© JEC/Carol-Anne Conway

© JEC/Carol-Anne Conway


I am sorry about the quality of the photographs. All week, the weather offered us challenging light for stitching and photography!

******
A dear friend has reached a significant stage on her Journey. Jane has just finished stitching Kusadama, her Phase X piece. Phase X is a graduation piece which encompasses all the techniques covered by Phases I-IX. Congratulations, Jane. I know how much this means to you and you know how much I admire your achievement.

Happy Stitching

Thursday, 8 April 2010

Snowflake

While life in the UK seemed to revolve around snow at the start of this year, a forum friend in Australia was melting in the heat and asking us to send some snow her way. I stitched this snowflake Travelling Page for her.

I covered a piece of sky blue satin with a piece of very pale blue organza to create an cool background. The snowflake comprises a variety of crystal beads, mostly silver lined so that they look icey and to give maximum sparkle. I embroidered the word 'Snowflake' in #1 silver.


Happy Stitching