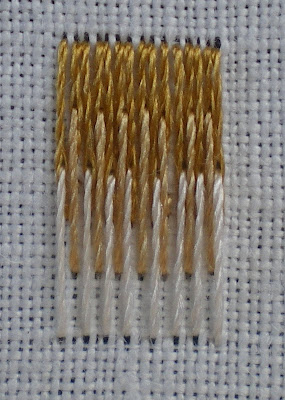
Japanese embroidery calls the technique sashinui which is described as "a stitch used to fill an area with different layers of threads, which are superimposed on the threads below or inserted between them". I don’t think that 'long and short stitch' is a literal translation of sashinui but simply the name of the technique that most closely resembles it. There are three variations: nagamijika-sashinui (alternating LSS), midare-sashinui (random LSS) and kussetsu-sashinui (curved angular stitches). The way that nagamijika-sashinui is worked, "Staggered Alternating Straight Stitch" seems a more appropriate name but, I admit, it is clumsy and unlikely to catch on.
The (full length) stitches of nagamijika-sashinui are very regular. They are consistent in length, starting (and ending) on the same line and follow the outine of the shape. The stitches should be evenly spaced. As with all filling stitches, I try to space them like the fingers of my hand, just touching; neither spread apart, nor squeezed together is comfortable!


I think of the first row as the foundation row. It is actually two rows worked simultaneously alternating "long" stitches with "short" stitches. This may be a little pedantic but it really helps me to look at it this way. The "long" stitches are 10mm, the "short" stitches are approximately two-thirds their length (6-7mm).
I stitched this sample on a piece of linen and used the threads as a guide, consequently the stitches are not as evenly spaced as they should be but this macro shot exaggerates that greatly.

The second row of stitches is worked between the "long" stitches of the foundation row and split the "short" stitches half way along their length. This is what the description of sashinui means by "... superimposed on the threads below ...". Tricia Nguyen of Thistle Threads recommends that you come up in the fabric and down into the thread (reason being that it is easier to split the thread from the top). Trish Burr advises the complete opposite, that you come up through the thread and down into the fabric (reason being that the split in the thread is neater). In Japanese embroidery the rule is that you always stitch towards you, so both directions are used.


The third row is worked between the stitches of the second row and split the "long" stitches of the foundation row approximately one-third their length.

Each subsequent row is worked in the same way, filling the space between the "long" stitches of the preceding row and overlapping the "short" stitch between them by one-third.
And there it is, as if by magic, I suddenly see why it is called Long and Short Stitch. Working alternate stitches row by row gives the illusion of "long" and "short" stitches.

Easy isn’t it? Well, yes, if all you are doing is filling a very small rectangular shape!

Happy Stitching

2 comments:
Very helpful, thank you!
It is a source of constant amazement to me that long and short stitch is so often suggested to beginners. It's a horribly difficult stitch to do well, and if it's done badly it looks appalling. The poor quality of many instructions for it doesn't help.
You've contributed a beautifully clear explanation here, thank you!
Post a Comment