Wednesday, 29 June 2011

Floral Glove, Roundels

I’d been looking forward to stitching the roundels. I’d had a look at the lovely gold wires used for this part of the embroidery and could not wait to use them. The oval shape of each roundel is treated in the same way, with three lines of gold wire. The middle line is applied first. The wire used here Gilt #1 Lizardine. Lizardine is made from a flattened wire formed into a tightly coiled spring (so is smooth purl but I’m not certain what the difference between the two is). Lizardine can be used as it is supplied but on this design it is slightly stretched and wrapped around a silk core. Easier said than done!

The lizardine is left in one piece but stretched a short length at a time to 25-30% longer than its original length. I grasped a 3 cm length firmly between my finger nails and slowly stretched the length of wire until it measured 4 cm, then repeated this with the next 3 cm length, and so on until I had stretched the entire length. The difficult part is making sure that each length is stretched a consistent amount (you can’t unstretch it) and not to damage the part you are grasping with your finger nails. The first little bit of stretch resists you but you must resist the temptation to pull too hard, once the wire begins to give, it stretches much more readily and it would be easy to overdo it. Furthermore, although you can’t unstretch it, there is a certain amount of ‘spring’ so when you release the tension the wire shortens slightly. I’m sure with more experience I would become familiar with all of these factors but on this design there is only a small amount of Lizardine so by the time I was becoming in tune with the wire, I had stretched the entire length!

Next, part of the stretched lizardine is wrapped around 3 strands of Soie de Paris. You don’t cut off a length of lizardine; you wrap the silk into one end of the wire. Again, this is easier said than done. I’m sure there a knack to this but I did not discover it. I tried holding the thread and twisting the wire; I think that this method would have worked well if I had three hands, one to hold the end of the wire and silk, one to hold the silk under tension and one to twist the wire. Mostly I held the end of the wire and silk in one hand and wound the silk into the gaps between the coils of the wire. It worked but it was slow and awkward.

The deepest shade of blue was used for the core on the central roundel and it is couched in place with a single strand of Soie de Paris. The couching stitches should lie over the silk core and allow the gold wire to show. Like the AGT on the Arabesques, I found the wire surprisingly stiff and at first found it difficult to form the oval outline. With a little trial and error, I developed a technique flexing the wire into a nice curve and couching it into place rather than trying to pull the wire into place with the couching stitches. The ends of the lizardine are not sunk but are trimmed so that they meet nicely at the start/finish of the oval. The silk core is sunk and secured on the back of the work.

© Thistle Threads/Carol-Anne Conway

A line of Gilt Pearl Purl Super is stitched inside and outside of the line of lizardine. Pearl Purl is made from a domed wire formed into a tightly wound spring. This gives the wire a beaded appearance similar to a string of tiny gold pearls. Again it can be used as supplied but for this project it is stretched to 25-30% longer than its original length. The technique is exactly the same as for the lizardine. The Gilt Pearl Purl Super is couched with Tire silk which is fine enough to fit between the ‘beads’ and is barely visible. Although the GPPS is still a little stiff, I found it easier to flex this into shape with the lizardine already stitched in place.

© Thistle Threads/Carol-Anne Conway

© Thistle Threads/Carol-Anne Conway

© Thistle Threads/Carol-Anne Conway

The remaining roundels were completed in exactly the same way except that the deepest shade of red was used for the silk core instead of blue.

Happy Stitching

Floral Glove, Arabesque

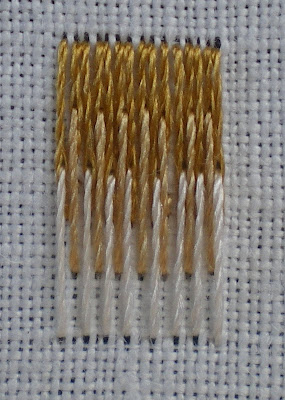
The blue petals and trefoils below each carnation and the rose are framed by an arabesque. A strand of AGT Old Gold Thread is couched along the line of the arabesque. I have no idea what AGT stands for (Antique Gold Thread, perhaps). The thread is new to me. It resembles lizardine that has been stretched and combined with a silk core (more about that later) except that it is heavier gauge than that. The silk core appears to be a full six strands of Soie de Paris and the gold that wraps around it is more elongated than a stretched lazardine. The picture below shows a single strand of Soie de Paris, a length of AGT Old GolD Thread, the inner core of the thread and the gold wire that is wrapped around the core.

© Thistle Threads/Carol-Anne Conway

As with any thread of this weight, it is couched on the surface, in this case with a single strand of black Soie de Paris. The couching stitches should lay over the black areas of the AGT allowing the gold wrap to show.

© Thistle Threads/Carol-Anne Conway

I found the AGT surprisingly stiff (I should not have been surprised, Tricia does mention that in the notes) and a bit unwieldy. I found it a little difficult to bend it into the right shape but the couching stitches seem to be holding it in position.

© Thistle Threads/Carol-Anne Conway

I think this makes a nice accent below the flowers.

Happy Stitching

Sunday, 26 June 2011

Floral Glove, Calyx

Before I could outline the carnations with Elizabethan Twist, I had a little work to do on the calyx. Well, I thought it was a little work but it turned out to be a whole lot of work. I had already satin stitched each calyx but this was just padding for the gold work.

© Thistle Threads/Carol-Anne Conway

Purl is a metallic thread that has been around for many centuries. It is a tightly coiled spring made from flattened wire. Traditionally it was available in natural metallic colours; gold, silver, copper ... Today it is available in a myriad of colours; the purl used on the calyxes of the carnations is olive coloured.

© Thistle Threads/Carol-Anne Conway

The purl comes in one continuous length that has to be cut into pieces. Each piece is then stitched into place as if it were a bead. The lengths of purl lie next to each other like satin stitches; they should be close enough to cover the back ground but not so close that they buckle.

© Thistle Threads/Carol-Anne Conway

Did I mention that Purl is a spring? It is springy, delicate and very easily damaged. When you try to measure a length for cutting, it springs around. When you try to cut a length, it springs around. When you try to pick a piece up on your needle, it springs around. And every slight slip handling it, cutting it, stitching it can damage it. This is slow, delicate and painstaking work.

© Thistle Threads/Carol-Anne Conway

But very satisfying.

© Thistle Threads/Carol-Anne Conway

Happy Stitching

Saturday, 25 June 2011

Floral Glove, Putting on the Glitz

With all of silk embroidery complete I am able to move onto the gold work. I mentioned that one reason I wanted to do this course was to work on my long and short stitch but by far the biggest reason was the gold work.

Gold work is really appealing to me. I find the techniques fascinating, and am looking forward to learning some of them on this sampler, but it is the yummy materials that really attract me.

The first step of the gold work is to outline all the flowers and leaves with Elizabethan Twist. The 2-ply twisted gold thread is couched around the edge of the embroidery. I wound the twist onto a koma; I find it much easier to handle metallic threads this way.

© Thistle Threads/Carol-Anne Conway

For the rose, every row of petals is outlined. As Rachel commented, the one point open space comes in very useful when positioning the Elizabethan Twist between the rows. Things got a bit messy with all of the tails on top but it is best to do all of the couching in one area before sinking them. The thread does catch on the loose ends but it would catch far more if they were on the back were you can’t see what is happening.

© Thistle Threads/Carol-Anne Conway

I am amazed how different this little flower looks just from outlining in gold.

© Thistle Threads/Carol-Anne Conway

Happy Stitching

Tuesday, 21 June 2011

Floral Glove, Blue Petals and Leaves

The small blue petals were worked in long and short stitch. As with all the other flowers, these were first outlined with backstitch. The petals are quite tiny and there was only room for one row each of dark blue, pale blue and white and the stitches are tapered towards the points to avoid overcrowding.

© Thistle Threads/Carol-Anne Conway

These were much simpler to stitch than the carnations!

© Thistle Threads/Carol-Anne Conway

© Thistle Threads/Carol-Anne Conway

The leaves are not outlined and are stitched in satin stitch. I have also satin stitched the calyx and the gold shapes at the bottom but this stitching serves as padding and will be covered by some of the gold work.

© Thistle Threads/Carol-Anne Conway

Happy Stitching

Monday, 20 June 2011

Floral Glove, Rose

The rose on the centre tab has three rows of petals, each in a different colour. I first stitched all of the outlines in backstitch (except the circle in the very centre) in the appropriate colour. All of the petals are worked in satin stitch but the stitches taper towards the centre so that they do not become over crowded. The technique is very similar to filling each petal with a single row on long and short stitch.

I first worked the central petals in white ...

© Thistle Threads/Carol-Anne Conway

... then the middle row in pink ...

© Thistle Threads/Carol-Anne Conway

... and finally the outer row in red. I did not take a picture of the completed outer row but at a later date I decided that I did not like any of the stitching on the rose, ripped it all out (except the backstitched outline) and redid it. I much prefer my second attempt.

© Thistle Threads/Carol-Anne Conway

Happy Stitching

Sunday, 19 June 2011

Floral Glove, Revisisted

I mentioned that Floral Glove went into hibernation not long after I had started it. There was a reason for that. The supplies for Floral Glove came in two separate parcels. The linen fabric, silk and gold threads and needles arrived first. The package containing all of the finishing materials arrived soon after I began stitching. Of course, I could not wait to open the package and look at everything. The finishing kit includes a dye cut cardboard glove. When I placed this over my fabric, I could see that I had a problem. The drawn outline on my fabric and the card cut out did not match and no matter how I adjusted it, there was no way that the embroidery was going to fit.

I emailed Tricia at Thistle Threads and after discussing options we agreed that Tricia would send a blank piece of linen and a copy of the original design which I would transfer onto the fabric myself. The replacement fabric and design were swiftly dispatched but I got caught up in the GMEX show, holidays, some beading, a couple of workshops, etc.

One of the reasons I wanted to do this course was to learn long and short stitch. I knew that I would be doing LSS at the next Phase of Japanese embroidery and I thought it would be a good spring board for that. As things turned out, I began Camellias before I returned to Floral Glove but when I became stuck on the random LSS, I decided to return to FG and practice alternating LSS some more.

After tracing the design and framing up I outlined the carnations in tiny back stitches. Rather than draw the little points on the flowers, I drew in the curved edge and marked the divisions for the points around the outline.

© Thistle Threads/Carol-Anne Conway

I’d worked a sample of alternating LSS on the edge of the linen to build up a little confidence but knew that stitching a virtual semi circle would be a completely different kettle of fish. On my sample I had used the linen threads to gauge the length of the stitches. I could not do that here, so I drew contour lines to serve as a guide. I’d also used the threads to judge the direction of the stitches and because I was working a small rectangle, it was easy to begin at one edge and work across. Here the stitches need to radiate around the circle. On Camellias I had draw directional lines to serve as a guide but in this case I found it easier to visualise a centre point and aim all of my stitches at that point. As I have been taught in Japanese embroidery, and everything else I have read suggests, I started from the centre and worked towards the right, then returned to the centre and worked towards the left.

© Thistle Threads/Carol-Anne Conway

Nagamijika-sashinui (alternating LSS) is not the same technique as thread painting. It is a stylized effect that is entirely in keeping with the Japanese penchant for stylized motifs and designs. I think that it is equally appropriate in this design where the motifs are more stylized than realistic. For the second row, I again worked from the centre towards each edge in turn. I brought the needle up roughly in the middle of each short stitch and stitched down into the fabric on my drawn guideline still aiming the stitches towards my imaginary centre point.

© Thistle Threads/Carol-Anne Conway

The stitches of the third row are stitched between those on the second row. Some of the stitches are shorter so that the centre does not get over crowded. I am quite pleased with the alignment of the stitches but I would have liked the bands of colour to have been the same width and for a bit more colour from one row to show through in the next but I’m not sure is that is possible with stitches that radiate as much as these.

© Thistle Threads/Carol-Anne Conway

The second carnation was stitched in the same way, except that I came up in the fabric and stitched down into the thread to experiment with both ways. I found it more difficult to judge the position of the stitches this way and I think the stitching on this flower is worse than on the first one.

Having said that, I think the shape is really difficult and I am not totally dissatisfied with this attempt, it certainly does not look as bad with the naked eye and this macro shot suggests.

© Thistle Threads/Carol-Anne Conway

Happy Stitching

Thursday, 16 June 2011

Random Long and Short Stitch

Still not done with LSS! Breaking the stitch down, analysing it and stitching samples is really helping me to understand the technique. Both the versions I have looked at so far are very regular and consistent. I can rationalise that. What I am struggling to get to grips with is working with stitches that vary in length and are arranged randomly.

For my stitched sample, I began in the same way as the two previous samples, although most of the instructions I read suggested that the stitches in the foundation row should vary in length (that was just too much for me to cope with!)


I worked subsequent rows in the same way I worked nagamijika-sashinui except that I varied the start position of each stitch. All of the stitches are roughly the same length (approx 10mm).


I repeated this row on row, varying the start position each time so that I did not end up with a bargello effect.


There is something not quite right about this. I feel another sample coming on!


Happy Stitching

Wednesday, 15 June 2011

A New Needlework Nibble

Two posts in one day!

Look what I received in the post today. I don’t normally blog projects until I work them but I wanted to show gorgeous supplies for the latest needlework nibble.


Thistle Threads has issued a second venture in fund raising for museums using Needlework Nibbles. The Tulip Slip kit is being sold to raise funds for the new exhibit at Winterthur which will feature the Plimoth Jacket. The piece is based upon a 17th century tent stitch slip and is faithful to the original. It includes the linen and soie d'alger silk threads needed to complete the tulip. A limited number of optional finishing kits are also available. $10.00 of each kit sold will go to Winterthur and be designated for the exhibit, entitled With Cunning Needle: Four Centuries of Embroidery this purpose. $5 of each finishing kit sold will also go towards the exhibit.

Happy Stitching

Long and Short Stitch, An Alternative Method

I hadn’t planned to do a series of posts on LSS but it seems that I’m not finished with it yet. This is not intended to be a definitive guide; I am certainly no expert on the subject. These are just my ramblings and pictures of my sample stitching.

The method describe in my previous post was based on the Japanese embroidery technique nagamijika-sashinui (alternating LSS). The foundation row consists of long stitches (approx. 10mm) alternating with short stitches (6-7mm).


The stitches of the following row are all the same length (approx 10mm) and worked between the long stitches of the foundation row, splitting the short stitches about half way along their length.


The stitches of the following rows are also the same length and are worked between the stitches of the preceding row, splitting the stitches of the previous row about one-third along their length.


The stitches in the final row are worked in the same way and are shorter, ending in line with the ends of the stitches in the previos row.


In her book Painting with a Needle, Young Yang Chung describes a different method; one that uses long and short stitches in every row.

The first row is worked in the same way as for nagamijika-sashinui but with slightly shorter stitches (approximately 8mm and 5mm).


The following rows also consist of alternating long and short stitches that overlap and interlock the stitches of the preceding row. The long stitches are roughly 13mm and the short stitches about 5mm.


Young Yang Chung says that the stitches should come from below the stitches in the previous row rather than split them. She suggests moving the stitch aside with your finger; I found it easier to do this with my tekobari.


The stitches do not travel across the fabric as the above diagram suggests. I drew it this way to illustrate how the stitches overlap and interlock.


And this is how it looks stitched.


Happy Stitching

Tuesday, 14 June 2011

Alternating Long and Short Stitch

It goes by several names but is perhaps most widely known as Long and Short Stitch and but why it is called this is a mystery to me! Although the first and last rows contain short stitches, all the other rows consist entirely of long stitches.

Japanese embroidery calls the technique sashinui which is described as "a stitch used to fill an area with different layers of threads, which are superimposed on the threads below or inserted between them". I don’t think that 'long and short stitch' is a literal translation of sashinui but simply the name of the technique that most closely resembles it. There are three variations: nagamijika-sashinui (alternating LSS), midare-sashinui (random LSS) and kussetsu-sashinui (curved angular stitches). The way that nagamijika-sashinui is worked, "Staggered Alternating Straight Stitch" seems a more appropriate name but, I admit, it is clumsy and unlikely to catch on.

The (full length) stitches of nagamijika-sashinui are very regular. They are consistent in length, starting (and ending) on the same line and follow the outine of the shape. The stitches should be evenly spaced. As with all filling stitches, I try to space them like the fingers of my hand, just touching; neither spread apart, nor squeezed together is comfortable!


I think of the first row as the foundation row. It is actually two rows worked simultaneously alternating "long" stitches with "short" stitches. This may be a little pedantic but it really helps me to look at it this way. The "long" stitches are 10mm, the "short" stitches are approximately two-thirds their length (6-7mm).

I stitched this sample on a piece of linen and used the threads as a guide, consequently the stitches are not as evenly spaced as they should be but this macro shot exaggerates that greatly.


The second row of stitches is worked between the "long" stitches of the foundation row and split the "short" stitches half way along their length. This is what the description of sashinui means by "... superimposed on the threads below ...". Tricia Nguyen of Thistle Threads recommends that you come up in the fabric and down into the thread (reason being that it is easier to split the thread from the top). Trish Burr advises the complete opposite, that you come up through the thread and down into the fabric (reason being that the split in the thread is neater). In Japanese embroidery the rule is that you always stitch towards you, so both directions are used.


The third row is worked between the stitches of the second row and split the "long" stitches of the foundation row approximately one-third their length.


Each subsequent row is worked in the same way, filling the space between the "long" stitches of the preceding row and overlapping the "short" stitch between them by one-third.

And there it is, as if by magic, I suddenly see why it is called Long and Short Stitch. Working alternate stitches row by row gives the illusion of "long" and "short" stitches.


Easy isn’t it? Well, yes, if all you are doing is filling a very small rectangular shape!


Happy Stitching