I don't really like working to a deadline. I do embroidery for pleasure and having to complete something on schedule puts me under pressure. For this reason, and out of fear of disappointing the recipient, I have never taken part in a swap ... until now.
When members of the Embroiderers' Guild forum started planning a Christmas card and ornament swap back in July, I thought that was a time frame that even I could handle. Of course, because I had plenty of time, I didn't get started straight away except to mentally plan what I wanted to do. In fact I only began to stitch in October after I purchases the bright Christmassy red silk that I wanted to use at the Alli Palli Stitching and Knitting Show.
I've been dieing to show and tell this little project but part of the fun of a swap is that the recipient does not get to see the item until they actually receive it.
Well, the swap date has arrived (in Australia, at least) and I know for certain that Elizabeth has received her ornament, I can finally blog it.
The swap called for a Christmas card and an ornament. I cheated, or was creative depending on how you view it, and made a card/ornament.
I wanted the ornament to look like a Christmas bauble. On the top half, I embroidered a design that I had learnt while stitching Suehiro. The design, called Flax leaf, is stitched over a weft foundation. On the bottom half, I attempted a design that I have not stitched before, 3-d effect. The design is stitched in 3 or more shades of the same colour. Around the centre of the bauble, I stitched a gold ribbon.
On the reverse of the bauble, I stitched the date.
When I had finished stitching the design I was feeling pleased that I had finished in good time ... until I remembered that I had to 'finish' the ornament.
I cut four circles of card - two from mount board and two from a cereal box - and two more from wadding. I laced the front and back onto the mount board using the wadding to give some padding. I covered the cereal box circles in plain fabric using PVA to secure the seam allowance to the wrong side. I then joined the front to a plain circle using ladder stitch and repeated the process for the back. This was when I realised that using PVA to secure the fabric was a bad idea. The PVA dries very hard and is extremely difficult to stitch through. I had a very sore finger to prove the point for several days!
I secured each end of a single ribbon between each pair of circles to create a hanger and stitched lengths of the same gold ribbon around the sides of the front and back to hide the join. From the remaining silk, I made a small tassel to hand on the bottom of the ornament.
Finally, I made an insert from silk paper onto which I wrote my greeting to Elizabeth.
Did you notice that when I made up the ornament, I turned the front up-side-down so that the solid red Flax design was on the bottom. When it came to it, the ornament told me that it wanted to hang this way up!
Despite the long time frame, I did not meet the dead line for posting my ornament. Fortunately, the postal service was kind to me and safely delivered it to Australia in only five days instead of the 10-12 I had expected.
I hope Elizabeth likes her ornament. I certainly enjoyed stitching it for her.
Happy Stitching
Sunday, 30 November 2008
Wednesday, 26 November 2008
Sumptuous Surfaces
For as long as I have know about it, I have wanted to take SharonB's online class, Sumptuous Surfaces. Previously, I have thought that I had too much on to take part. When it was announced that the class would run again this Autumn, I decided that if I didn't just make time for it, I would never get to do it, so I signed on and waited excitedly for the start date.
At the start of the course, I had several other commitments and had to contain my eagerness for a couple more weeks but finally I have some time to dedicate to it.
The course runs over six lessons with the the first three weeks concentrating on monochromatic design and the remaining three weeks focusing on colour. Although the course is now on week five, I am still on week two - I have waited too long for this course to rush through it simply to 'keep up' and I am very pleased that Sharon fully embraces this philosophy and encourages her students to work at their own pace.
These are the threads I have selected for the monochromatic design. Some I already had, others I sourced at the Stitching and Knitting Show at Alli Palli and the remainder I picked up at one of the few embroidery suppliers in my area. I've included a selection of co-ordinated beads and sequins.
Rather than concentrate on a single design for this stage, I have chosen to do a series of small samplers 4 X 2.5 inches. I chose the simplest shape I could imagine as the basis for my designs - a circle.
First we are encouraged to outline the main features of our design, in this case those are the circle, which I have outlined in threaded back stitch using a soft wool purchased at Alli Palli and the wavy lines for which I used Portuguese stem stick. I have never used this stitch before but very quickly settled into it and found that I liked it.
The next step is to work on areas of low relief. In this design there are two areas of relief that hopefully have a very different feel to them. The first is essentially linear but I've tried to make give it a random feel by varying the width and spacing of the lines of satin stitch. These are all stitch in Mulberry silks in a variety of thicknesses and colours.
In the second area I wanted to try out pulled thread work. The stitch I have used is honeycomb stitch. It gives a lovely regular texture but it taxed my brain more that a little.
I like the contrast between these two areas. The third area will be more textured and offer greater contrast but I will not stitch that until I have explored low relief a little more.
Happy Stitching
Friday, 21 November 2008
What Knot?
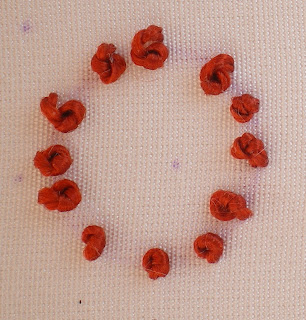
Knots have long been my nemisis. From the first time I encountered a French knot, I have gotten into a tangle with them and bullions simply get me in a twist.
During TAST I attempted to get to grips with both the French knot and bullion knots. In the process, I became more comfortable with both but never felt that I mastered either.
Having made some twisted threads, I decided to play a little with round knots, starting with my old adversary, French knots. French knots are formed by wrapping the thread around the needle before reinserting the needle into the fabric close to where the thread emerges. The thread is usually wrapped twice around the needle but it can be wrapped once or more than twice to alter the size of the knot.
Although I no longer get into a tangle over French knots, I still find it difficult to make them consistent.
Colonial knots are formed by wrapping the thread around the needle in a figure of eight - hence there other name, the figure of eight knot! Again the needle is reinserted a short distance from where the thread emerges from the fabric.
I usually get more consistent results with colonial knots but still do not feel that I am the boss of them.
Japanese round knots are more like colonial knots than French knots.
While forming the knot, the loop is held open with your fingers. It took me a long time to grasp this technique but once I did, I found that I could form much more consistent knots.
These knots are slightly smaller than colonial knots and, as their name suggests have a rounded shape.
A variation of Japanese round knots is the long-legged knot. These are formed in the same way as round knots, except that the needle is reinserted further away from where it emerges from the fabric and the knot is manipulated to sit at one end of the stitch.
These are slightly more difficult to control than round knots but once I understood how to hold and adjust the loop with my fingers, even long-legged knots became a little easier for me.
Happy Stitching
Thursday, 20 November 2008
Let's Blog Again
Despite J’s best efforts, my computer was beyond saving; apparently the problem was the motherboard. Fortunately the hard drive was not corrupt and my photographs have been copied onto CD’s but sadly an old but very nice and familiar laptop is no more. I currently have the use of a newer and faster second-hand laptop. We are not working in complete harmony yet, the size and layout of the keyboard is different so I hit the wrong note - frequently, but we will get used to one another in time.
Following my post 'One Thread Fits All', I had a very interesting email conversation with Michael who left the following comment
Well I haven’t actually sat down with a pin either, but I very carefully unreeled a fresh length of silk and took a good look at it. Firstly, I have always understood that the silk we use is totally flat (that is to say that the sugas are not twisted together at all) and having examined it, I think that is the case. The problem is, it is very easy to introduce twist, and indeed the method by which we secure the tread to the awl introduces 2 or 3 twists to begin with! I then went about separating the thread into single sugas (there are 12 sugars to each thread). I purposely selected a thread that separated easily, in my experience pale thread are more obliging than darker ones.
As you can see, each sugar is very fine. The thread on the far left is DMC cotton (as it comes with 6 strands loosely twisted together), beside that is a strand of silk as it comes from the reel, then the 12 individual sugars and, on the far right, a single strand of DMC cotton. If you click on the picture for an enlargement you can clearly see that the DMC is a two-ply thread with a fairly tight twist. Each sugar is made up of many silk strands, which (I think) are lightly twisted together. I have heard that in China they use a single suga for silk painting. Now that must take some patience!
Before I go, I need to pass on some news. Most of you will already know but incase you have missed it, SharonB has moved her blog to a new blog 'Pin Tangle'. Wether you are a regular or occasional visitor to Sharon'sw blog, you will want to make a note of her new site.
Happy Stitching
Following my post 'One Thread Fits All', I had a very interesting email conversation with Michael who left the following comment
I've got a question. I don't have much experience with Japanese flat silk. I have handled a piece of JEC Flat Silk that Mary Corbet sent me, but that's it.
It appears that the sugas are very slightly twisted. I haven't actually sat down with a pin and a piece of tape and figured out how many twists per foot, but it looks like they've got just enough twist that it's easy to separate the sugas (i.e., you can pick half a thread, or a third of a thread, and it hangs together well.) Is this typical of the flat silks you're using? I can't really tell from looking at the photos; even with the macro, I can't tell if the sugas are distinct, or if I'm just imagining it.
I'm thinking that this would be part of their strategy for managing the silk "flat" - otherwise, it's a hairy beast to get it into and out of the dye kettle without massive tangles.
Well I haven’t actually sat down with a pin either, but I very carefully unreeled a fresh length of silk and took a good look at it. Firstly, I have always understood that the silk we use is totally flat (that is to say that the sugas are not twisted together at all) and having examined it, I think that is the case. The problem is, it is very easy to introduce twist, and indeed the method by which we secure the tread to the awl introduces 2 or 3 twists to begin with! I then went about separating the thread into single sugas (there are 12 sugars to each thread). I purposely selected a thread that separated easily, in my experience pale thread are more obliging than darker ones.
As you can see, each sugar is very fine. The thread on the far left is DMC cotton (as it comes with 6 strands loosely twisted together), beside that is a strand of silk as it comes from the reel, then the 12 individual sugars and, on the far right, a single strand of DMC cotton. If you click on the picture for an enlargement you can clearly see that the DMC is a two-ply thread with a fairly tight twist. Each sugar is made up of many silk strands, which (I think) are lightly twisted together. I have heard that in China they use a single suga for silk painting. Now that must take some patience!
Before I go, I need to pass on some news. Most of you will already know but incase you have missed it, SharonB has moved her blog to a new blog 'Pin Tangle'. Wether you are a regular or occasional visitor to Sharon'sw blog, you will want to make a note of her new site.
Happy Stitching
Monday, 10 November 2008
My Poorly Computer
My computer is very poorly; the hard disc has died. My partner obtained a new disc and installed it but it now seems that one may be defective. We are waiting for a replacement. In the meantime I have limited accesses to the web. More concerning is the potential loss of many of my photographs and various files that I have downloaded and saved. Some of my pictures are copied onto CD but not the more recent ones. J says that it may be possible to retrieve them but by no means certain. All of my fingers and toes are crossed that they can be recovered.
On the stitching front I am making slow but steady progress with a couple of projects. Work on Venerable Friends continues. Currently I am outlining the pages of the central book. For each outline, I first make the couching threads and then a 4->1 tight twist of sufficient length for the outline I am stitching. To make the threads and outline a page takes me a little more than one hour and must be done in one sitting as the tight twist begins to relax if it is not couched in place quickly. I can only manage an hour-long session a couple of times a week so progress is slow. Only a couple of main pages remain; once they are outlined, things should go a little quicker because the remaining outlines are shorter.
Between times, I am stitching a Christmas ornament for a swap. This is the first swap I have ever signed up for and I am slightly anxious about it. I have probably decided on a design that is too time consuming for the time available, but I am determined that I will not be late sending it. I am also concerned that the recipient will not like it, but I guess I can only do my best at stitching it and hope that she will.
When I first heard about SharonB’s Sumptuous Surfaces on-line course, I very much wanted to take part but at the time was over whelmed with other projects. That has been the case each time the course has rerun, until this year. As soon as I heard that it would rerun this November, I determined to do it and signed up. With the Christmas ornament still to do, my time is a little stretched but I have made time to read the excellent class materials and work some of the exercises. I am desperate to start stitching but will resist all temptation until the ornament is dispatched (well, I'll try).
So even if the computer were fully operational, I would have very little stitching to show even though I am doing quite a lot. The only new pictures I have, are some scans of my design exercises for Sumptuous Surfaces in my Flickr account.
Happy Stitching
Saturday, 1 November 2008
Let's Twist Again
In addition to the basic twists discussed in 'One Thread Fits All' there are a number of twist variations. Only one of these is a stitchable thread - boroyori. This is a 4->i twist but instead of the even 2+2 threads I reviewed before this is a 3.5 + 0.5 twist that results in a bumpy, irregular thread.
It is a challenging thread to stitch with. You needle a large-eyed needle to recreate a sufficiently large hole in the fabric for the thread to pass through. Also the thread needs to be re-twisted during stitching to maintain the twist and bumps. The stitch I have used here is staggered diagonal so the thread appears twice a thick as it really is. I have not used this thread on any of the designs I have been taught so far so do not know which stitches best suit it, I thick the double threads somewhat detracts from the look of the thread.
The following stitches are all none stitchable threads that are couched in place. The first three are katayori and variations there of. These twist variations can be of any thickness but I have used 6 strands of flat silk as the basis for each one so that they can be compared like for like.
The basic katayori is all silk, 5.5 + 0.5. The bulk of the treads are given an tight undertwist and then over twisted with the half strand. The resulting thread is wonderfully bumpy and textured.
In the first variation, kinkarami no katayori, one of the 5.5 strands of silk is replaced by a strand of #1 gold. The resulting thread is still bumpy but has the added appeal of irregular flecks of gold running through it.
Shinkin no katayori also incoporates #1 gold but in this instance it replaces the 0.5 strand of silk that is added in at the overtwist stage. This thread has a gold core. I was not sure how I should couch this thread. Normally I couch between the bumps using a 1->2 twist in the same colour silk as the katayori but this would cover the gold thread. Instead I couched on the bumps but the fine twisted thread shows against the much loser twist of the katayori.
The other basic twist variation is karayori.
For Karayori, the two strands have an equal quantity of thread, in this case 3 strands of silk each. Each strand is tightly undertwisted before they are overtwisted together resulting in an even bobble like a string of pearls. My 'pearls' have relaxed too much here and it looks more like rope.
This is a smooth version of karayori. The tread is only lightly undertwisted but tightly overtwisted. The resulting thread has a smooth almost glassy texture.
Here are all the couched threads together for comparison.
Here I have left a tail of thread uncouched to show it in its original state, although the twists have relaxed slightly.
You can click on all of the pictures to see an enlargement that show warts and all!
Happy Stitching
Subscribe to:
Posts (Atom)