Good News: My bike is repaired.
Bad News: I haven't heard back from the driver and don't know if she is going to cough up for the repairs.
Good News: I am cycling to work again :)
Bad News: I fell off my bike on the way to work this morning.
I'm not hurt at all except for a knocked elbow and a very injured pride. Yes, anyone that saw it had a good laugh at my expense but the rumours are not true, I'd do not lace my cornflakes with sherry!
Sorry there is not much stitching to report lately. I hope to have something stitch related soon.
Happy Stitching
Wednesday, 24 September 2008

Sunday, 14 September 2008
The Sinking Needle
When couching metallic or other threads onto the surface, the ends of the threads need to be sunk, or plunged, to the underside of the fabric. In Japanese Embroidery the tool used for this purpose is called a sinking needle.
To make a sinking needle, first under twist a length of thread (one strand of flat silk). Thread a large needle (size 10 hand made Japanese needle) onto the twisted thread, then fold the thread and over twist the two halves together resulting in a two-ply cord with a needle trapped in fold of the thread.
To prevent the thread from unravelling, fix the thread with glue (the glue we use is called yamato).

Pass the end of the thread through the eye of the needle to form a loop.

To use a sinking needle, insert the needle into the fabric at the point were the couched thread should be sunk (or plunged) to the reverse of the fabric.

Pull the needle through the fabric but leave a loop of thread on the surface of the fabric. Insert the end of the tread to be sunk into the loop.

Continue to pull the sinking needle to tighten the loop against the thread, then gently pull and wriggle the sinking needle to ease the tail through the fabric.

I find it helps to grasp the thread of the sinking needle close to the underside of the fabric (with my left hand) and pull on this rather than to pull on the needle. I also like to support the underside of the fabric with the thumb and forefinger of my right hand either side of the sinking needle.
Sink one thread at a time, and be gentle – a sharp tug works, but it is much better to take your time and ease the thread through.
Happy Stitching
Thursday, 11 September 2008
India Retrospective, henna
Navdha invited J and myself to join her and her family for her henna party at her family home. When we arrived some of Navdha's female relatives had already had their hands decorated with elaborate designs. As their guest, Nav and her family insisted that I should go next and no amount of protest would dissuade them that Navdha should go before me.
Two henna artists had been employed for the evening, and they were artists. Working from a catalogue of traditional designs stored in their heads, with swift confident hands they created intricate works of art on our hands.

I think that each design has some significance but the henna artists did not speak English and to be fair there was too much work to be done to spend time explaining things to me. Here is what I remember; obviously the main focus is the bride and groom and the palms of the hands are decorated with symbols to bring them long life, happiness and (I think) to bless them with children.

The symbols on the back of the hands are to protect and bring good fortune to me and to the bride’s brother (I hope I have remembered this correctly and that some one will correct me if I have not).

Look how intricate the designs are. I can't remember exactly how long this took but it was certainly less than an hour.
The whole evening had the feeling of a hen party, although there was no alcohol involved of course. There was music and singing and a lot of giggling. Every one was keen to admire the artwork on each other’s hands.
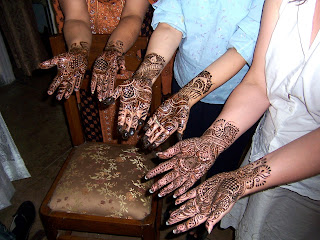

Our visit to India coincided with an auspicious time for weddings and during our stay we met several brides. From my experiences I recognised their henna'd hands, their bangles and the red dye in their hair parting. Particularly, in the rural areas while I was keen to examine the rustic henna designs on their hands, they excitedly took my hands in theirs and turned them back and forth while exclaiming in words I could not understand but with admiration that needed no translation (not of my hands you understand but the exquisite art work that they temporarily displayed).
Two henna artists had been employed for the evening, and they were artists. Working from a catalogue of traditional designs stored in their heads, with swift confident hands they created intricate works of art on our hands.

I think that each design has some significance but the henna artists did not speak English and to be fair there was too much work to be done to spend time explaining things to me. Here is what I remember; obviously the main focus is the bride and groom and the palms of the hands are decorated with symbols to bring them long life, happiness and (I think) to bless them with children.

The symbols on the back of the hands are to protect and bring good fortune to me and to the bride’s brother (I hope I have remembered this correctly and that some one will correct me if I have not).

Look how intricate the designs are. I can't remember exactly how long this took but it was certainly less than an hour.
The whole evening had the feeling of a hen party, although there was no alcohol involved of course. There was music and singing and a lot of giggling. Every one was keen to admire the artwork on each other’s hands.


Our visit to India coincided with an auspicious time for weddings and during our stay we met several brides. From my experiences I recognised their henna'd hands, their bangles and the red dye in their hair parting. Particularly, in the rural areas while I was keen to examine the rustic henna designs on their hands, they excitedly took my hands in theirs and turned them back and forth while exclaiming in words I could not understand but with admiration that needed no translation (not of my hands you understand but the exquisite art work that they temporarily displayed).
Wednesday, 10 September 2008
Karahana, Finished
Back in May, Pam left a comment about the couched threads 
I’m sorry that I ignored your question at the time Pam, but I wasn’t ready to reveal the 'secret' of the couched threads. You were half right, the threads are removed but nothing is put in their place, they are there to create an even space between the individual elements.
When I completed the first petal, I was sorely tempted to remove the yellow thread between the petal and the turn over to see how it looked but that would have been like reading the last page of the book when I had only read the first chapter. I determined to leave the couched threads in place until all the gold work was complete and then savour the moment when I removed the threads and could see Karahana truly finished. (Yes, I do realise how sad that sounds.) And as if that isn’t sad enough, I decided to remove the threads in reverse order to that in which they were stitched.
First to go was the short length of orange thread between the fifth and sixth petals.


These first two photographs show how different the gold looks with the spacer threads removed so that the background silk shows between the separate elements.
It can be a bit fiddly removing the couching stitches; I find the easiest way (once the first few stitches are removed) is to gently tug on the spacer thread. This lifts the couching thread and forms a loop into which you can insert your tekobari and then gently remove the stitch.


Some of the stitches won’t come, usually because you have caught the thread with a subsequent stitch. When this happens, it sometimes helps to turn the frame over and work from the back.

This is when you are grateful that your sensei advised you to couch the spacing threads in white couching thread. Imagine if you had used the same orange thread that you used to couch the gold!
Eventually, the only spacing threads that remain are the double row that I couched between the flower center and the petals back in March.


And then even they are gone and Karahana is finished.

It feels as if I have been stitching this Phase for a long time, but both Phase I and II took me 12 months where Karahana has only take 6 months. I have really enjoyed stitching this design and hope to do another gold work design in the future but in the short term I will be happy to get back to stitching with silk.
Thank you to everyone who left comments or emailed support and encouragement throughout this project, I greatly appreciate your kind words about my work.
Happy Stitching
… I am curious about the couched thread between the leaves -- is that removed afterwards and then something else put in the space? …

© JEC/Carol-Anne Conway
I’m sorry that I ignored your question at the time Pam, but I wasn’t ready to reveal the 'secret' of the couched threads. You were half right, the threads are removed but nothing is put in their place, they are there to create an even space between the individual elements.
When I completed the first petal, I was sorely tempted to remove the yellow thread between the petal and the turn over to see how it looked but that would have been like reading the last page of the book when I had only read the first chapter. I determined to leave the couched threads in place until all the gold work was complete and then savour the moment when I removed the threads and could see Karahana truly finished. (Yes, I do realise how sad that sounds.) And as if that isn’t sad enough, I decided to remove the threads in reverse order to that in which they were stitched.
First to go was the short length of orange thread between the fifth and sixth petals.

© JEC/Carol-Anne Conway

© JEC/Carol-Anne Conway
These first two photographs show how different the gold looks with the spacer threads removed so that the background silk shows between the separate elements.
It can be a bit fiddly removing the couching stitches; I find the easiest way (once the first few stitches are removed) is to gently tug on the spacer thread. This lifts the couching thread and forms a loop into which you can insert your tekobari and then gently remove the stitch.

© JEC/Carol-Anne Conway

© JEC/Carol-Anne Conway
Some of the stitches won’t come, usually because you have caught the thread with a subsequent stitch. When this happens, it sometimes helps to turn the frame over and work from the back.

© JEC/Carol-Anne Conway
This is when you are grateful that your sensei advised you to couch the spacing threads in white couching thread. Imagine if you had used the same orange thread that you used to couch the gold!
Eventually, the only spacing threads that remain are the double row that I couched between the flower center and the petals back in March.

© JEC/Carol-Anne Conway

© JEC/Carol-Anne Conway
And then even they are gone and Karahana is finished.

© JEC/Carol-Anne Conway
It feels as if I have been stitching this Phase for a long time, but both Phase I and II took me 12 months where Karahana has only take 6 months. I have really enjoyed stitching this design and hope to do another gold work design in the future but in the short term I will be happy to get back to stitching with silk.
Thank you to everyone who left comments or emailed support and encouragement throughout this project, I greatly appreciate your kind words about my work.
Happy Stitching
Tuesday, 9 September 2008
Karahana, finished but not Finished
Before going to Manchester for the Stitching and Creative Crafts Show and the day I returned, I’d managed a few hours stitching on Karahana.
I’d completed the outlines on the trefoils, before I left and made a start on the stems, which are worked in a line of staggered diagonals with #1 gold half hitched onto the needle. A line of staggered diagonals is the Japanese embroidery equivalent of stem stitch.

After the weekend I worked the remaining stems and redid the outlines of the two completed leaves. I’m much happier with how they look now.


With only the top stem and leaf to finish, I was confident that Karahana would be complete by the end of the week! Never count your chickens!
It was Sunday before I was able to hold a needle again and then only for a few minutes at a time. Fortunately, all that remained was not time consuming; 30 minutes stitching in the morning was sufficient to couch the top stem and later that day I was able to complete the final leaf.


It is very satisfying to see the gold work complete on Karahana, I have thoroughly enjoyed stitching her. All that remains now is a little 'finishing' before I do the actual finishing process and mounting.
Happy Stitching
I’d completed the outlines on the trefoils, before I left and made a start on the stems, which are worked in a line of staggered diagonals with #1 gold half hitched onto the needle. A line of staggered diagonals is the Japanese embroidery equivalent of stem stitch.

© JEC/Carol-Anne Conway
After the weekend I worked the remaining stems and redid the outlines of the two completed leaves. I’m much happier with how they look now.

© JEC/Carol-Anne Conway

© JEC/Carol-Anne Conway
With only the top stem and leaf to finish, I was confident that Karahana would be complete by the end of the week! Never count your chickens!
It was Sunday before I was able to hold a needle again and then only for a few minutes at a time. Fortunately, all that remained was not time consuming; 30 minutes stitching in the morning was sufficient to couch the top stem and later that day I was able to complete the final leaf.

© JEC/Carol-Anne Conway

© JEC/Carol-Anne Conway
It is very satisfying to see the gold work complete on Karahana, I have thoroughly enjoyed stitching her. All that remains now is a little 'finishing' before I do the actual finishing process and mounting.
Happy Stitching
Thursday, 4 September 2008
Good News, Bad News
Good news: I escaped without breaking so much as a fingernail and not a drop of blood was split.
Bad news: A car knocked me off my bike yesterday morning and I am very battered and bruised.
Good news: Last night J came home from a week-long holiday in Spain.
Bad news: I am so bruised and battered I can barely manage to hug him.
Good news: I’m taking a couple of days off work to recover and keep some weight off my left foot.
Bad news: My hands are so painful I can’t hold a needle, so no stitching for today at least :(
I had a very lucky escape and am counting my blessings.
Happy Stitching
Tuesday, 2 September 2008
Stitch and Creative Crafts Show
Last weekend Jane, Sue, Denise, Francis and I manned the Japanese Embroidery UK stand at the G-Mex Stitch and Creative Crafts Show and we had a great time. I helped on the stand at Japan Day in Liverpool a few weeks ago but this is the first time I have done a full weekend at a stitching show. From comments made by other stall holders, I got the impression that there were fewer visitors than previous shows, but our stall was very busy for much of the time and generated a lot of interest from stitchers and non-stitchers alike. There is nothing more thrilling than someone showing interest in what you are doing and wanting to know more about your work. After three days of nearly continuous talking and demonstrating I was very tired but I enjoyed every minute of it.

Here Sue, Denise and Jane (from left to right) are putting final touches to the stall before the show opens on Friday morning.
I took Bridge Between East and West to use as a demonstration piece and throughout the weekend I made a small amount of progress. I stitched the first of these petals in Cambridge under the tuition of Tamura-san. We were asked to stitch the diagonal foundation layer of the pointed petal flowers with a slight gap between the stitches. This seemed alien to me and I had to fight the urge to close the gap between the stitches.

The reason for the gap between the stitches is that blister stitches are worked on top of the foundation and that will spread the foundation stitches slightly. The first step of blister stitch is to work a round knot in the centre of each petal. Knots, all knots, cause me problems and I need to practice them some time.

These knots are not perfect but in this case they are for padding and will be concealed beneath a straight stitch.

I'm not sure that I like this flower. To me it looks artificial and it does not help that it is worked in two of my least favourite colours, orange and pink. It may look less stark when all the other stitching around it has been completed but that will not be for some time because I will put this work away now until Karahana and Venerable Friends are finished (or I am invited to help at another show).
Happy Stitching

Here Sue, Denise and Jane (from left to right) are putting final touches to the stall before the show opens on Friday morning.
I took Bridge Between East and West to use as a demonstration piece and throughout the weekend I made a small amount of progress. I stitched the first of these petals in Cambridge under the tuition of Tamura-san. We were asked to stitch the diagonal foundation layer of the pointed petal flowers with a slight gap between the stitches. This seemed alien to me and I had to fight the urge to close the gap between the stitches.

© JEC/Carol-Anne Conway
The reason for the gap between the stitches is that blister stitches are worked on top of the foundation and that will spread the foundation stitches slightly. The first step of blister stitch is to work a round knot in the centre of each petal. Knots, all knots, cause me problems and I need to practice them some time.

© JEC/Carol-Anne Conway
These knots are not perfect but in this case they are for padding and will be concealed beneath a straight stitch.

© JEC/Carol-Anne Conway
I'm not sure that I like this flower. To me it looks artificial and it does not help that it is worked in two of my least favourite colours, orange and pink. It may look less stark when all the other stitching around it has been completed but that will not be for some time because I will put this work away now until Karahana and Venerable Friends are finished (or I am invited to help at another show).
Happy Stitching
Subscribe to:
Posts (Atom)
